The iPhone is an advanced smart device and is popular around the world. Apple has added lots of important and useful features on iOS devices. In fact, most users do not fully grasp these features. Emergency Bypass on iPhone, for example, allows you to receive phone calls and texts from specific contacts while blocking other contacts. This guide will explain this feature in detail, like how to turn it on and set up it.

- Part 1: What Is Emergency Bypass on iPhone
- Part 2: How to Turn on/off Emergency Bypass on iPhone
- Part 3: How to Add Emergency Contacts from FaceTime on iPhone
- Part 4: FAQs of Emergency Bypass on iPhone
Part 1: What Is Emergency Bypass on iPhone
Emergency Bypass is not a single feature, but works with the Do Not Disturb, Silent, or Focus mode. Once you turn on the Do Not Disturb mode on your device, you won’t get notifications of any call or message. That may lead you to miss important information. Therefore, Apple introduced Emergency Bypass on iPhones running iOS 10 and above, so that you can receive notifications from specific contacts.
Unlike the Always Allow Calls from or Allow People option, Emergency Bypass does not require you to create a group of contacts. Instead, you can set single contacts or multiple contacts. Moreover, you have to set the allowed calls for every mode separately, whereas Emergency Bypass is available to all modes.
Bear in mind that Emergency Bypass also bypasses the silent ringtone switch. It means that your iPhone will ring when you get a call from an added Emergency Bypass contact. The notifications of the allowed call list for the Focus mode can get through, but it will still be on silent.
In short, there are some things you should know about Emergency Bypass on iPhone before turning it on:
1. You can set individual or multiple contacts for Emergency Bypass.
2. Emergency Bypass contacts are available for Do Not Disturb, Silent, and Focus mode.
3. Your iPhone will ring when receiving calls or texts from Emergency Bypass contacts.
4. Emergency Bypass lets you call emergency services even if your device is locked or lacks cellular coverage.
Part 2: How to Turn on/off Emergency Bypass on iPhone
Instead of setting Emergency Bypass on the iPhone for each mode, you can turn on this feature for phone calls and text messages respectively. The setting can be done in the Contacts app on your iPhone without extra software and hardware.
How to Turn on/off Emergency Bypass for Phone Calls
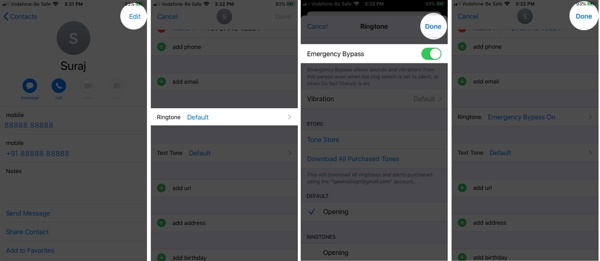
Step 1 Open the Contacts app, and browse the contact list up and down until you find the desired person.
Step 2 Tap the contact, press the Edit button at the top right corner, and touch the Ringtone option.
Step 3 Find the Emergency Bypass option, toggle on the switch, and tap Done to confirm the change.
Step 4 Then turn on the Emergency Bypass option for other desired contacts.
How to Turn on/off Emergency Bypass for Texts
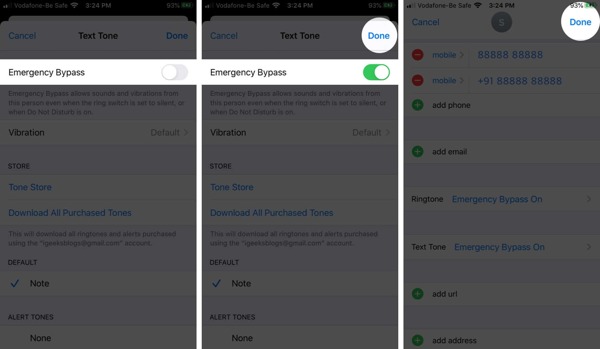
Step 1 To turn on Emergency Bypass contact on your iPhone for text messages, run the Contacts app.
Step 2 Select a desired contact, and tap the Edit button.
Step 3 Press the Text Tone option, toggle on Emergency Bypass, and tap the Done button. Then press Done again to confirm it.
Part 3: How to Add Emergency Contacts from FaceTime on iPhone
In addition to the Contacts app, you can also turn on Emergency Bypass contacts for FaceTime calls. So that you won’t miss the important FaceTime calls in the Do Not Disturb or Silent mode.
Step 1 Open your FaceTime app from the home screen.
Step 2 Find the contact that you want to set up, and tap the Info button on the item.
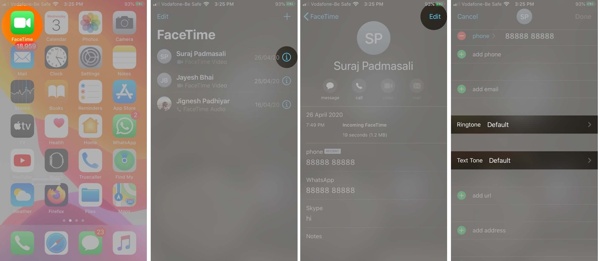
Step 3 Next, press the Edit button at the upper right side, scroll down to find the Ringtone option, and tap it.
Step 4 Toggle on Emergency Bypass, and tap the Done button.
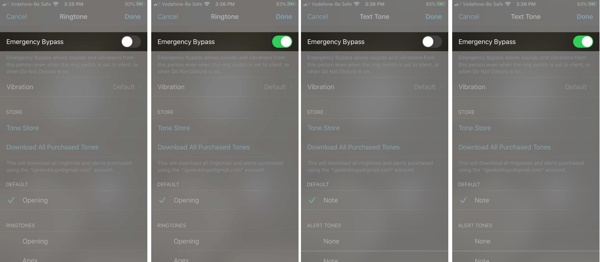
Step 5 If you wish to turn on Emergency Bypass for FaceTime text messages, find and tap the Text Tone option on the contact edit screen. Then toggle on Emergency Bypass, and tap Done.
Recommend: Best iPhone Unlocker to Bypass iPhone Locks
Emergency Bypass enables you to receive phone calls and text messages from important contacts without accessing your device. However, you still need to regain access to your iPhone or iPad. If you forget your iPhone passcode, the easiest solution is Apeaksoft iOS Unlocker. It helps you unlock your locked iOS device easily.

4,000,000+ Downloads
Unlock a disabled or locked iOS device without a password.
Remove iPhone passcode, Apple ID password, iCloud Lock, etc.
Wipe iTunes backup password and Screen Time password without data loss.
Support the latest iPhones and iPad models.
Part 4: FAQs of Erasing iPhone Without Password
Does Emergency Bypass work without cellular service?
Emergency Bypass enables you to receive notifications of specific contacts. You can only receive phone calls and text messages with a cellular service. Emergency SOS, on the other hand, lets you call emergency services without cellular service. It works through satellite.
Can I unlock my iPhone with an Emergency Bypass?
No, the Emergency Bypass feature only allows you to receive important phone calls and text messages on the iPhone lock screen. You cannot unlock your device without your passcode.
Which iPhone models support Emergency Bypass?
Currently, all iPhones running iOS 10 and above support the Emergency Bypass feature. If you have updated your software, you can turn on this feature in the Contacts and FaceTime app directly.
Conclusion
This guide has explained what the Emergency Bypass feature is and how to turn on Emergency Bypass on your iPhone properly. You can add individual contacts in the Contacts app and FaceTime app. So that you can receive phone calls and text messages in Do Not Disturb or Silent mode. Apeaksoft iOS Unlocker can help you get into a locked iPhone easily. If you have other questions about this topic, please write them down below this post.

