The Memories feature in Photos app can automatically group some pictures that captured in a while together, add some beautiful music and motions to create a great slideshow for you.
Do you know how to save a slideshow on iPhone?
In fact, besides Memories feature, Photos app built into the iOS also enables you to easily create your own slideshow with images and music.
This post will show you how to save a slideshow on iPhone. In addition, you can learn how to make a picture slideshow on iPhone with detailed steps.

- Part 1: How to Save a Slideshow on iPhone
- Part 2: How to Save iPhone Slideshow to Computer
- Part 3: How to Make a Slideshow on iPhone
- Part 4: How to Edit an iPhone Memories Slideshow
- Part 5: Best Slideshow Creator You May Want to Know

Part 1: How to Save a Memories Slideshow on iPhone
First, we will show you how to quickly save auto-created Memories slideshows on iPhone. Many iOS users like these iPhone Memories video very much and want to save them for further sharing. If you are one of them, just follow this part.
Step 1. Turn on your iPhone and open Photos app.
Step 2. Tap the second For You on the bottom menu bar to check Memories slideshows on iPhone. Here we take iOS 12 as an example. Tap on See All to enter the Memories interface.
If you are using iOS 11, directly tap on Memories in the menu bar at the bottom of the screen.
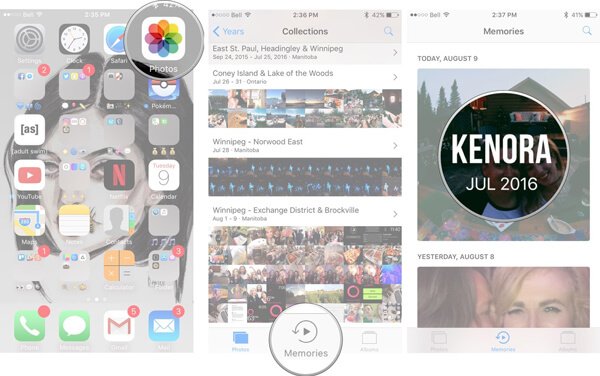
Step 3. Tap the specific memory video you want to save, and then you can tap the Play button to check the details of this iPhone picture slideshow.
Step 4. Tap the Share button on the bottom-left cornor of the menu bar and then tap Save Video to save this Memories slideshow on your iPhone.
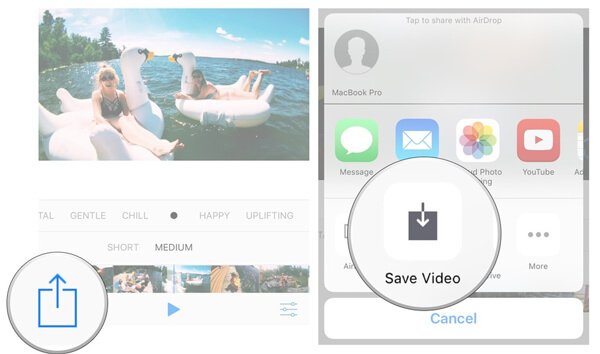
After tapping the “Save Video”, the picture slideshow will be save in the photos folder. You can find it in Today part of Photos. As you can see, this “Share” feature allows you to directly send this slideshow to family and friends with different ways.
Part 2: How to Save iPhone Slideshow to Computer
Just in a few taps, you can save Memories slideshow on iPhone with ease. Then how do you save or transfer these slideshows to Mac or PC?
Here we sincerely recommend a powerful iOS data transfer, MobieTrans to directly copy various iOS data like videos, songs, pictures, contacts, messages, notes and more from iPhone to computer or from iPhone to Android phone. You can free download it and give a try.
Step 1. Run iOS data transfer
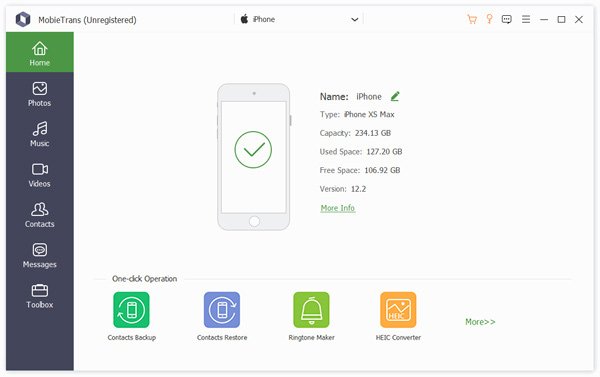
Download, install and launch this iPhone slideshow transferring software on your computer. Connect your iPhone to it with USB cable. MobieTrans will automatically recognize the iOS device and show its basic information in the interface.
Step 2. Find iPhone slideshow
When you enter the main interface, you can see various key data types are listed on the left control, such as Photos, Videos, Music, Contacts, Messages and more. Click Videos and the locate specific slideshow videos on the right window.
Step 3. Save iPhone slideshow to computer
Choose the slideshow videos you want to transfer, and then click on the Computer button to export selected slideshows to your computer.
Part 3: How to Make a Slideshow on iPhone
With the method above, you can handily save the auto-created Memories slideshow on iPhone. Do you want to make your own slideshow video? This part will tell you how to create iPhone slideshow step by step.
Step 1. Unlock iPhone and open “Photos” app.
Step 2. Tap Select on the top-right and then choose the photos you want to make slideshow. You can tap two or more photos, videos or an album according to your need.
Step 3. After choosing all pictures or clips you need, tap “Share” button on the bottom-left corner.
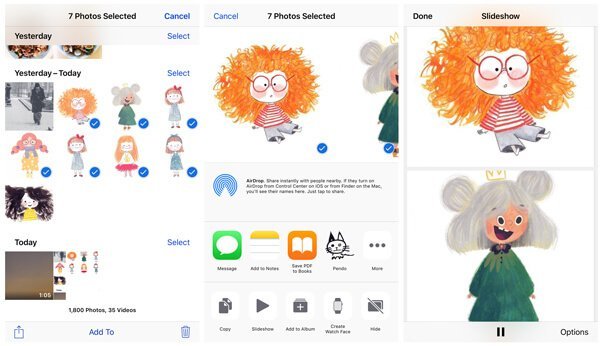
Step 4. Tap “Slideshow” to view the iPhone slideshow. You can tap “Options” to set more settings. Then tap “Done” to create your own slideshow.
Part 4: How to Edit an iPhone Memories Slideshow
Step 1. Unlock iPhone and enter the “Photos” app.
Step 2. Tap For You > Memories in iOS 12 or tap Memories in the bottom menu bar in iOS 11.
Step 3. Tap the slideshow video you would like to see and then tap Play button to check detailed photos.
Step 4. Tap the screen to arise the edit feature on the bottom-right corner. Tap on Edit button.
Step 5. Here you are allowed to edit Title, Music, Duration, and Photos & Videos of this Memories slideshow.
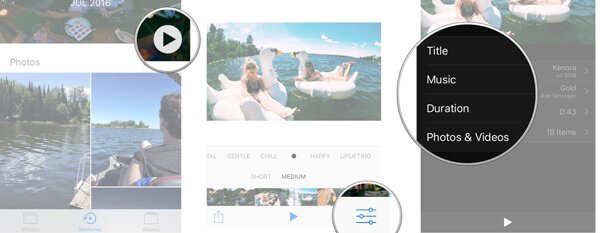
Step 6. You can edit iPhone slideshow based on your need. After that, tap Done to confirm the operation.
Part 5: Best Slideshow Creator You May Want to Know
If you want to get more control of your slideshow, like adding more motions, getting more slideshow themes, adjusting more elements and so on, you should rely on professional slideshow creator.
Apeaksoft Slideshow Maker provides a simple way to create your own slideshows with pictures, video clips and audio files. 10 great slideshow themes and other tools are offered to let you quickly create slideshow with fabulous effects.

4,000,000+ Downloads
Easy create slideshows with any of your pictures, video clips and music.
Supports any popular image/video/audio format.
10 ready-made themes like wedding, travel, fashion and more for you to quickly make slideshow.
Many editing features and elements are offered to help you customize themes and edit slideshow video.
We mainly talk about how to save a slideshow on iPhone in this page. What’s more, you can learn detailed steps to edit Memories slideshow or create your own slideshow on iPhone. If you have the need to transfer iPhone slideshow to computer or create picture slideshow on PC/Mac, you can find suitable tools from this page. Leave us a message if you still have any question.

