Nowadays, most people regard mobile phones as cameras that can be carried with them. So, in order to save memory or for other reasons, it is necessary to master how to transfer photos to computers. If you own an Android phone, the transfer process may become a bit difficult. But don’t worry – keep reading to find out how to transfer photos from an Android phone to a Computer while the quality can still be guaranteed.

- Part 1. The Best Tool to Transfer Photos from Android to Computer
- Part 2. Easily Transfer Photos from Android to Computer via Google Photos App
- Part 3. How to Transfer Photos from Android to Computer Using Gmail
- Part 4. How to Transfer Photos from Android to Computer with USB
Part 1. The Best Tool to Transfer Photos from Android to Computer
When large batches of photos need to be transferred from your Android to a Computer, the best and simplest method is to use a professional transfer tool. Here, we recommend one of the best Android transfer software: Apeaksoft MobieTrans. It enables you to transfer phone photos, contacts, music, videos and SMS easily with just a few clicks.

4,000,000+ Downloads
Transfer photos or many other files from Android or iPhone to Computer with one click.
Manage, backup and transfer files between your Android and iOS devices to make your phone orderly and efficiently.
Support batch transfer to save your time.
Preview and check the photo information before transferring to the Computer.
Support iPhone 16/15/14/13/12/11/X, Samsung, HTC, Motorola, etc.
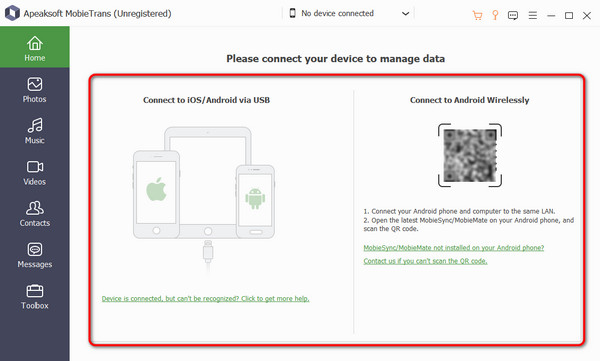
Step 1Connect your Android to your Computer
Free download the Apeaksoft MobieTrans by clicking on the above button and installing it. Then, use a USB cable to connect your Android phone to the Computer or follow the prompts to scan the QR code directly to connect wirelessly.
Step 2 Choose photos for transfer from Android
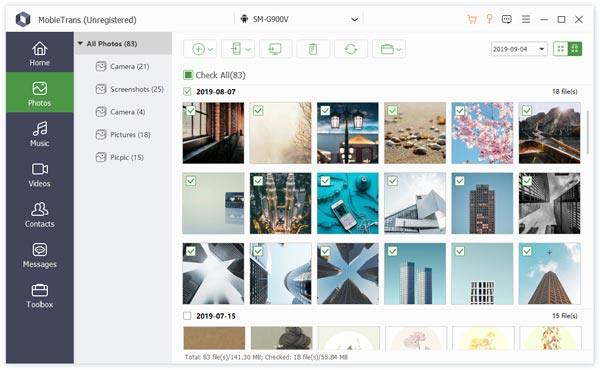
Move your mouse to Photos in the main interface. Then, your Android phone will be scanned in a few seconds, and all the photos will display on the right side. You can preview and choose any photo you want to transfer.
Step 3 Transfer photos from Android to PC
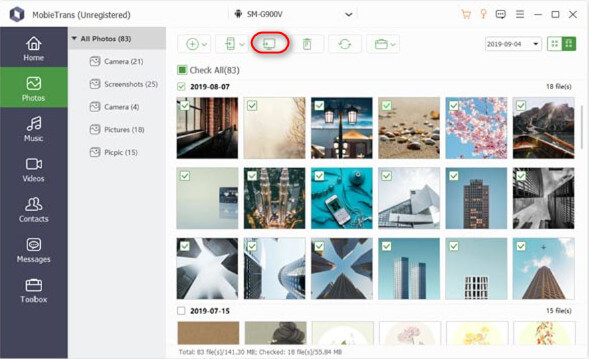
Finally, click the Export to PC button, and the selected pictures will be moved to your Computer without losing quality.
If you recently purchase an iPhone or you or you want to share photos with your friend, but he has an iPhone. How should you send the photos? Obviously you can’t airdrop files with just one click because the device is not compatible after all, but we do have ways to transfer Android photos to iPhone.
Part 2. Easily Transfer Photos from Android to Computer via Google Photos App
Google Photos is a versatile cloud storage application that allows you to automatically back up, manage, edit, and share your digital photos. It allows you to wirelessly transfer photos from Android to PC. Moreover, as Google Photos comes automatically installed on most Android devices, there’s no need to download additional software. You may also want to know how to transfer photos from Android to Mac. Don’t worry; this software can be used on Windows and Mac systems following the same steps.
Step 1Back up the photos on your Android phone
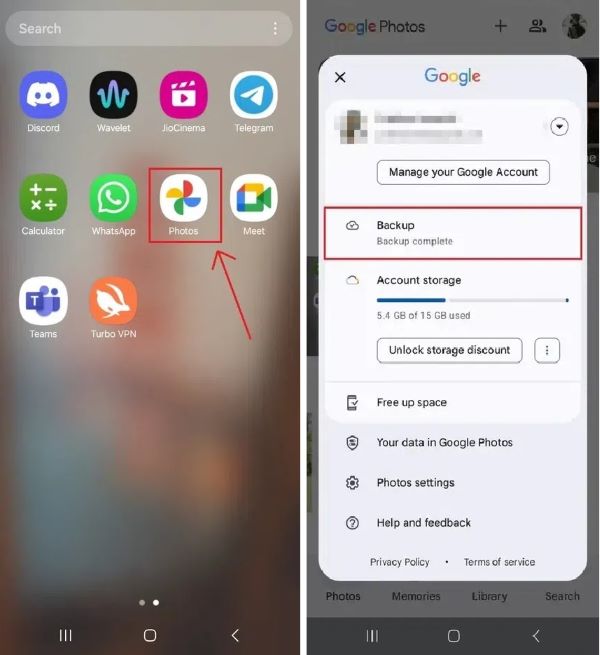
Open Google Photos; after entering the main page, press Profile in the upper right corner and enable the Backup feature to back up your photos on Google Photos.
Step 2 Open Google Photos on your Computer
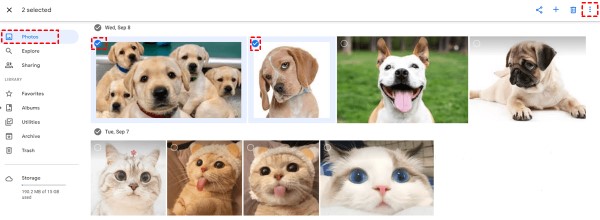
Sign in your account to the Google Photos website on Computer’s browser. Then, choose Go to Google Photos and select your desired photos by checking them. Later, tap the Three Dots in the top-right corner.
Step 3 Download to your Computer
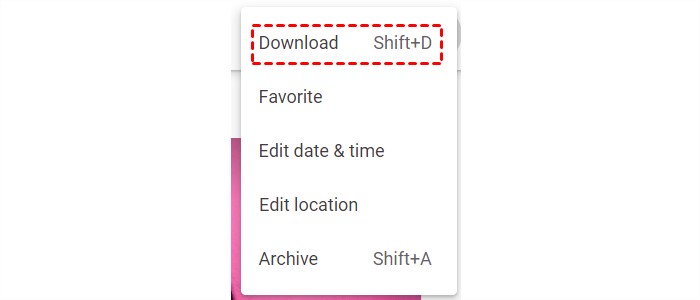
A drop-down menu will pop up. Click the first Download button, and then you can download the photos on your Android phone to your Computer.
Part 3. How to Transfer Photos from Android to Computer Using Gmail
Gmail is Google’s email service that stores your email securely in the cloud. You can check your emails through a web browser on any device. So you can also use it to import photos from Android to PC.
Step 1Send an email to yourself on your Android phone
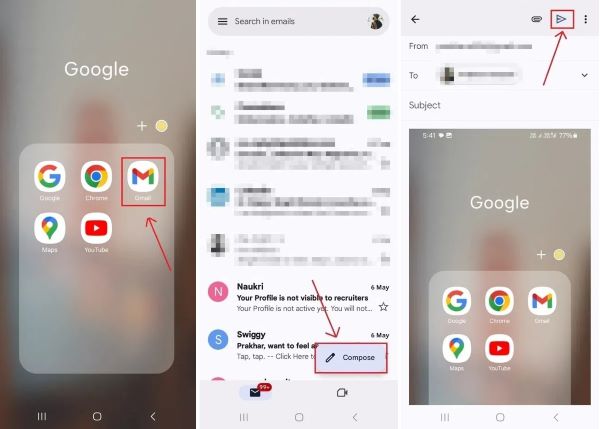
Go to the Gmail app, which contains all the photos on your Android. Next, click on the Compose button and choose the desired photos to send to yourself.
Step 2 Open the mail on your Computer
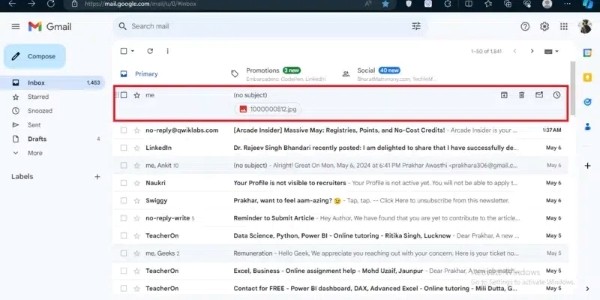
Navigate to and log in Gmail on your Computer, view the email you just sent to yourself. One of the great things about Gmail is that the files won’t disappear even if you don’t check in time.
Step 3 Download to your Computer
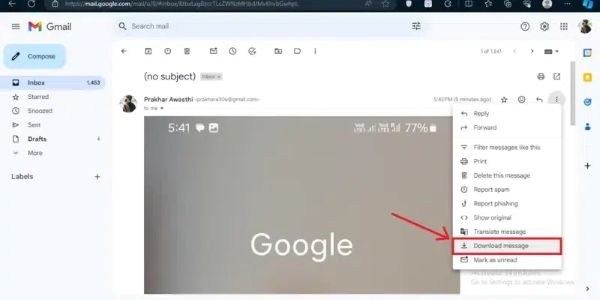
After checking it correctly, click the Three Dots button in the upper right corner of the email, choose Download message in the drop-down bar, and then you can view the pictures on your Computer.
Part 4. How to Transfer Photos from Android to Computer with USB
If the above methods are a little troublesome, you can also transfer pictures from your phone to your Computer with a USB cable. A USB cable is the most straightforward and simple method; you can transfer any photos as long as the devices are connected.
Step 1Connect Android phone to Computer
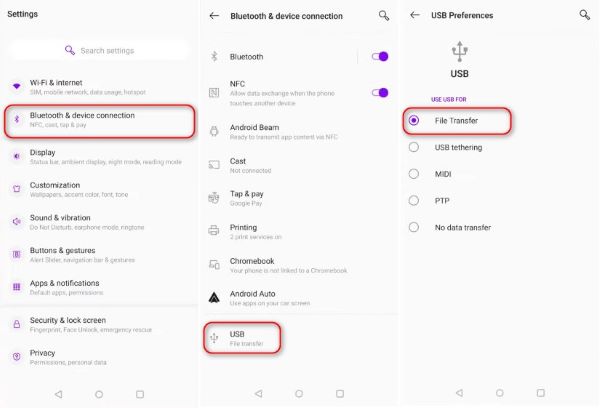
Using a compatible USB cable to plug your Android phone into your Computer. Then, go to your phone’s Settings page, select Bluetooth & device connection > USB, and use it for File Transfer.
Step 2 Copy photos to your Computer
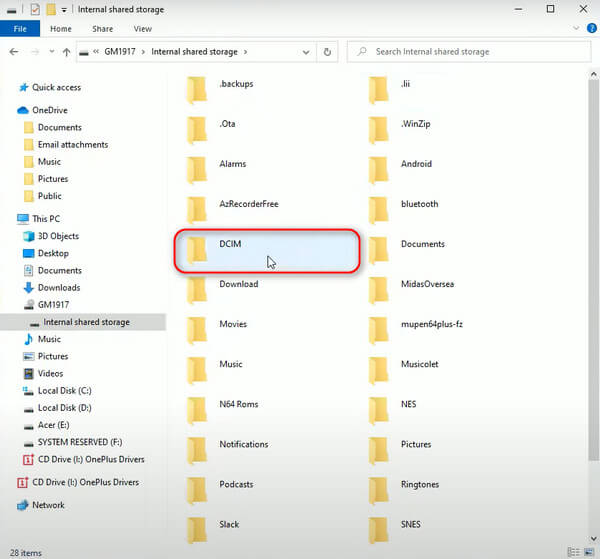
According to the default settings, photos transferred from the Android phone will be automatically stored in the DCIM folder. Finally, you can copy the photos to your Computer by opening the folder.
Although this method is very simple to operate, the normal loss of the cable when transmitting large images can cause data errors, resulting in tonal coloration, distortion, etc. Therefore, in order to ensure quality, it is recommended that you still use email to send large photos or image conversion tools.
Conclusion
As you’ve learned from this article, transferring pictures from Android phone to Computer can be done in many simple steps. We offer you four methods that require different facilities or plug-ins. Anyway, Apeaksoft MobieTrans must be your first choice for transferring large batches of files without losing quality.

