How to Transfer eSIM from One iPhone to Another 2025
Bought a new iPhone? Congratulations! You are moving a big step forward towards a brighter future. This post will help you set up eSIM on your new iPhone. Whether you have set it up, you can find the instructions to transfer eSIM to new iPhone. We will also show you how to transfer eSIM from Android to your new iPhone. Scan the table of contents and jump to the part you are interested in.
PAGE CONTENT:
Part 1: What is eSIM and Can My iPhone Use eSIM
An eSIM is a digital SIM that allows you to use the cellular network and other services carriers provide without using a physical SIM.
eSIM is becoming popular because no physical card is needed to be plugged into your phone to use the phone number. You can get a URL or QR code from carriers and set it up on your phone remotely, which is also much safer and more convenient. Generally, a phone can accommodate eight or more eSIMs compared to 3 physical SIMs.
Nowadays, more and more carriers and phones support eSIM, and physical SIM is gradually superseding. Fortunately, converting physical SIM to eSIM is totally practical, and you can convert it if needed.

Your iPhone needs to be an iPhone XS, iPhone XS Max, iPhone XR, iPhone 11 series or later to use eSIM, and iPhone 5, 6, 7, and 8 series are not supported. During the setup, a Wi-Fi network is necessary (if you are using iPhone 14 and later and only eSIM can be activated on your iPhone, a Wi-Fi network is unnecessary).
Part 2: Transfer eSIM to New iPhone [Before and After Setup]
If your iPhone meets the model limitation we mentioned before, let’s first see how to transfer eSIM to new iPhone before setup.
How to Transfer eSIM from One iPhone to Another Before Setup
Step 1. Put your old and new iPhones side by side and turn on the Wi-Fi and Bluetooth of the old iPhone. Follow the on-screen instructions to set up your new iPhone until you reach the Quick Start Screen, which says Looking for nearby devices. Your old iPhone should be detected here.
Once your old iPhone is detected, use it to scan the animation shown on the new one. Enter the passcode of your old iPhone on the new one.
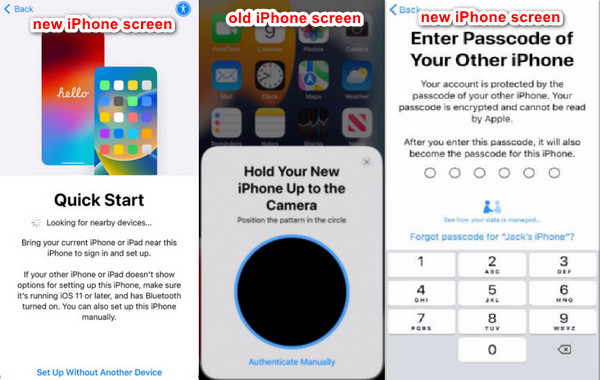
Step 2. Set the Face ID or Touch ID and Passcode according to your needs. Once you reach the Transfer Cellular Plan screen, choose one of your old iPhone SIMs and tap Continue. Follow the later steps on the screen to set up your new iPhone successfully.
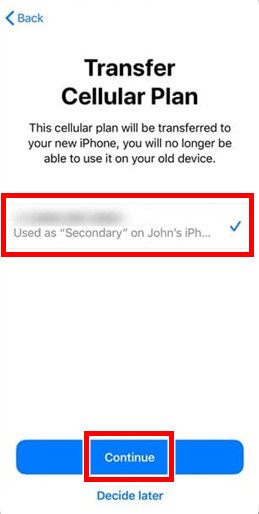
Now, you have successfully transferred your eSIM to the new iPhone. But if the new iPhone is already set up and the phone says no SIM, don’t worry. Follow the next guide to transfer it.
Transfer eSIM to new iPhone After Setup
Step 1. Open the Settings app on your new iPhone and choose Mobile Data, Mobile Service or Cellular.
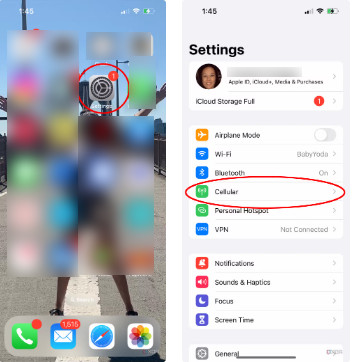
Step 2. On this screen, tap Add Data Plan or Add eSIM. Tap Transfer From Nearby iPhone.
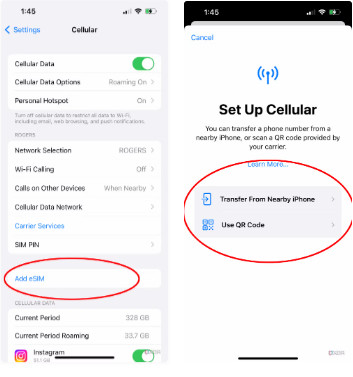
Step 3. Select the eSIM you want to transfer and confirm on your old iPhone, and then enter the code shown on your new iPhone. You may be led to the Finish Setting Up Your Network Provider's Data Plan page. If you have any problems here, contact your eSIM provider. After successfully transferring, the eSIM will be deactivated on your old iPhone.
Part 3: How to Transfer eSIM to New iPhone If I Have an Android Device
Before you start, apart from meeting the iPhone model prerequisite we mentioned, you should call your eSIM carrier for help and make sure your eSIM supports to be transferred from Android to iPhone. By the way, you should also contact your carrier if you want to transfer eSIM from iPhone to Android.
Step 1. Connect your carrier and ask them to activate your eSIM on your iPhone.
Step 2. When they do so, tap Carrier Mobile Plan Ready to Be Installed, shown on your iPhone.
Step 3. After installation, the eSIM should be set up. Make a call or try to turn on cellular to check it.
Part 4: Transfer All Your Contacts and Data to New iPhone
If you use a SIM card, you can save iPhone contacts to the SIM card and check them directly on your new iPhone. But eSIM can’t carry contacts. Nowadays, we use iCloud, Google, and other online software to store contacts. Although it is more convenient, we may miss some contacts on an online platform that is not often used and forget where to find them, which makes it tricky to organize contacts.
There is a highly recommended program that can transfer contacts between iPhones without any contacts missed, no matter what online platforms you use to store contacts. Besides, apart from contacts, this program can also transfer photos, videos, music, books, notes, calendars, safari history, calls and messages between iPhones and computers.
Safely Transfer All Contacts on iPhone
- Transfer iPhone contacts to another without data loss.
- Automatically de-duplicate contacts in seconds.
- iPhone, iPad, and iPod widely supported.
- Lightweight and easy to use.
Secure Download
Secure Download

Let’s see how to transfer contacts to new iPhone.
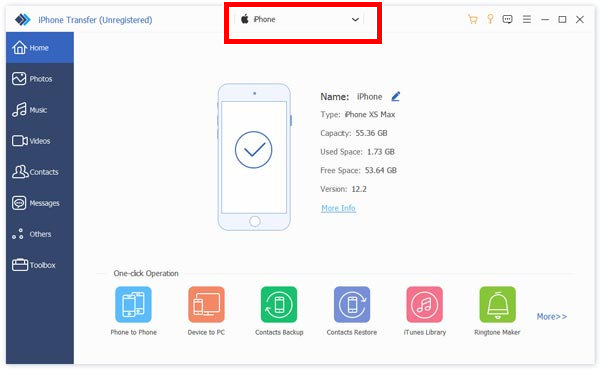
Step 1. Download the program from the former links and install it on your computer. Launch it first, and then connect your iPhones to this computer. You need to tap allow on the pop-up window on both iPhones.

Step 2. After connecting both devices, choose the old iPhone name on the top.
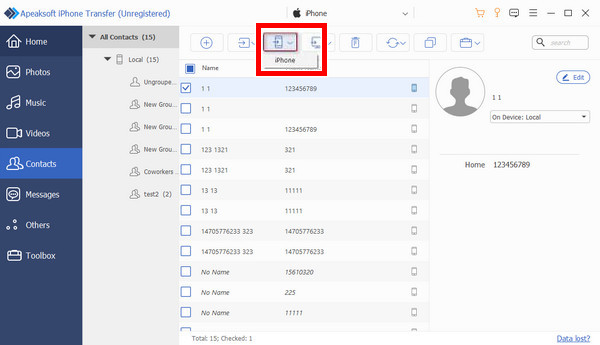
Step 3. Click Contacts on the left. Select all contacts and click the phone button. Click your new iPhone name on the top. All contacts will be transferred in a few seconds.
Conclusion
eSIM is becoming more and more common in our daily lives. This article introduces three methods about how to transfer eSIM from one iPhone to another. They are all simple and easy to operate, enabling you to use cellular and other services as soon as possible. Don't forget to try Apeaksoft iPhone Transfer to copy all contacts to your new iPhone.
Related Articles
Want to transfer your SIM card to the new cell phone, but do not know the detailed methods? Just read this post to learn more about how to transfer SIM card.
Do you encounter the SIM card not working on your iPhone issue? This post will tell you why you met this issue and how to solve it.
If you are looking for a PIN generator to unlock your SIM network, you are lucky since this guide shares the top list for beginners.
When you want to remove SIM card from your iPhone, what will you do? Just follow this article to learn how to remove iPhone SIM card safely.

