“I want to transfer contacts from my husband’s iPad to my iPhone. Since we are using the different Apple account, is there a simple method to transfer contacts from iPad to iPhone without iCloud? I do not want to erase the original ones in my iPhone. Is there any solution for this?”
Actually, copying contacts from iPad to iPhone is not a difficult task. But how to transfer the desired contacts to iPhone without erasing the original data? Moreover, when you transfer the contacts, you have to review, edit or add some comments. Just learn 3 best solutions to sync contacts from iPad to iPhone from this article now.

- Part 1: How to edit/manage/transfer contacts from iPad to iPhone
- Part 2: How to sync contacts from iPad to iPhone with Exchange ActiveSync
- Part 3: How to copy contacts from iPad to iPhone with iTunes
Part 1: How to edit/manage/transfer contacts from iPad to iPhone
When you need to transfer contacts from iPad to other’s iPhone, iCloud is not the only restriction. If you simply import iPad contacts to iPhone, there should be some duplications. You have to edit these contacts, manage the contact information before finally transferring contacts from iPad.
MobieTrans should be the best iTunes alternative to transfer iOS data for iPhone/iPad/iPod. Besides transferring contacts from iPad to iPhone, you can also preview/select/edit contacts, customize iTunes library, manage iPhone contacts and more.
Some key features of iPad/iPhone contacts transfer
- 1. Transfer photos, contacts, text messages, music, videos, books, PDF and more other 21 file types.
- 2. Transfer data between iOS device and computer, between iOS devices, or copy files from iOS device to iTunes directly.
- 3. Break the iTunes restrictions, such as preview the files, select the desired contacts, manage the files and avoid iTunes errors.
- 4. Export/import contacts in multiple formats; edit contacts information and avoid duplicates.
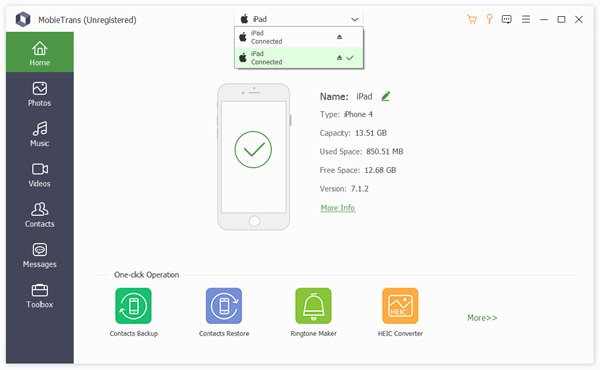
Step 1. Launch iPhone/iPad contacts transfer
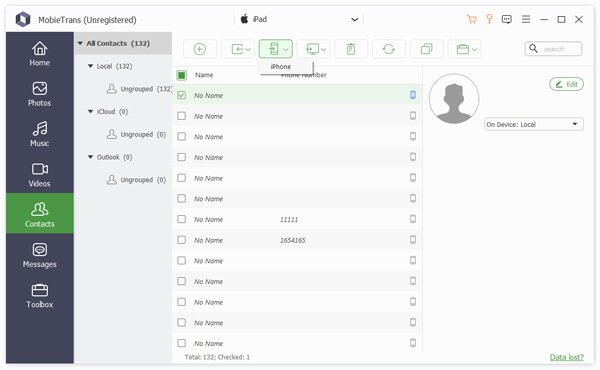
Once you download and install this iPhone/iPad contacts transfer, you can launch it on computer. Just connect iPhone and iPad to computer with the original USB cables. The program is able to detect all iOS files within the program.
Step 2. Check and select iPad contacts
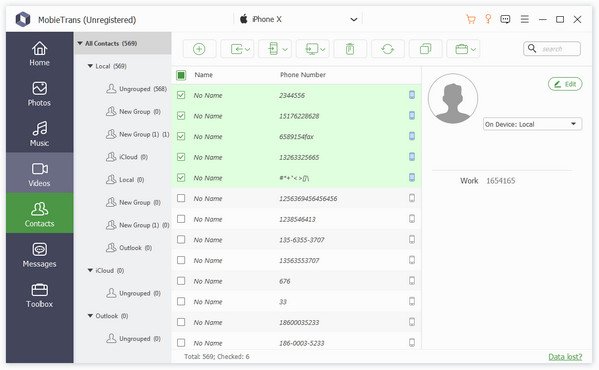
Click the “Contacts” option on the left, then you are allowed to view detailed information of each contact. Then you can select the desired contacts.
Step 3. Edit and manage iPad contacts
Click “Edit” button to change the name of the contacts, or add some comments for the contacts. Just take an example; you can change the name of the contacts before transferring from iPad to iPhone.
Step 4. Remove duplicated contacts
You may have some duplicated contacts with your husband or friends. You can click the “De-duplicate” button to remove the same contacts. Of course, you can get more other files from different channels.
Step 5. Transfer contacts from iPad to iPhone
Once you get all the desired contacts, you can click the “Import/Export” or choose the “Export All Contacts” or “Export Selected Contacts”. After that, you can export contacts from iPad to iPhone with ease.
Besides the transfer feature, this all-featured software also can help you convert HEIC to JPEG/PNG, make iPhone ringtones and more. Just free download it and give a try.
Other tools like MobieTrans are iCopyBot, SynciOS Manager, CopyTrans, Leawo iTransfer, etc., can also move contacts from iPad to iPhone.
Part 2: How to sync contacts from iPad to iPhone with Exchange ActiveSync
Exchange ActiveSync (EAS) is an available service for most of the iPhone and iPad versions. Once you set up EAS account for both iPhone and iPad, you can sync contacts from iPad to iPhone with an email address. Just in simple, you can have both the contacts information for iPhone and iPad.
Step 1. Go to “Settings” > “Passwords & Accounts” > ”Add Account”, choose the “Exchange” option from the drop down list.
Step 2. Enter the email address and have a description for the account, such as the contact information from husband. Choose the “Sign In” option or “Configure Manually” option.
Step 3. After that you can choose “Contacts” to transfer contacts from iPad to iPhone. Of course, you can also sync other information, such as “Mail”, “Calendars”, “Reminders” and “Notes”. Tap the “Save” option to confirm.
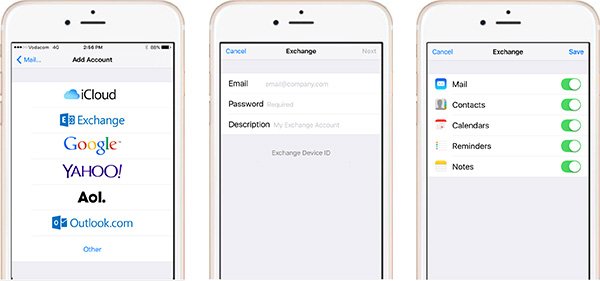
Step 4. After that you can enter the account with the contact information from iPad. It should be a complex method to transfer contacts and other files between iPad and iPhone.
Part 3: How to copy contacts from iPad to iPhone with iTunes
If you want to copy contacts from iPad to a new iPhone, you can use iTunes to restore iPad contact backup to iPhone. When you connect the new device to your computer, you have to tap the “Trust the computer” option on both devices first. Here is the method you have to follow.
Step 1. Create a backup for iPad contacts
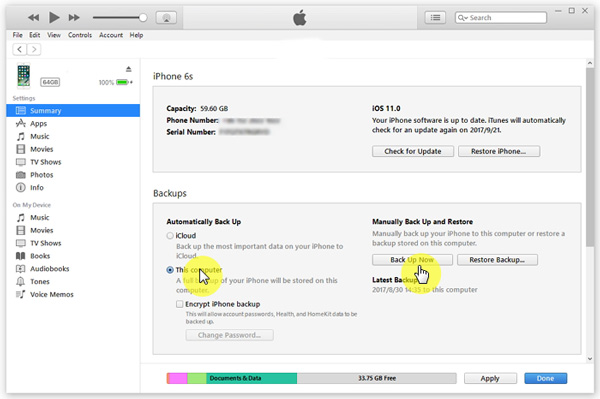
Connect the iPad to your computer, iTunes will launch automatically on your computer. Click the “iPad’ icon and choose the “Summary”. After that choose the “Back Up Now” option under Manually Back Up and Restore.
Step 2. Choose the backup files to restore
Once you make the backup file for iPad. You can disconnect iPad and connect iPhone with original USB cable. Go to “Summary” and choose the “Restore Backup…” option to copy contacts from iPad to iPhone.
Step 3. Copy contacts from iPad to iPhone
After that you can choose the last backup for iPad, click the “Restore” option and wait till all the contacts transfer from your iPad to iPhone via iTunes. You can find the contacts of iPhone on iPad when you open the application.
Conclusion
If you want to transfer contacts from iPad to iPhone with different Apple IDs, MobieTrans should be the best solution to preview, edit, manage and transfer files. Of course, you can also use the Exchange ActiveSync to have another contacts file within your iPhone.
iTunes is another solution to copy contacts from iPhone to iPad. You can get the detailed information about the process from the article. Just leave more information in the article if you have any problem about how to transfer contacts from iPad to iPhone.
For more topics about iPad transfer, visit here.


