"Are you excited to have a new iPhone? But it feels very troublesome when you think about transferring all the content on your old iPhone. The traditional way to transfer data between iPhones is through iCloud, but many Apple users don’t like this method. You must ensure that your iCloud has synchronized all the pictures, apps, music, etc., on your old phone. However, most people’s iCloud capacity is insufficient, so if it is transferred through iCloud, much data may not be copied to the new iPhone. Read on for five reliable ways to transfer everything from iPhone to iPhone without iCloud.

- Part 1. How to Transfer iPhone to iPhone Without iCloud
- Part 2. How to Transfer Data to New iPhone via Quick Start
- Part 3. How to Transfer Data from iPhone to iPhone Using AirDrop
- Part 4. How to Sync iPhone to Mac in Case You Want to Transfer iPhone Data to PC or Mac
Part 1. How to Transfer iPhone to iPhone Without iCloud
The main reason you may wonder how to transfer data from one iPhone to another is to keep all your files and settings on your new device without losing too much time. That is, you want to make your new iPhone as familiar and easy to use as your old iPhone. In addition to iCloud, using a third-party phone data transmitter is the most convenient and easy-to-use method without worrying about losing data. After many tests and comprehensive considerations, we would like to introduce you three of our most recommended products.
Apeaksoft iPhone Transfer – the Best iPhone Transfer
Apeaksoft iPhone Transfer is the best iPhone-to-iPhone transmitter. It can scan your iOS devices in seconds and move all types of data to your new device in just a few clicks. Most Apple-designed tools might lose some files during the transfer process. However, this method does not require any backups or restores, so you do not need to worry about losing your data.
Apeaksoft iPhone Transfer
• It supports transferring data between two iPhones, including photos, music, videos, contacts, messages and more.
• Do not overwrite any existing data.
• Sync data in just one click and can manage and edit easily.
• Transfer safely without any data loss.
• Supports the latest iOS devices and iOS versions.

4,000,000+ Downloads
It supports transferring data between two iPhones, including photos, music, videos, contacts, messages and more.
Do not overwrite any existing data.
Sync data in just one click and can manage and edit easily.
Transfer safely without any data loss.
Supports the latest iOS devices and iOS versions.
You can use this software to transfer data between two iPhones.
Method one:
Step 1Download and install Apeaksoft iPhone Transfer on your computer, then launch it. Connect both of your iPhones with USB cables to your computer.
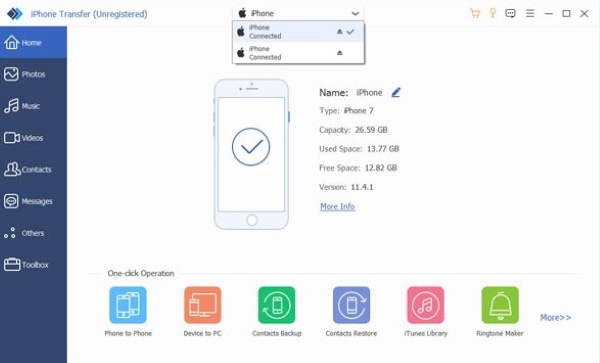
Step 2Once the iPhones are detected, you can see a row of toolbars on the left side of the default page, and you can choose any data type you want to transfer.
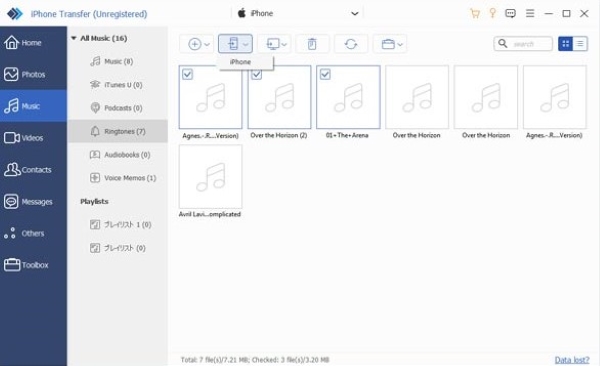
Data types not directly displayed can be found in Others, such as Notes, Calendar, Safari, etc.
Step 3Then, you can manually select the files you want to transfer according to different categories. Once done, click the Export to Device button to start transferring your selected data from the source device to the destination device.
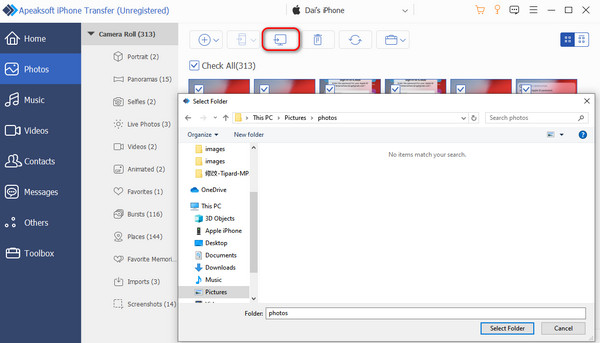
During the process, you can preview information about all the photos, music, videos, etc., and also edit contact information.
Method two:
Step 1Download and install Apeaksoft iPhone Transfer on your computer and run it. Unlock your iPhones and connect them to your computer via USB cables.
Step 2 Step 2. After the program completes scanning the phones, you can see the One-click Operation provided at the bottom of the Home page and choose Device to Device.
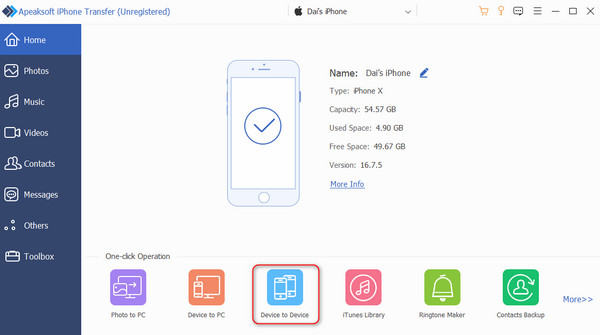
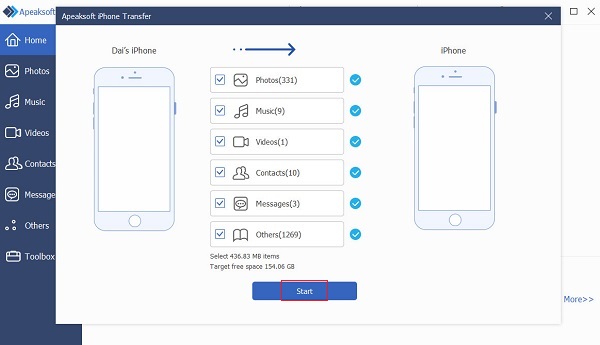
Step 3This function is set up so that all the data can be transferred with just one click without manually selecting them. Click Start to transfer to check all the files on your new iPhone.
Syncios Data Transfer
Syncios Data Transfer is a viable tool to help you transfer files to and from your iOS devices. With it, you can easily manage, backup, restore, edit, or delete data on multiple devices. Not only Apple devices, it also supports many Android devices, such as Samsung, HTC, etc., so you are enabled to transfer files from Android to iPhone as well. But it connects and scans devices slowly, making it not a good choice if you have requirements for transfer speed.
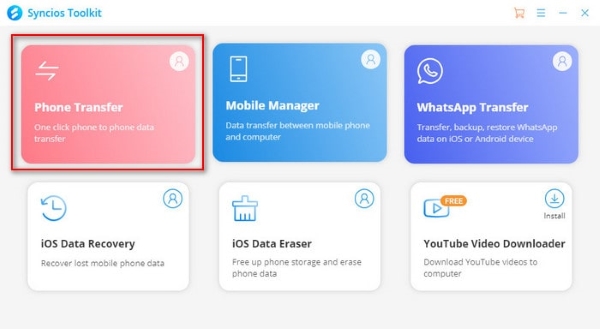
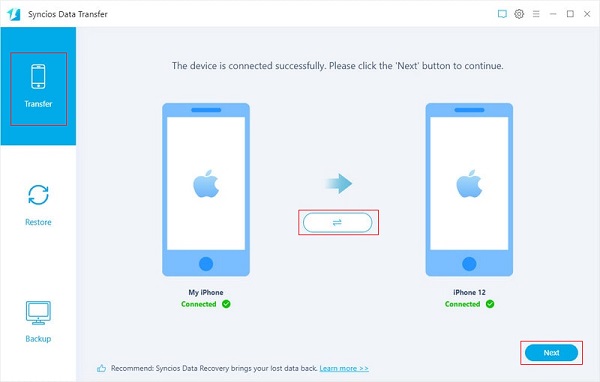
Step 1After downloading Syncios Data Transfer on your computer, plug your iPhones into the computer, choose Phone Transfer mode on the main interface, and wait for the device information to load. This might take a while.
Step 2Select Transfer on the left side of the loaded page, and then make sure the left side of the screen is your original device and the right side is your new device. If you need to change the order, just click the Flip icon in the middle. Then tap on Next.
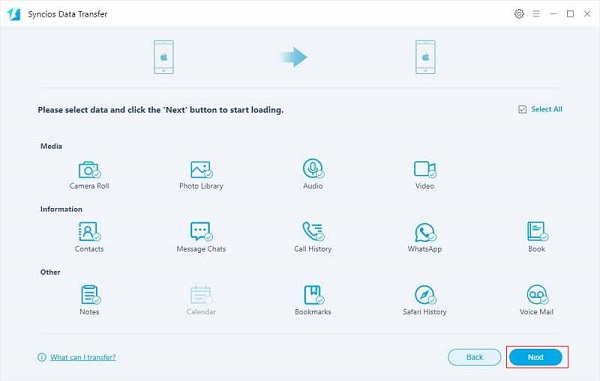
Step 3The program will display almost all the data on your original iPhone and divide it into three categories: Media, Information and Other. After selecting the data type you need to convert, click Next. Then, hit the Next button again to start the transfer.
EaseUS MobiMover
EaseUS MobiMover provides comprehensive mobile device management solutions. It excels in data backup, recovery, transfer, etc. Its pages are concise and easy to understand. Only one toolkit can meet your multiple needs, and you can use it anytime and anywhere. However, it only supports Windows systems and does not provide services in many regions, so you need to confirm whether it can be used before downloading.
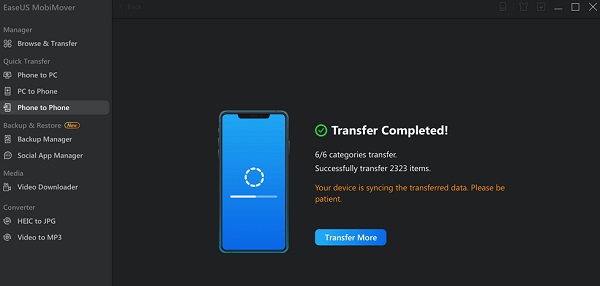
Step 1To move data to a new iPhone with EaseUS MobiMover, connect your two iPhones to the computer using USB. When the connection is established, click Phone to Phone.
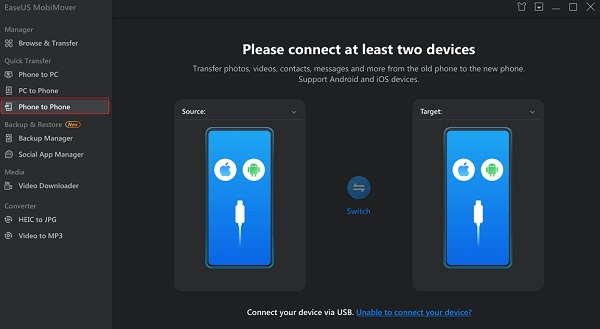
Step 2After waiting a while, the data in your original iPhone will be displayed in categories on the program’s page. After selecting the data type you want to copy, click Transfer directly.
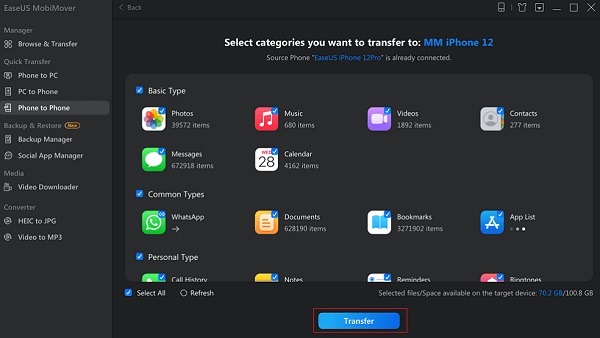
Step 3After completing the process, you can view them on your new iPhone.
Although there are certain restrictions, you don’t have to worry too much about device compatibility if you are a Mac user. There are still many ways to transfer files from Mac to iPhone or iPad.
Part 2. How to Transfer Data to New iPhone via Quick Start
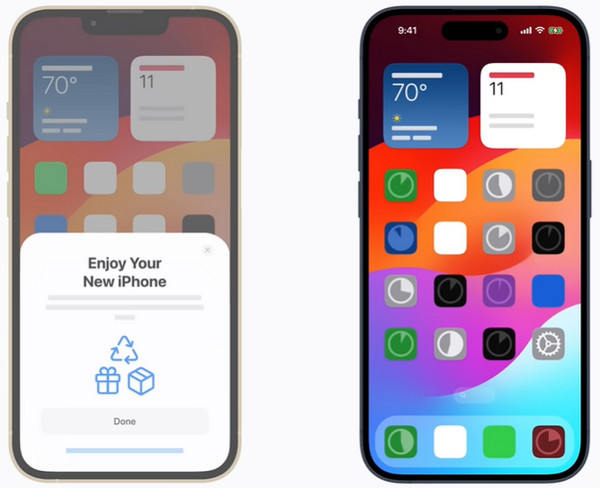
Apple introduced a feature called Quick Start in iOS 11. With Quick Start, you can easily set up your new iPhone, iPad, or iPod by simply placing your old device near and following a few steps. This function is necessary for the accelerated iteration cycle of mobile phones and the rapid data migration. Although this process is somewhat complicated, you’d better master this technique as it does not require any iPhone-to-iPhone transfer apps.
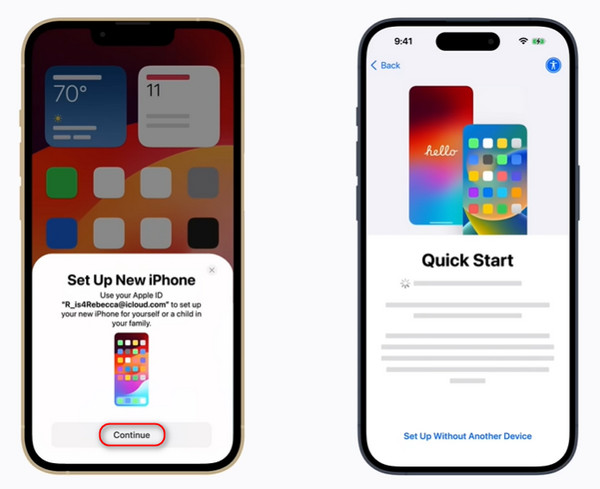
Step 1Unlock your new iPhone and place it near your old one. Then, the Quick Start screen will pop up on your source iPhone. It provides the option of using your Apple ID to set up your new iPhone. Make sure the Apple ID is correct and tap Continue.
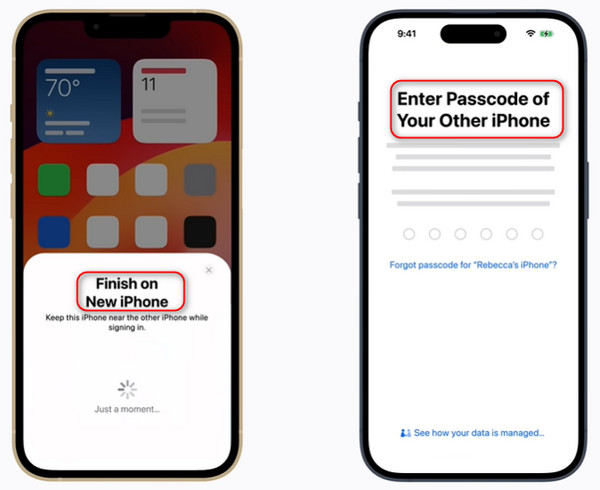
Step 2Then follow the steps on your source iPhone, which includes scanning an animation using the camera and continuing your new iPhone when prompted. Enter your old passcode on the new iPhone when the message Finish on New iPhone pops up.
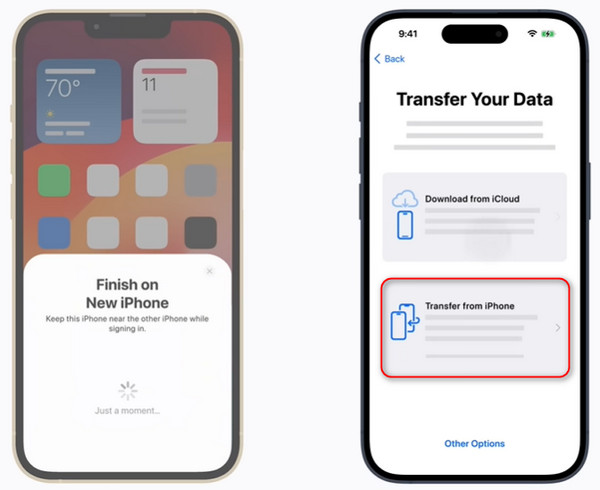
Step 3Then tap Transfer from iPhone.It might take a moment for your Apple ID to finish setting up and follow the remaining prompts.
Step 4When it’s done, your new iPhone is ready; all your data will download in the background when you’re connected to Wi-Fi.
When using this method to set up a new iPhone, you may encounter the annoying problem, “Why didn’t my apps transfer to the new iPhone?” We have also found several possible ways for you to solve this issue.
Part 3. How to Transfer Data from iPhone to iPhone Using AirDrop
AirDrop is a fantastic tool for quickly transferring data between iOS devices. With AirDrop , you can easily share photos, long videos, contacts, etc., from your iPhone to any nearby Apple device. However, generally speaking, the effective range of AirDrop is about 9 meters between devices. If the distance exceeds this, it will not work properly. In addition, network stability is also a major factor affecting the normal operation of this function.
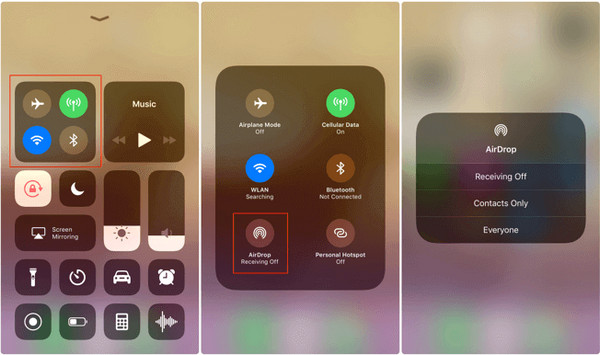
Step 1Ensure the two iPhones have Bluetooth and Wi-Fi turned on and off Personal Hotspot.
Step 2On your devices, open Control Center and touch the Network Settings card in the upper-left corner. Tap on AirDrop, then check Contacts Only or Everyone for 10 Minutes.
Step 3Next, select all the files you wish to transfer and hit the Share icon, which is usually represented by a blue arrow pointing up.
Step 4Click AirDrop and tap on the option for your new iPhone. Finally, just accept the AirDrop request on your target iPhone and wait for the chosen files to transfer.
Part 4. How to Sync iPhone to Mac in Case You Want to Transfer iPhone Data to PC or Mac
There is also a data transfer method that many people are familiar with: back up all data in advance and upload it to the cloud. This way, when the transfer is needed, you must only log in with the same Apple ID to complete the transfer easily. And there are other benefits of syncing iPhone data to Mac:
• Prevent data loss: Backing up data can prevent loss caused by potential virus attacks, human errors and other factors. In an emergency, the backup operation facilitates quickly recovering lost data, avoiding unnecessary losses and troubles.
• Improve data security: Password settings are reliable when performing the sync process to ensure security. Even in severe situations such as device theft, backup files can still preserve the integrity of the data and maintain privacy, thereby significantly reducing various risks caused by information leakage.
So, how do you sync an iPhone to a Mac? If you are interested, here are 2 system-built-in methods that you can try.
Finder
Finder is a file manager and graphical user interface in Apple’s macOS operating system. It allows you to browse files and folders on Mac computers, perform file operations such as copying, pasting, deleting, and renaming, and access other system resources and applications. You can also use it to sync iPhone messages to Mac contacts, calendar, etc.
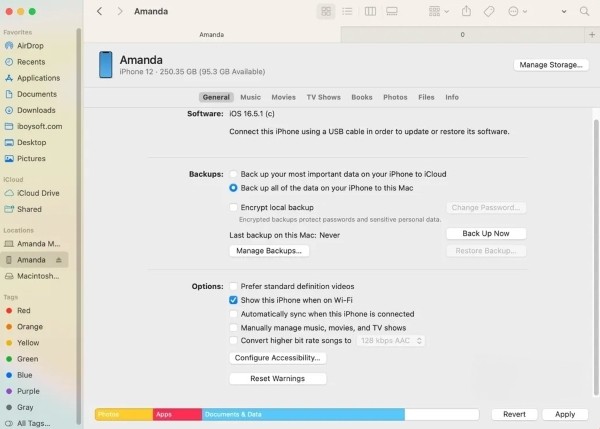
Step 1Connect your iPhone to your Mac with a working cable. Normally, the Finder is pinned to the Dock and can be opened by clicking on it.
Step 2Select the iPhone you just plugged in under Location in the left sidebar.
Step 3On the General screen, you can back up your device to iCloud or this Mac. Under Options, you can determine how your iPhone syncs with your Mac. Check the box that you want and click Apply.
Step 4Then, beside the General button, you can choose the types of data you want to transfer, such as Music, Movies, Books, etc. Finally, click Apply > Sync to start the transfer process.
iTunes
Using iTunes to back up data from iPhone to Mac is a more basic method. Although it originally served as Apple’s official music and video player, you can also use iTunes backup to manage iPhone data, including music, movies, photos, etc. However, iTunes does not support backing up individual files and will delete all data on your new iPhone during recovery.
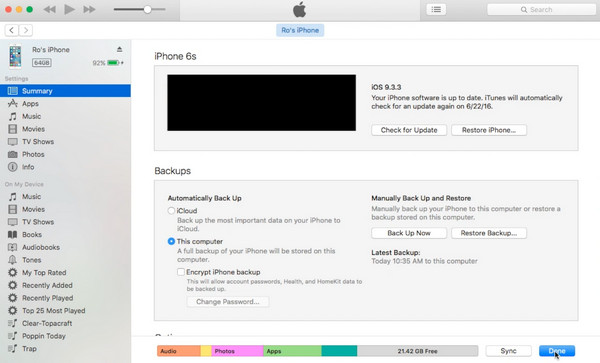
Step 1Connect your source iPhone to your Mac using a cable and open iTunes on your computer. After connecting, your iPhone icon will show up at the top right next to the Music tab.
Step 2Click on the iPhone icon on the interface. Your sync option is at the very bottom of the iPhone > Summary page. The data can be automatically backed up on your iPhone to iCloud or this computer.
Step 3Then, in the toolbar under Settings on the left, you can select the data type you need to back up. You can select all by default or select manually. Finally, click Sync , and automatic backup will begin.
After all the data is backed up to iTunes, you must consider installing it on another Windows computer so you can easily get all the files with one click. Actually, transferring iTunes from PC to Mac is feasible.
Conclusion
The above is the whole content of transferring data from iPhone to iPhone. Remember, if you choose a wireless method, such as AirDrop, make sure the network connection is stable. If you don’t want to lose any data and want to transfer all of it as quickly as possible, you can’t go wrong with Apeaksoft iPhone Transfer.

