If you need to save some important business data in an Excel file, you have to add password on it to prevent from others read it. However, you might forget the password. How to open password protected Excel file?

Every coin has two sides, so does Excel encryption feature. Once forgot the password, you will be locked out of the workbook and your data. Fortunately, there are methods to unlock encrypted Excel file without password. And to help you recover data, we are going to show you how-to in detail below.
- Part 1: How to encrypt Excel file
- Part 2: How to restore deleted or lost password-protected Excel files
- Part 3: How to open password protected Excel file with VBA code
- Part 4: FAQs of encrypting Excel file
Part 1: How to encrypt Excel file
As mentioned before, Excel has powerful encryption feature, which allows users to password protect a whole workbook or a single worksheet for different rights.
Way 1: How to encrypt an Excel file
Encrypting Excel file means password protect all worksheet in the file.
Step 1: Open the Excel file that you want to encrypt in Excel program.
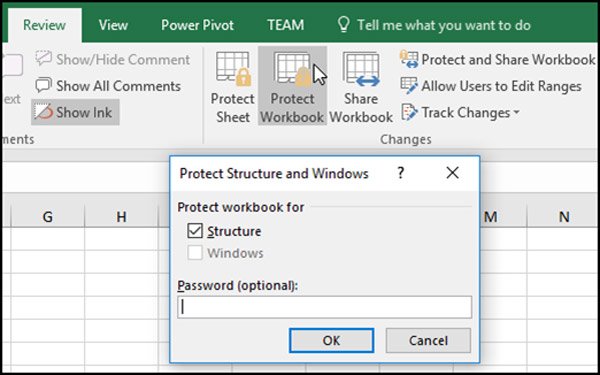
Step 2: Go to the “Review” tab on top of the window and click on the “Protect Workbook” option in the “Changes” section.
Step 3: On the popup dialog, drop your password in the box and click on “OK” button to confirm it.
Note: In Excel 2010 and earlier versions, there are two options on the popup dialog. If you select “Structure”, others cannot edit, hide or look at the hidden worksheets without password; while the Windows option is used to prevent others from moving or changing the workbook window.
In addition to Review tab, you can go to “File” > ”Info” > ”Protect Workbook” > “Encrypt with Password” to set password as well.
Mac users ca find different ways here to encrypt files on Mac including the Excel file, Word file, etc.
Way 2: How to encrypt a single worksheet
If you just want to hide a single worksheet but not encrypt Excel file, you can encrypt the sheet separately.
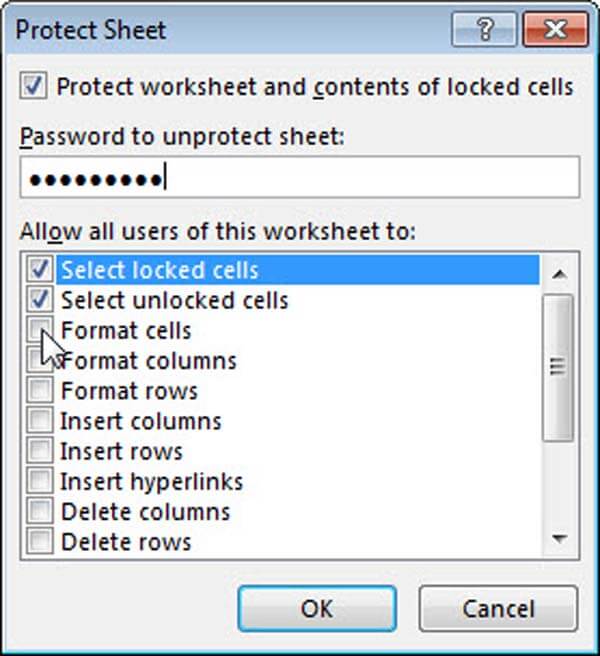
Step 1: Open the Excel file in your Excel program, locate to the bottom, select the worksheet that you’d like to protect and right-click on it. Select “Format Cells” on the menu bar to open the Protect Sheet dialog.
Step 2: Enter your password into the field and make sure to check the box of “Protect worksheet and contents of locked cells”.
Step 3: Next, you can set users’ rights by unchecking the options in the list. Finally, click on OK to confirm it.
Way 3: How to set passwords for different rights
In latest versions of Excel, Microsoft has introduced custom options relate to encrypt Excel file, which allows you to set different passwords for open and modify.
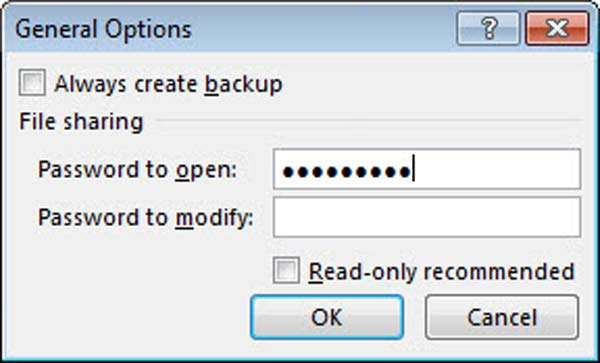
Step 1: After load the Excel file to encrypt, go to “File” tab and select the “Save As” option. Click on the “Tools” menu on the Save As dialog and choose “General Options” in the dropdown list.
Step 2: Next, you will be presented the General Options dialog. Enter a password in the field of “open”, and input another password in the field of “modify”.
Step 3: Click on the “OK” button and then click “Save” to encrypt Excel file with different passwords for different rights.
Part 2: How to restore deleted or lost password-protected Excel files
As you can see, it is not difficult to encrypt Excel file. While unencrypting Excel file is another story. If you forgot your password, the Excel file is no longer accessible. You can try some data recovery software like Apeaksoft Data Recovery to retrieve lost excel files and try your luck with third-party tools to open the file. Its main features include:
- Restore Excel files from internal and external drives in one click.
- Available to various situations, like forgot password, accidental deletion, virus attack, system crash, or format.
- Support a variety of data types and formats, including XLSX, XLS and more.
- Recover Excel file in original format and quality.
- Preview all Excel files and decide to recover all of them or specific items.
- Quicker, lightweight and safer.
- Compatible with 10/8.1/8/7/Vista/XP.
How to restore deleted or lost password-protected Excel files
Step 1: Scan entire hard drive to look for Excel files
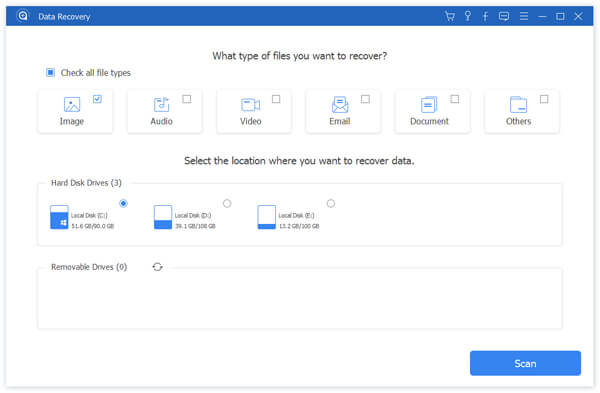
Get Data Recovery installed on your computer and launch it. Locate to the data type section and select “Document” by ticking the corresponding checkbox. Then head to the location section and choose where you save the encrypted Excel file. Data Recovery will work as soon as you click on the “Scan” button.
Tip: If your Excel file was saved on an external drive, connect it to your PC before recovery.
Step 2: Preview Excel files before recovery
When going into the result window after scanning, go to the “Document” tab from left sidebar, and then open the folders titled XLSX and XLS to view all recoverable Excel files. Plus, the “Filter” feature at top ribbon could locate the Excel file quickly. If you cannot find the desired file in standard scanning result, click on the “Deep Scan” button to perform a deep scan.

Step 3: Save the recovered Excel file (s)
Select the desired Excel files or the whole folder and click on the “Recover” button to start restoring Excel files. Now you have found and saved the lost excel files on your computer. Try your luck and see if you can find the encrypted ones.

Extended Reading: How to recover unsaved excel files
Part 3: How to open password protected Excel file with VBA code
VBA is a program language supported by Excel. And you can try the VBA code to unencrypt Excel file with the steps below.
Step 1: Run Excel program from your desktop and open the encrypted Excel file. Then press Alt + F11 to open the Macro editor.
Step 2: Double click on the worksheet you want to unlock on left side to open the declarations page.
Step 3: Copy and paste the VBA code below in the declarations page.
Sub PasswordBreaker ()
'Breaks worksheet password protection.
Dim i As Integer, j As Integer, k As Integer
Dim l As Integer, m As Integer, n As Integer
Dim i1 As Integer, i2 As Integer, i3 As Integer
Dim i4 As Integer, i5 As Integer, i6 As Integer
On Error Resume Next
For i = 65 To 66: For j = 65 To 66: For k = 65 To 66
For l = 65 To 66: For m = 65 To 66: For i1 = 65 To 66
For i2 = 65 To 66: For i3 = 65 To 66: For i4 = 65 To 66
For i5 = 65 To 66: For i6 = 65 To 66: For n = 32 To 126
ActiveSheet.Unprotect Chr (i) & Chr (j) & Chr (k) & _
Chr (l) & Chr (m) & Chr (i1) & Chr (i2) & Chr (i3) & _
Chr (i4) & Chr (i5) & Chr (i6) & Chr (n)
If ActiveSheet.ProtectContents = False Then
MsgBox "One usable password is " & Chr (i) & Chr (j) & _
Chr (k) & Chr (l) & Chr (m) & Chr (i1) & Chr (i2) & _
Chr (i3) & Chr (i4) & Chr (i5) & Chr (i6) & Chr (n)
Exit Sub
End If
Next: Next: Next: Next: Next: Next
Next: Next: Next: Next: Next: Next
End Sub
Step 4: Next, open the “Run” menu and select “Run Macro” to run the VBA code. Then you can unencrypt Excel file with the usable password displayed on the popup dialog simply.
Part 4: FAQs of encrypting Excel file
Can Microsoft retrieve forgotten passwords?
No, Microsoft cannot retrieve forgotten passwords. So make sure that your password is exactly memorable.
Are there any restrictions on the passwords when I encrypt an Excel file?
Passwords have no limits on length, characters, or numbers. Note that passwords are case-sensitive.
Are Excel files with passwords always secure?
Although your Excel files are encrypted, you still run the risk of passwords falling into the hands of unintended users.
Conclusion:
People and small business rely on Excel to store and visualize sensitive data, partly because Excel provides awesome encryption features. However, it is headache if you forgot the password. In this tutorial, we have told you how to encrypt Excel file and how to unencrypt it simply. We hope that our guide is helpful to you.


