It cannot be denied that advanced technologies are changing our lives and making everything easier and easier. For example, once you input the destination in a Map app, it will show you the best path. However, you have to clear maps history frequently to free up space. That is especially important on iPhone since iOS device does not offer any feature to clear cache data officially.

If search this problem online, you may get various answers. Therefore, we have interviewed some smartphone experts and expected to get the best methods. In this tutorial, we are going to show how to clear maps history in detail.
- Part 1: How to clear maps history on iPhone/iPad
- Part 2: How to permanently clear Google maps history
Part 1: How to clear maps history on iPhone/iPad
There are a lot map apps for smartphones, like Google Maps, Waze, Apple Maps, etc. And in this part, you can learn how to clear maps history for these services.
Situation 1: How to clear maps history in Apple Maps
iPhone owners prefer to Apple Maps, partly because it is preinstalled. The problem is that finding your location history in Apple Mas was definitely the most difficult than others. Plus, Apple has changed the design of Apple Maps on iOS 10, result in the method to clear maps history on iOS and above is different on old iOS devices.
On iOS 9 and earlier
Step 1. Unlock your iPhone and start the Apple Maps app from your home screen. Tap on the search bar on top of the screen, then you will see the popup dialog activated.
Step 2. Select "Favorites" to open the floating screen, go to the "Recent" tab from bottom to display all recently search history.
Step 3. Next, tap on the "Clear" button at left upper corner of the floating screen, and then hit "Clear All Recents" on the popup box to confirm it.
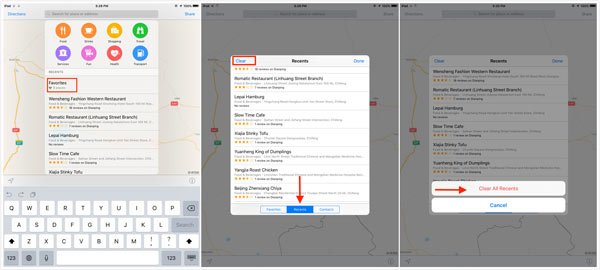
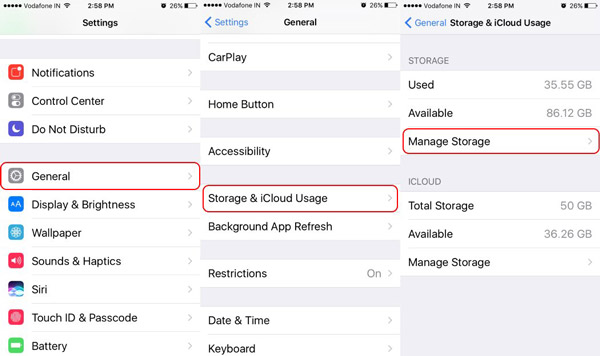
This way is able to clear maps history from the Apple Maps. After that, you can go to "Settings" > "General" > "Usage & iCloud Storage" and check the size of Apple Maps app.
On iOS 10 and later
Unfortunately, Apple has discarded the one-click clear feature from iOS 10. It means that you have to clear maps history one by one on iOS 10 and later.
Step 1. Also start the Apple Maps app on your iPhone, hit the search bar to display all search history.
Step 2. Locate to a location history that you want to clear from your iPhone, swipe left over the location to show options.
Step 3. Tap on the "Remove" button, this map history is cleared from your iPhone immediately.
Step 4. Repeat the operations on other maps history until you delete all recently locations that you searched in Apple Maps.

Situation 2: How to clear Google Maps history on iPhone
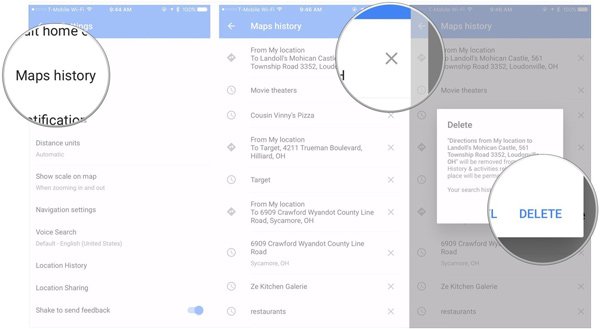
Step 1. To clear Google Maps history, open the Google Maps app on your iPhone, tap on the "menu" button next to the search bar.
Step 2. Head to "Settings" > "Maps history", tap the "Delete" button next to one location history that you want to clear and hit "Delete" on the warning message.
Step 3. Then do the same operation on other maps history to clear Google maps history one by one.
Similar to iOS 10, Google Maps app does not integrate a feature to clear all maps history at one time.
Situation 3: How to clear maps history in Waze Maps
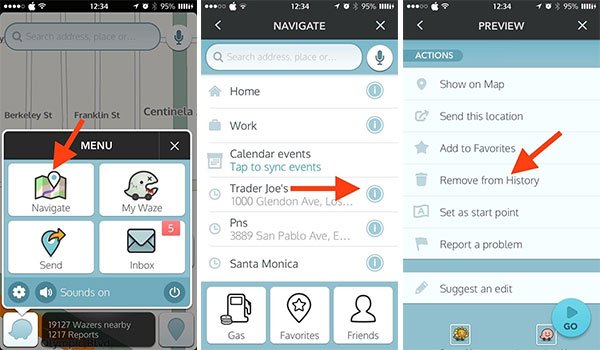
Step 1. Tap on the "Waze" button at bottom left corner of the main interface of Waze Maps app. Then select Navigate on the menu bar to show up all locations that you have searched in Waze.
Step 2. Hit the "menu" button next to a maps history and select "Remove from History" to clear maps history from Waze.
Step 3. Also, you have to clear maps history one by one repeating the workflow above.
Part 2: How to permanently clear Google maps history
As you can see, map apps do not permit users to clear maps history at once. If you have accumulated a lot of history or searched in maps app frequently, it is terrible to clear all of them one by one. From this point, we recommend Apeaksoft iPhone Eraser. Its key features include:
- It has the capacity to permanently clear Google Maps history and other maps history in one click.
- Besides, you can erase voicemails, SMS, custom settings, photos, music, videos, app data and other files from iPhone.
- It use advanced technology to erase maps history on iPhone, which is important to protect your privacy.
- The iPhone erasing tool allows you to decide the level to clear data on iPhone.
- iPhone Eraser supports all iOS models, like iPhone 16/15/14/13/12/11/X, etc., and iPad.
- It is available to Windows 11/10/8/8.1/7/XP.
In short, it is the best option to clear Google Maps history from iPhone at one time.
How to clear Google Maps history from iPhone in one click
Step 1. Install the best iPhone erasing application to your computer
Download and install iPhone Eraser on your computer. And hook up your iPhone to your computer via a Lightning cable. Start the iPhone Eraser and wait for it to detect your device automatically.
This way will wipe all data from your iPhone, so you'd better make a backup first to avoid data loss.

Step 2. Decide an erasing level
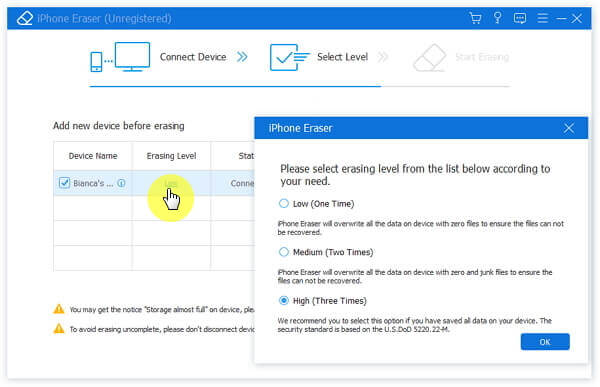
Now, you will be presented three options related to erasing level, "Low", "Medium" and "High". The first one overwrites your iPhone one time; the second one does it twice and latter one repeats overwriting for three times. Select an appropriate erasing level according to your requirements.
Step 3. Clear Google Maps history in one click
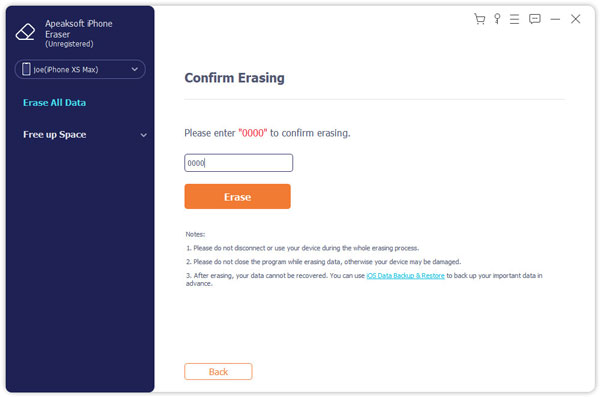
If you are ready, click the "Start" button on the window to initiate clearing Google Maps history. A few seconds later when it is done, remove your iPhone from your computer.
You May be Interested:
How to Delete History on iPhone
Conclusion
In this tutorial, we have showed you how to clear maps history on iPhone. First of all, Apple Maps, Google Maps and Waze offer the feature to delete the locations that you have searched in the map app. The native clear feature is convenient when you only need to erase several locations. If you have a lot of maps history stored in your iPhone, we suggest you to try Apeaksoft iPhone Eraser, because it is able to complete this task in one click. Anyway, we hope that our guides and recommends are helpful. If you have more questions related to clear maps history, please leave a message below this article.

