Aero theme is unique together with Windows 7 system and it has brought users a transparent and cool visual effect on the desktop. This post introduces 3 methods to help you set your Windows to Aero theme with step-by-step instructions.
 Free Download
  Free Download
 FAQ: How to Set Windows 7 System Aero Theme on Windows PC
You can enable Windows 7 Aero theme with the native settings on your computer from 3 aspects. Follow the instructions below to learn what you can do with these features.
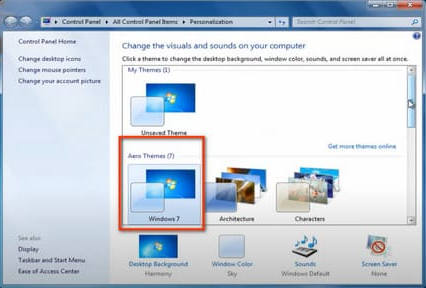
Method 1. Personalize the Desktop Theme
Step 1.Right click the desktop and open Properties to continue.
Step 2.In the following interface, you can view the Aero Themes as you drag and move the scroll bar on the right side. Click Windows 7 and you can change the background if you like.
Method 2. Set Visual Effects with Advanced Settings
Step 1.Move to the Windows icon at the bottom and Computer section. Click it and open Properties.
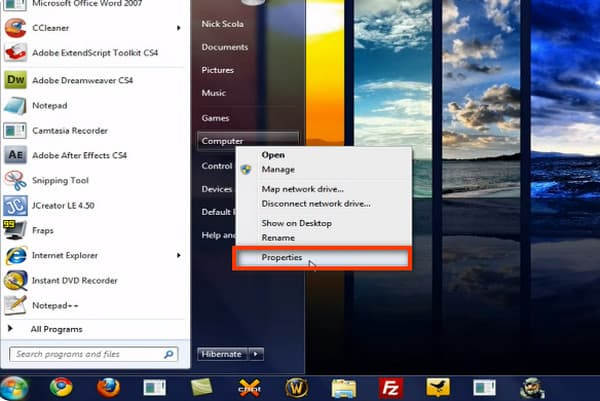
Step 2.On the Control Panel Home list, open Advanced system settings and move to the Advanced section on the top menu. Click Settings to continue.
Step 3.Then you can see Visual Effects channel in the pop-up window. Select the first option to let Windows choose what is best for your computer. And click the OK button to save the changes.

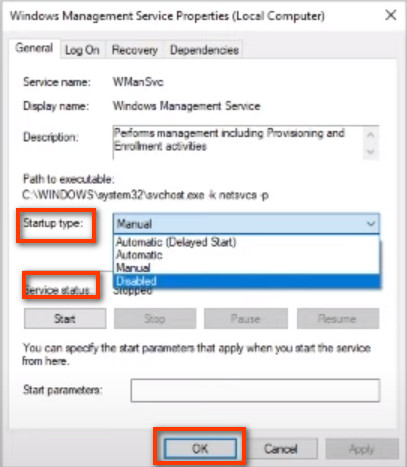
Method 3. Adjust the Service Model
Step 1. Tap the Search icon at the bottom and input services.msc to enter.
Step 2. In the Services interface, move your mouse to Windows Management Service and right click it to choose Properties.

Step 3.Then you can drop down the list following Startup Type and choose Automatic. Adjust the Service Status by clicking the Start button. Then you can click OK to apply the changes.
With further doubts, please feel free to contact us at support@apeaksoft.com anytime you want.
 iPhone Data Recovery
 iOS System Recovery
 iOS Data Backup & Restore
 iOS Screen Recorder
 MobieTrans
 iPhone Transfer
 iPhone Eraser
 WhatsApp Transfer
 iOS Unlocker
 Free HEIC Converter
 iPhone Location Changer
 Android Data Recovery
 Broken Android Data Extraction
 Android Data Backup & Restore
 Data Recovery
 Blu-ray Player
 Mac Cleaner
 DVD Creator
 PDF Converter Ultimate
 Windows Password Reset
 Phone Mirror
 Video Fixer
 Video Converter Ultimate
 Video Editor
 Screen Recorder
 PPT to Video Converter
 Slideshow Maker
 Free Video Converter
 Free Screen Recorder
 Free HEIC Converter
 Free Video Compressor
 Free PDF Compressor
 Free Audio Converter
 Free Audio Recorder
 Free Video Joiner
 Free Image Compressor
 Free Background Eraser
 Free Image Upscaler
 Free Watermark Remover
 iPhone Screen Lock
 Puzzle Game Cube