Video Playback issues such as stutters and choppy visuals can be an insightful experience for users like movie connoisseurs, video editors, or ordinary viewers. Such difficulties are still present in this era of the digital world, even though our technology has been getting better day by day. The causes of such problems, like choppy video playback in VLC, are divided into many factors. Hardware malfunctions could cause it, or it could be due to old hardware. Incompatible media players can also cause this issue, or it could be outdated drivers waiting to be updated. With all those possibilities in mind, we have compiled a tutorial that you can read to apply and fix your choppy videos.

- Part 1. How to Fix Choppy Video in VLC Using Apeaksoft Video Fixer
- Part 2. Troubleshooting Choppy Video Playback in VLC Using Common Methods
- Part 3. FAQs about Choppy Video Playback in VLC
Part 1. How to Fix Choppy Video in VLC Using Apeaksoft Video Fixer
Apeaksoft Video Fixer is a downloadable application available on Windows and Mac. Using sample reference rendering to fix your video shows reliable and high-quality outputs. Made with a simple and intuitive user interface, it ensures that users can easily work with this application. Apeaksoft Video Fixer also supports many video formats, making it compatible with any video tool you use. Also, by seamlessly integrating with VLC Media Player, Apeaksoft Video Fixer can specifically address and fix choppy video playback issues. To learn how to use the application, follow the steps given below.
Step 1Acquire and Launch AppThe first step you need to do is to download and install the application. To download the application, click on the button given below. Make sure you download the appropriate file type according to your system requirements. After installing the application, launch the tool. To do that, click on the shortcut icon of the tool on your desktop.
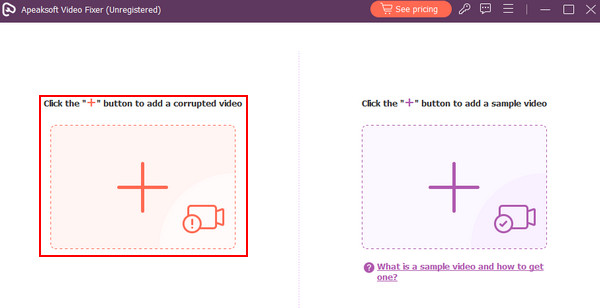
Step 2Import Choppy VideoThe next step is to import your choppy video. To do that, click the big + button on the left side of your app window. After clicking, you should see another document window open up. In this window, you will search for your choppy video. Select your video and import.
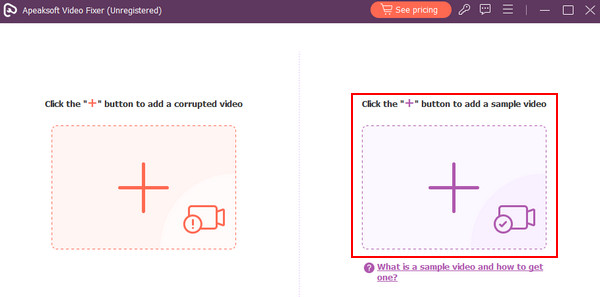
 Step 3 Import Sample Video
 After importing your choppy video. You now need to import your sample or reference video. Your reference video will be used as a standard to fix your choppy video. Now, click on the big + button on the right side of your application. It will also open another window where you can access your directory and find your sample video. Select your reference video and import it.
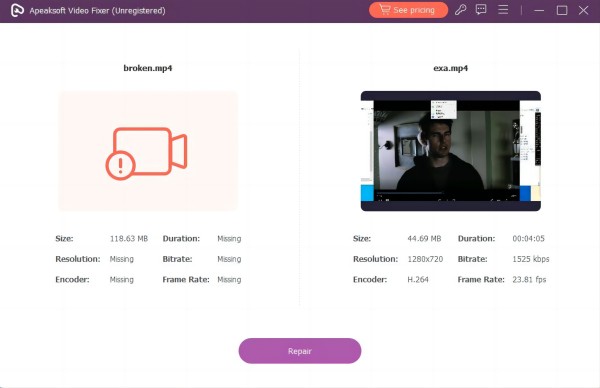
 Step 4Repair Video
 Now that you are done importing both corrupted and sample video, you are ready to repair your video. Just click on the Repair button pointed by an arrow below. You will see your output video in the default directory of your application.
Part 2. Troubleshooting Choppy Video Playback in VLC Using Common Methods
Optimize Video Setting
Lowering the video quality or resolution to lessen the load on your system can help. Also, slowing down the playback speed might help if you have an older system because it also reduces the stress on your system.
Update Graphic Drivers
Always make sure that your drivers are up to date. Outdated drivers can lead to choppy playbacks. To update your driver, visit the official manufacturer of your GPU.

Check For Overheating Issues
Overheating can lead to performance issues. Make sure your PC or laptop is running in cool temperatures. Also, consider cleaning the fans of your PC or laptop occasionally.
Use Different Media Player
Sometimes, playing a video with a certain media player can cause your video to lag and be stuttery. So try playing it with a different media player; it might help you with your issue.
Clean Temporary Files
Cleaning temporary files after years of use on your PC can have a significant impact, as it releases your PC from loads of unused files.
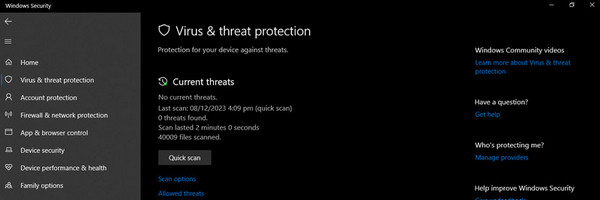
Scan for Malware
Perform a thorough scan of your system for malware and viruses. Malicious software can significantly impact your system as it targets specific parts of the system, making your system collapse part by part.
Further Reading:
How to Fix Premiere Pro Won’t Play Video [Proven Ways]
VLC Media Player Review and More Information You Should Know
Part 3. FAQs about Choppy Video Playback in VLC
Can VLC players optimize the video playback?
Yes, VLC Media Player offers various features and settings that allow you to optimize video playbacks to avoid choppy videos for a smoother and more enjoyable experience. Just set the correct settings according to your PC’s capability.
Why is my MKV video choppy in VLC?
MKV files can use different types of codecs for video and audio. Ensure that your VLC player supports the specific codecs that your video has. Also, you can experiment with different video output modules in VLC. Go to Tools > Preferences > Video and try different settings under Options. Changing the video output setting can improve stability.
Should I use third-party tools to fix choppy video in VLC?
Using a third-party tool should be your last resort, as it might reduce the quality of your video. At least try common methods first before trying a third-party application.
Does VLC support 4K videos?
Yes, VLC does support 4K videos. It is known for its extensive codec support and can handle various video formats. Whether you have a local 4K file on your computer or are streaming 4K, VLC should be able to play it.
How do I know if my system meets the requirements for smooth video playback?
Check the recommended CPU specifications for the video content you want to play. High definition and 4K might require more processing power. Also, ensure that your GPU supports hardware acceleration and can handle high-quality video.
Conclusion
VLC choppy videos are a prevalent thing we are bound to experience. Making an unsightly and unbearable video to watch. We must be wary of our devices because they might get old and need replacement.

