Want to Find and Recover Recently Deleted? Check This Out
Nowadays, people have too much data in their lives, and to ensure enough memory on iPhones, they can only be cleared regularly. Important information will inevitably be accidentally deleted in this process. Apple's Recently Deleted gives you a second chance, which allows you to recover deleted data within 30 days, including photos, notes, files, etc. With such a convenient function, do you still have trouble finding and recovering recently deleted files on your iPhone? Here, you have come to the right place.
PAGE CONTENT:
- Part 1. How to Go to Recently Deleted on iPhone or iPad
- Part 2. Easily View and Recover iCloud Recently Deleted
- Part 3. How to Recover Permanently Deleted Files on iPhone with Backup
- Part 4. Excellent Tool to Recover Files Recently Deleted on iPhone Without Backup
- Bonus Tip: How to Lock Recently Deleted on iPhone
Part 1. How to Go to Recently Deleted on iPhone or iPad
Did you know that when you delete a file in iOS, it doesn't get deleted? Instead, your iPhone puts it in a Recently Deleted folder. In other words, you can restore it within 30 days after the first deletion. However, once this period is exceeded, it will be permanently deleted and more troublesome to restore.
Follow the below steps to learn how to go to Recently Deleted on your iPhone and iPad:
On your iPhone
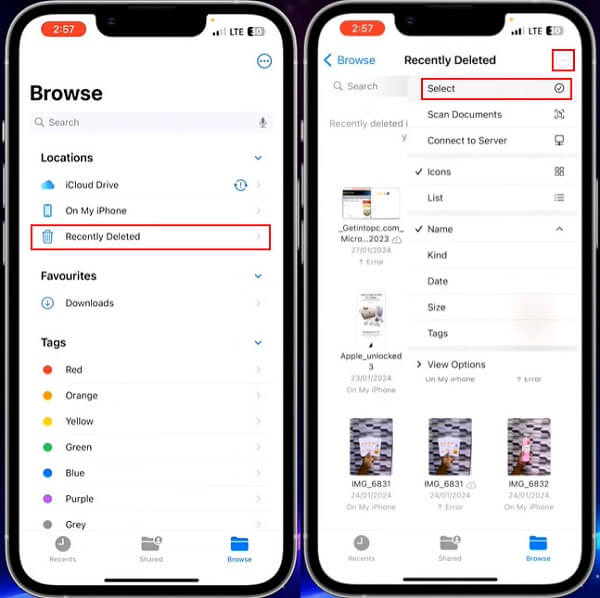
Step 1. Open the Files app on your iPhone and click back at the top left corner until you see the Browse option. Then, choose Recently Deleted under the Locations section to see all deleted files within 30 days.
Step 2. Click the three-dot button in the upper right corner, then find Select from the drop-down list.
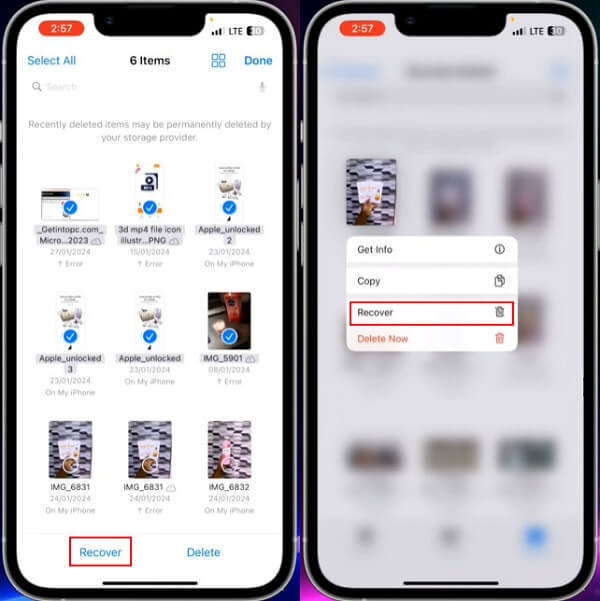
Step 3. Next, you can check your wanted files and click Recover to start. To recover a single file, you can just long-click on it and choose Recover in the pop-up window.
On your iPad
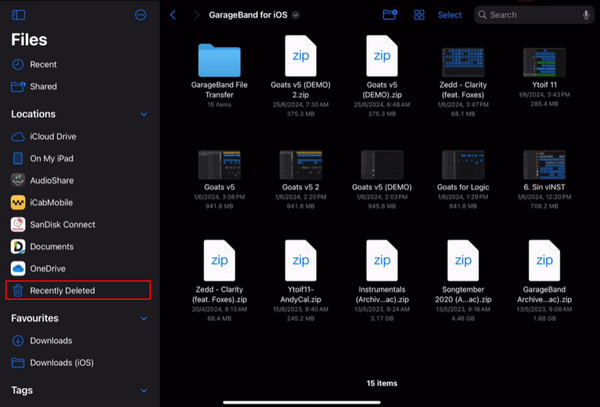
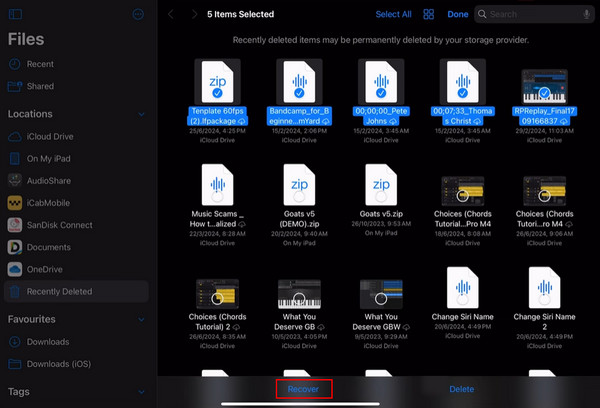
Step 1. Go to the Files app on your iPad. If you can't find it, search for it directly on the home screen. Here, you can see all the files from different platforms. Then click Recently Deleted at the bottom of Locations.
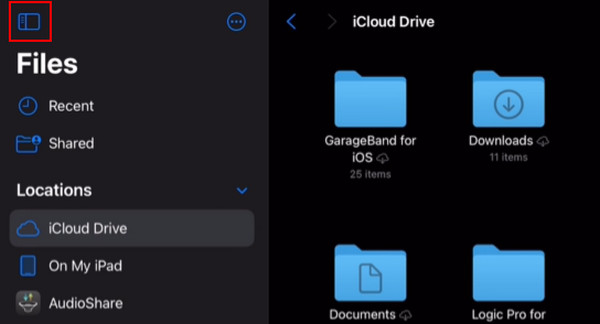
If the sidebar is not displayed by default, click the Show Sidebar button at the top left of the page.
Step 2. Hit the Select button and choose multiple files, or simply tap and hold on one single file and choose Recover.
Part 2. Easily View and Recover iCloud Recently Deleted
If you have iCloud Drive on your iPhone and set it to automatic backup in advance, all your files will be stored in it. This iCloud service subsystem can share and store various data in all your Apple devices, so once you delete files from your iPhone, they will be automatically transferred to Recently Deleted in iCloud Drive. Therefore, you can access iCloud Recently Deleted to recover files.
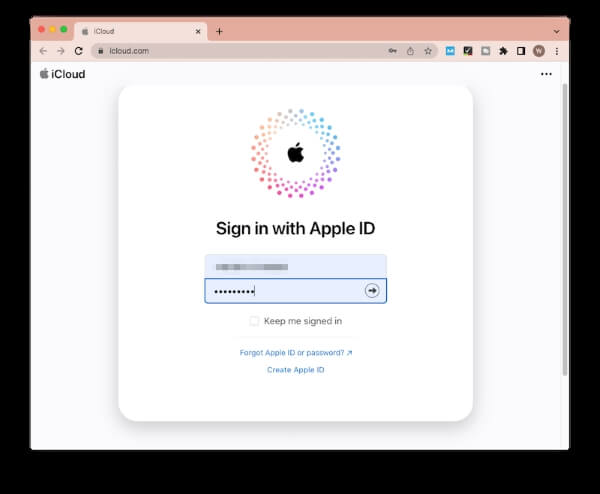
Step 1. Open the browser on your computer, navigate to iCloud.com, and sign into it with your Apple ID, which should be the same as on your iPhone.
Step 2. After logging in, go to the iCloud Drive section on the home page. Choose Recently Deleted from the left sidebar.
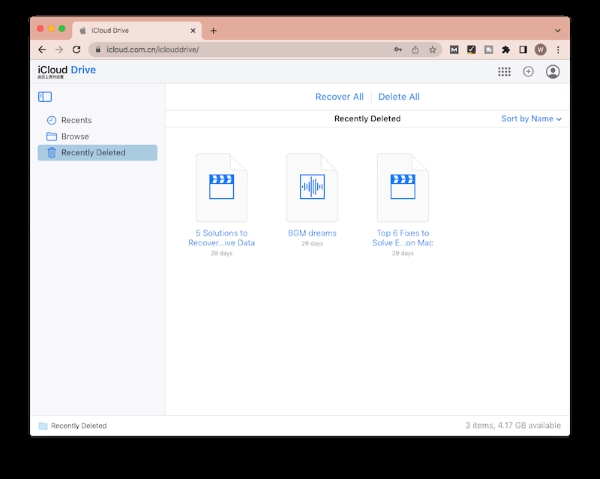
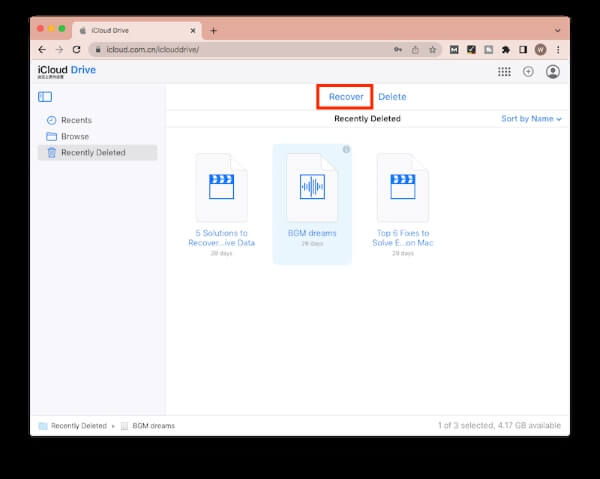
Step 3. All recently deleted files will then be displayed, and below each file, it will be shown how long it will remain in the Recently Deleted folder. Select your wanted files and click Recover to restore them to their original location in iCloud.
Part 3. How to Recover Permanently Deleted Files on iPhone with Backup
Nowadays, many people choose to back up their mobile phones regularly. This is indeed a very safe way because if backup data is present, whether it was recently or permanently deleted, it can be easily restored within a few clicks. The following are the two backup tools most commonly used by users.
iCloud
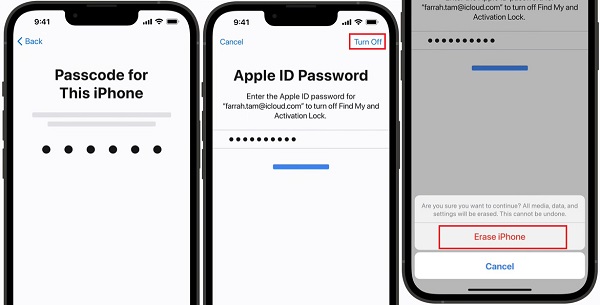
Step 1. Head to Settings on your iPhone, tap General and scroll down to the bottom. Choose Transfer or Reset iPhone, then go to Erase All Content and Settings.
Step 2. Follow the next instructions on the screen and enter your passcode. Tap Erase iPhone to confirm, and the erasing process should begin. If you forgot the passcode, don't worry; there are other compatible methods to factory reset your iPhone without a password.
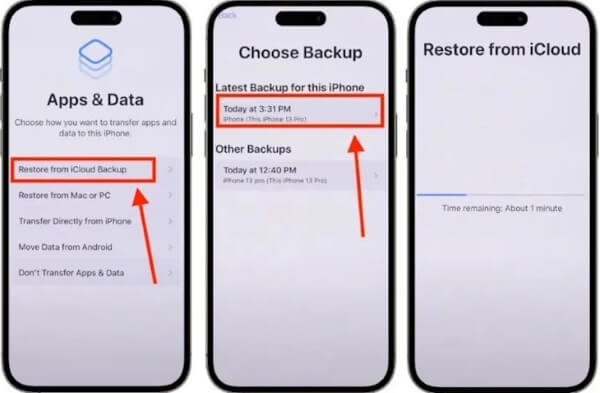
Step 3. Wait for your device to restart, then follow the setup guides until you reach the Apps & Data screen. Choose Restore from iCloud Backup and sign into your iCloud account.
Step 4. Pick an iCloud backup of your containing backups, click Continue, and the restore process will begin automatically.
iTunes
Step 1. Open iTunes on your Mac; if you are a Windows user, just download it freely from its official website and launch the latest version.
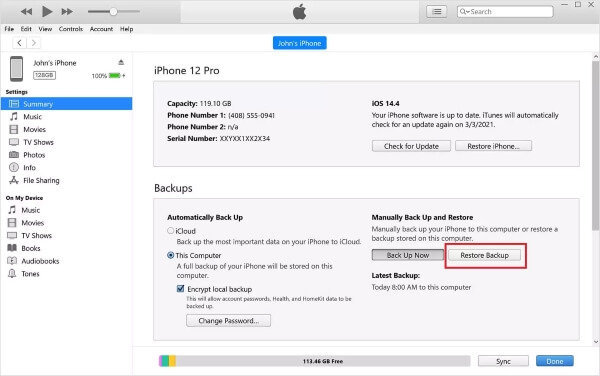
Step 2. Plug your iPhone into the computer and wait for its logo to appear in the upper-left corner of iTunes. Click it and choose Summary under the Settings section.
Step 3. Based on the fact that you have backed up iPhone data to iTunes in advance, click Restore Backup directly and choose the latest backup version of your iPhone, then click Restore to start the restoration process.
Part 4. Excellent Tool to Recover Files Recently Deleted on iPhone Without Backup
Apart from recovering files from Recently Deleted and recovering files from previous backups, the most non-restrictive method is to use Apeaksoft iPhone Data Recovery. This best-ever iPhone data recovery tool offers three recovery modes: recover from iOS devices, recover from iTunes backup and recover from iCloud backup. Although you didn't sync your iPhone before, this powerful software will deep scan your devices and recover all the deleted files of more than 20 types.
Best Tool to Get Your iPhone Data Back
- Recover iPhone data for various scenarios, such as factory reset, password forgotten, water damaged, etc.
- Backup iPhone data to other devices within seconds and restore without any data loss.
- Allow users to preview deleted files before the recovery process.
- Quickly scan all the data in your iPhone and automatically classify it to make it easier for users to find.
Secure Download
Secure Download

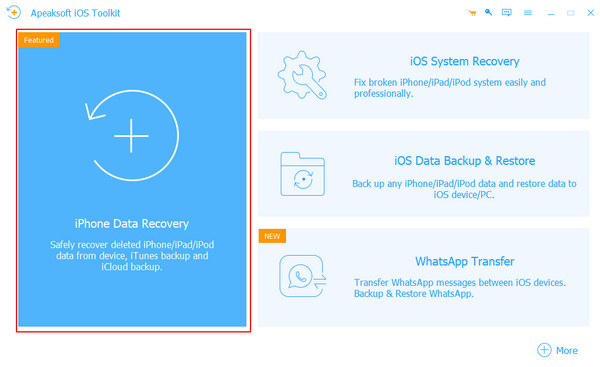
Step 1. Download, install and launch Apeaksoft iPhone Data Recovery on your computer. Double-click to open it and choose the iPhone Data Recovery option on the left side of the home page.
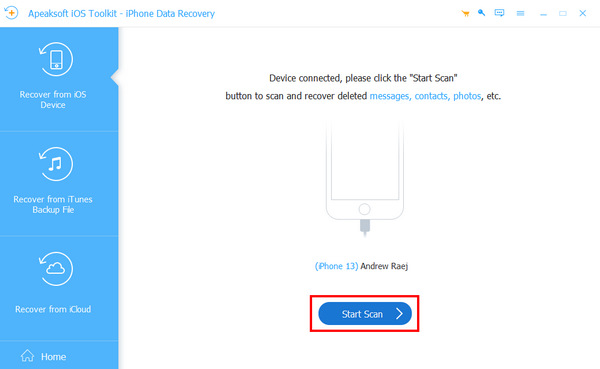
Step 2. Choose Recover from iOS device and use a workable cable to connect your iPhone and computer. After the program detects your iPhone successfully, click Start Scan to continue.
Step 3. After a while, all deleted files will be listed by category. To avoid interference from files still on your phone, you can Show Deleted Only in the toolbar above.
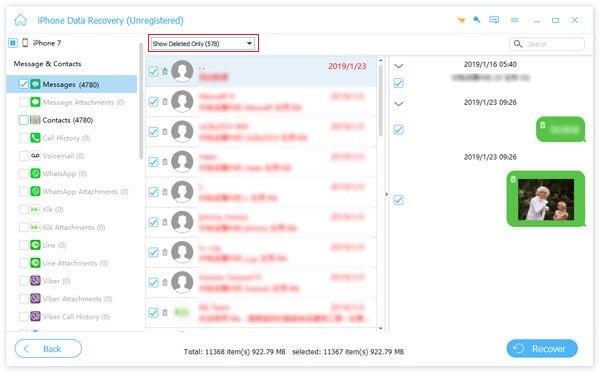
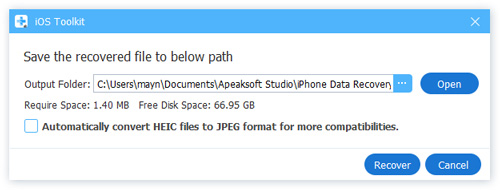
Step 4. Tick the deleted files you wish to restore and click Recover at the bottom. Select the address you want to store in the pop-up window, then click Recover again.
Bonus Tip: How to Lock Recently Deleted on iPhone
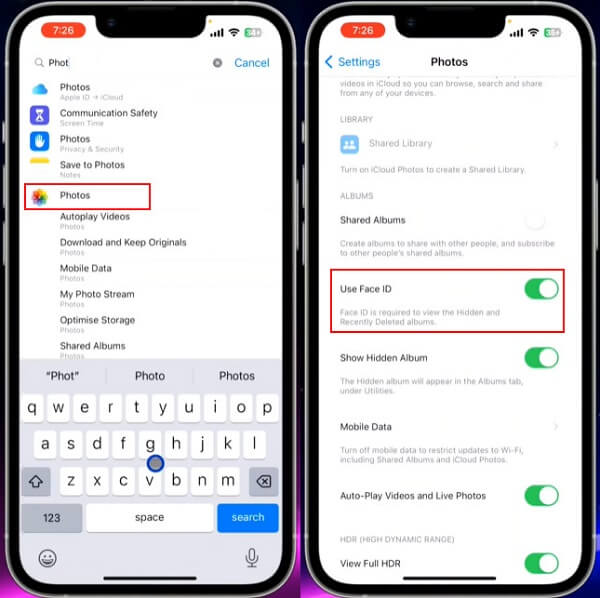
Step 1. Open Settings on your iPhone, scroll down to Photos or search for it at the top.
Step 2. Ensure your device is in iOS16 or above, then click on it, and you'll see Use Face ID.
Step 3. Turn on the Use Face ID toggle, which is required to view hidden and recently deleted photos.
Conclusion
Before reading this article, you might think that recovering recently deleted files or files that have been deleted for more than 30 days can be difficult. Still, depending on your preference, you can have multiple ways to recover them. If you're unsure which method is best for you, try Apeaksoft iPhone Data Recovery. With this excellent software, you can recover all the deleted files quickly and easily without password verification.
Related Articles
Even though your iPhone is locked because of forgotten password, damages or deletion by mistake, you can recover deleted files from iPhone easily.
How can you recover deleted notes on your iPhone when you mistakenly permanently delete them? Check 5 ways to recover notes on iPhone.
Did you delete your Safari History? Here is the ultimate guide to recovering it in six ways, even if you don't have backup.
Have you ever looked for a way to unlock your iPhone with broken screen? This post shares 4 easy but effective ways to achieve it!

