How to Sync Email on iPhone/iPad Seamlessly and Syncing Tips
Nowadays, staying connected is important for most of us. Ensuring your email synced seamlessly becomes a necessity. This article will introduce how to sync email on iPhone and how to take advantage of Mail Days to Sync.
PAGE CONTENT:
Part 1: What Does Mail Days to Sync Mean
What is Mail Days to Sync?
Mail days to sync refers to the function that allows users to set the range of days the email is synced. Usually, the options range from 1 Day to 1 Month (default).
Users can choose the syncing days as required, avoiding syncing too many unnecessary emails, which will take up too much storage space.
This setting helps users meet their needs to sync email for a specific time and manage their email storage space.
How to change Mail Days to Sync iPhone/iPad?
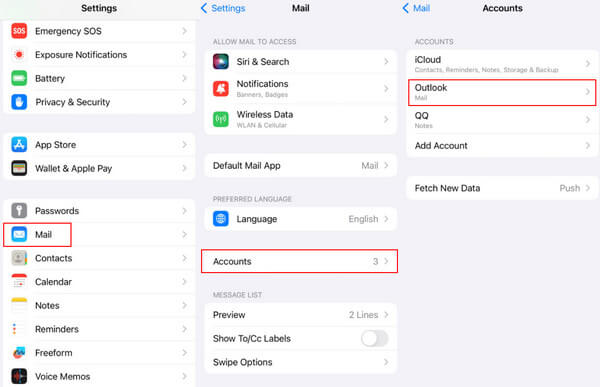
Step 1. Go to Settings, scroll down to find Mail and click it. On the following page, tap Accounts and choose your targeted account.
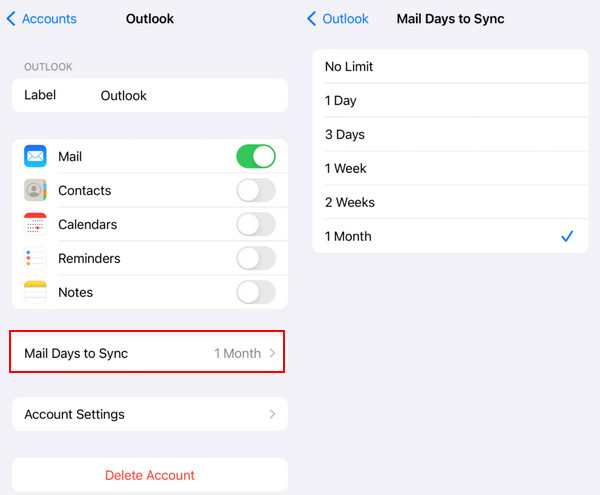
Step 2. On your email account page, click Mail Days to Sync and choose the desired time limit for emails sent to your iPhone Mail automatically on the following page. If you want to sync all emails, please choose No Limit.
Part 2: How to Sync Email on iPhone and iPad
Since you know how to change Mail Days to Sync iPhone/iPad, do you know how to sync email on iPhone and iPad? The following text will give you the answer.
1. Via Mail
This section introduces how to sync email to iPhone using email sync settings iPhone.
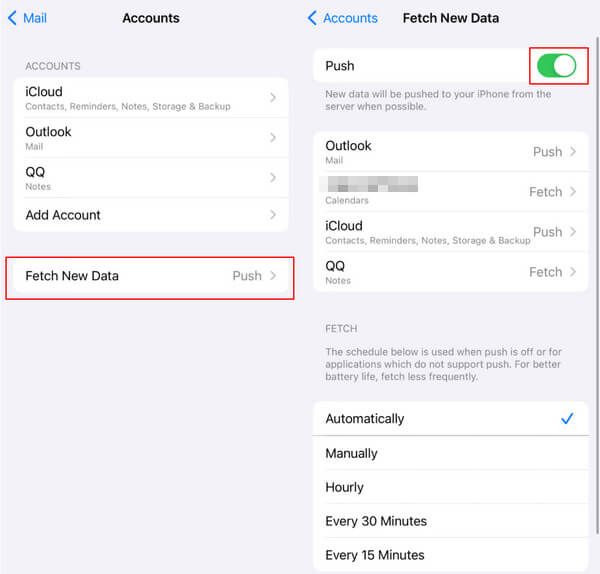
Step 1. Go to Settings > Mail > Accounts > Fetch New Data to check whether the Push toggle is in green. If not, turn it on to push new data to your iPhone from the server when possible.
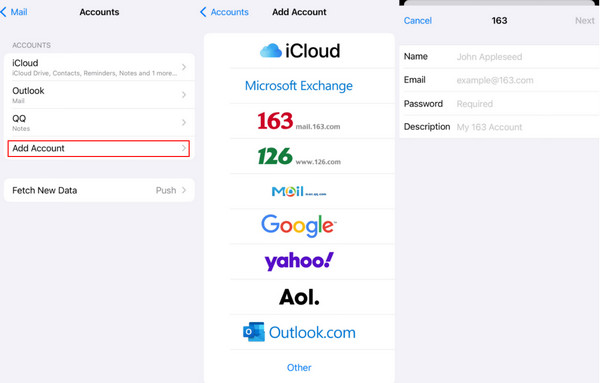
Step 2. After turning on the Push, return to the previous page and choose Add Account. Then, choose your email account (iCloud, Exchange, Google, etc.) and input your email address and password to set up the email account on your device.
Step 3. Click on the account you just added, then tap the Mail toggle on (green).
Then, you can sync email on iPhone seamlessly.
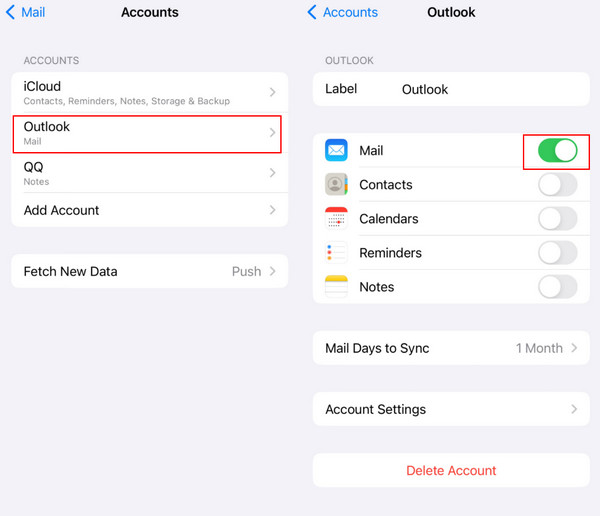
The steps to sync email on iPad are basically the same.
To sync email between iPhone and iPad or among other iOS devices, you can use iCloud.
Just go to the Settings interface and click your name on the top. Find iCloud and click it. Then tap Show All to find Mail and allow it to Sync this iPhone. Then, you will find relevant emails on other iOS devices under the same Apple ID.
Besides email, you can also use iCloud to sync messages, photos, files, etc. among iOS devices.
2. Via a Third-Party Email App
Although Mail has a robust syncing function, some users are still accustomed to using third-party email apps like Gmail and Outlook for advanced features.
In the following part, we will take Gmail as an example to introduce how to sync email on iPhone via the email app.
Step 1. Make sure you have installed the Gmail on your iPhone. If not, go to the App Store to get it.
Step 2. Launch Gmail and log in to the correct account with a password.
Step 3. Go to the top left corner of the interface to find Menu (three strips). Then, scroll down to choose Settings.
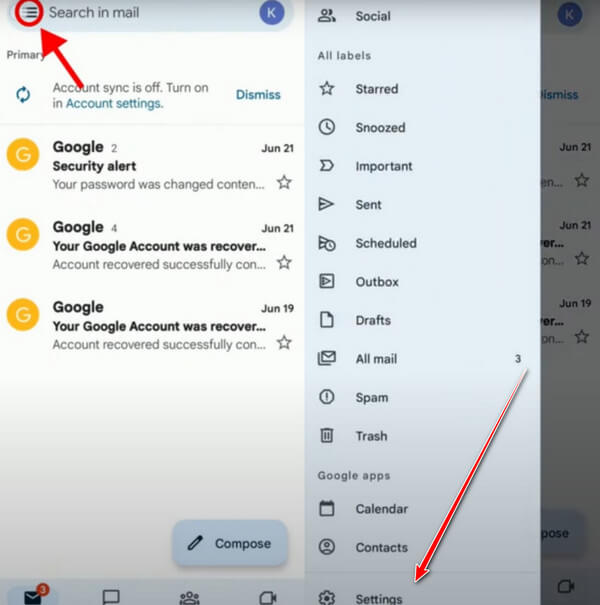
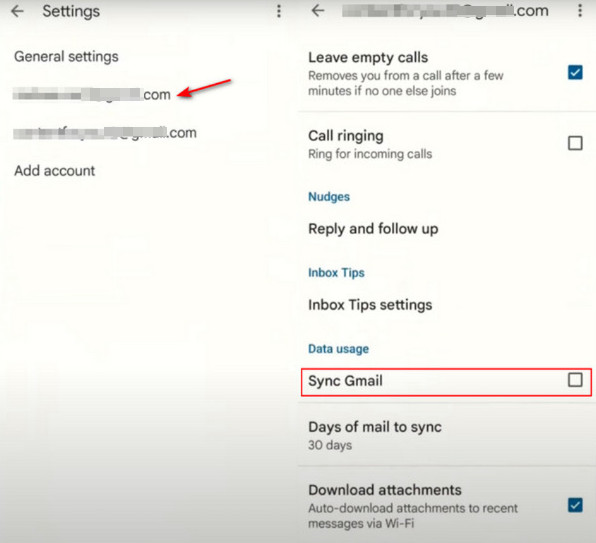
Step 4. Tap your account on the following page. Find the Sync Gmail option and check it. Then, you can sync email to iPhone easily.
More Tips: Using Apeaksoft iPhone Transfer to Sync Data
If you need to sync your iPhone data to another iPhone or other devices, we strongly recommend Apeaksoft iPhone Transfer to you!
As a dedicated transfer tool for iPhone, it can transfer data like photos, music, videos, contacts, messages, etc. between iOS devices and computer without any data loss. Besides syncing, you can also edit your iPhone files on your computer via it.
Secure Download
Secure Download
Here are the steps to sync data via Apeaksoft iPhone Transfer.
Step 1. Download Apeaksoft iPhone Transfer from its official website or by pressing the corresponding above. Run it after installation.
Step 2. Connect your iPhone to your computer with a data cable. Then you will see the related information about your iPhone on the interface.
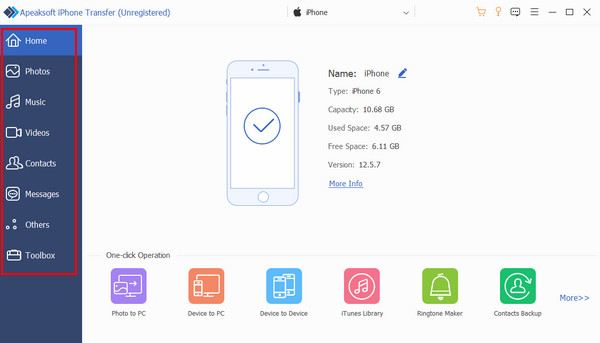
Step 3. Go to the left navigation and choose the functions you need. Here we select Photos as an example. Then, in the second column bar, choose the position of the photos you want to transfer. Check them on the right page.
Step 4. Press the phone-like pattern or the computer-like button in the top bar. Then you can sync photos to the corresponding device.
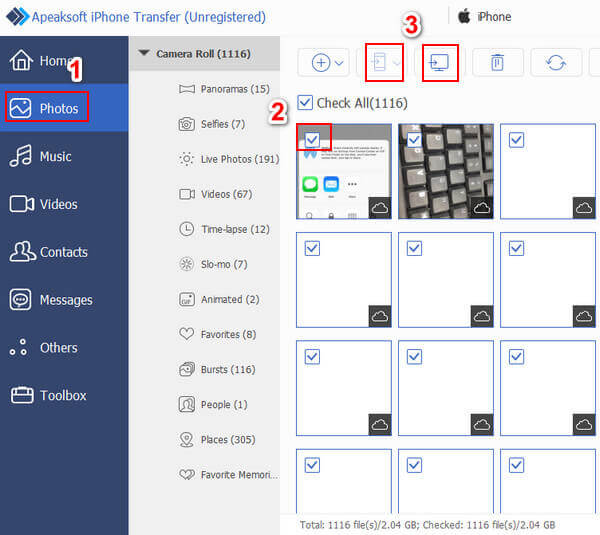
Tips: You should connect two mobile phones to the computer with two separate data cables if you want to transfer data from iPhone to iPhone.
Part 3: Tips for Syncing Emails
1. Account Configuration
Ensure the email account is accurately set up in Settings or the Mail app. This includes correct server settings and authentication. Also, ensure SSL/TLS encryption is enabled to protect your email data security during transit.
2. The Same Email Account
Make sure you are using the same email account while syncing email on your iPhone. This is the key to allowing the devices to recognize and sync emails.
3. The Same Apple ID
If you want to sync email on iPhone and iPad, don't forget to log in to the same Apple ID.
4. Storage Management
Make wise use of Mail Days to Sync to manage your device's storage to avoid overloading it with synced emails. Also, you can clean up your inbox by deleting old emails from time to time.
Conclusion
In this article, we mainly introduced Mail Days to Sync meaning and how to sync email on iPhone. Also, we mentioned a powerful data transfer tool - Apeaksoft iPhone Transfer to you. Hope this article will be useful to you.
Related Articles
When you delete emails in Gmail by mistake, stop doing anything, read and follow our guide to recover deleted Gmail emails.
You can get three practical methods to recover deleted emails in Outlook with or without Microsoft 365 from this article.
To migrate data and files from one iOS device to another, this guide tells you how to sync iPhone and iPad with or without iCloud.
Do you undergo improper ways of transferring iPhone to iPad? This article illustrates 5 ways and lists their features for you to evaluate the best one.

