Apple has emerged as one of the tech industry's leading giants, offering an extensive array of products, services, and applications for users globally. To access the full suite of Apple's services and seamlessly integrate into their ecosystem, users must create an Apple ID to enjoy various Apple services like iCloud, the App Store, Apple Music, Apple TV, and more. Here, we will walk you through the steps to create a new Apple ID and provide you with skillful tips.

- Part 1. What Is Apple ID
- Part 2. Create an Apple ID Account
- Part 3. How to Fix Apple ID Could Not Be Created
- Part 4. FAQs of Apple ID Set-up
Part 1. What Is Apple ID
Before diving into the creation process, it is essential to understand why having an Apple ID is crucial. An Apple ID is a central hub connecting all your devices and services. Once created, you can enjoy a seamless and integrated experience across your iPhone, iPad, Mac, Apple Watch, and other Apple products. After you create an Apple ID for login, you can access iCloud, Apple's cloud storage service, which enables you to synchronize and back up your data, photos, and documents across multiple devices. (Apple ID VS iCloud?)
Moreover, with your Apple ID, you can get games from the App Store, download music and movies from iTunes, and subscribe to various services like Apple Music, Apple TV+, and Apple News+. Additionally, the Apple ID grants you access to various productivity tools such as Pages, Keynote, and Numbers, allowing you to create, edit, and collaborate on documents with ease.
Part 2. Create an Apple ID Account
Preparations
Before creating an Apple ID, ensure you have the following:
a. An Apple Device: To create an Apple ID, you need an Apple device such as an iPhone, iPad, iPod Touch, or Mac. It's still possible to create an Apple ID without an iPhone. Instead, you can also create an Apple ID through the Apple ID website (appleid.apple.com).
b. Active Internet Connection: Ensure that your device is connected to a stable internet connection. You can create your Apple ID on Safari and any browser you prefer. The creation process involves data transmission to set up your account correctly.
c. Valid Email Address: You will need a valid email address to register for your Apple ID. This address will be connected to your Apple ID account and used for communication purposes.
Tips: Since Apple adopts a Two-factor authentication, which means you need at least a phone number to verify your identity, you may not create an Apple ID without phone numbers now.
Create New Apple ID and Password
Now that you have everything you need, let us dive into the step-by-step process of creating your Apple ID:
Step 1 Access the Apple ID Creation Page
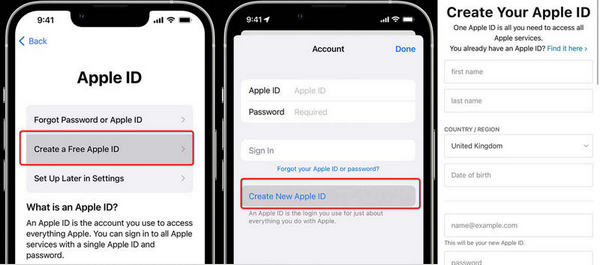
Open the Settings app or System Preferences (on Mac). Scroll down or navigate to the Sign In or iCloud section, depending on your device model.
Step 2 Tap/Create Apple ID or Sign in to Your [Device]
If you're not signed in with an Apple ID, you will see options to Create Apple ID or Sign in to Your [Device] . Tap on Create Apple ID.
Step 3 Complete the Fill-in Content
Enter your date of birth to proceed. Apple requires this information for age verification and for providing age-appropriate content.
Then, input a valid email address for your Apple ID username. Choose a strong password to secure your account. Make sure your password is unique and not bound to other accounts.
Step 4 Select Security Questions and Answers
To guard your Apple ID against hacking and other risks, select three security questions and provide answers you can easily remember. This will help you recover your account if you forget your password or get locked out.
Step 5 Set Up Two-Factor Authentication (Recommended)
Two-factor Authentication (2FA) acts as another layer of security to your Apple ID. When enabled, you'll receive a verification code on a trusted device every time you sign in to your Apple ID. Set this up by following the on-screen instructions. It's highly recommended to enable 2FA for better security.
Tips: You can follow the steps in case others reset a stolen iPhone to protect your privacy.
Step 6 Agree to Terms and Conditions
Carefully read through Apple's Terms and Conditions and Privacy Policy. If you agree, tap Agree to proceed.
Step 7 Verify Your Apple ID
You will receive a verification email during registration. Open the email and enter the link to confirm your Apple ID.
Step 8 Complete Account Setup
Return to your device's settings or system preferences and sign in with your fresh Apple ID and password. You may also be asked to set up iCloud, FaceTime, iMessage, and other services during this process. Choose your preferences according to your needs.
Manage Your Apple ID
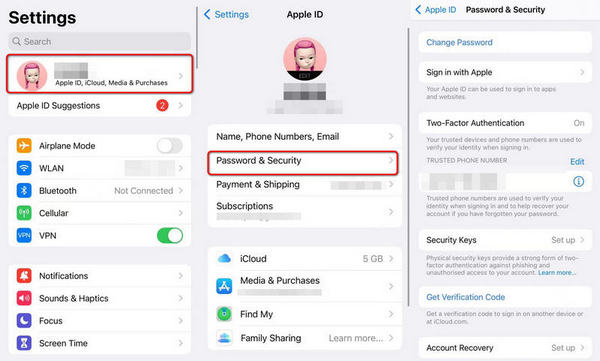
Once your Apple ID is created, you can manage your account settings at any time. To do so, follow these steps:
On iOS devices:
Go to Settings > [Your Name] > Password & Security to change your password, update security questions, or turn two-factor authentication on/off.
On Mac:
Visit System Preferences > Apple ID to access your account settings.
Additionally, you can manage your Apple ID from the Apple ID website (appleid.apple.com) using a web browser. Simply sign in with your Apple ID credentials to access your account settings, including account information, security options, and payment methods. You can also change region or country on iPhone based on your needs.
Part 3. How to Fix Apple ID Could Not Be Created
What happens if you are holding a second-hand iPhone or fail to create an Apple ID due to the locked devices? Is there any way out to get a new Apple ID if you forget about the passwords? The answer is all yes in Apeaksoft iOS Unlocker.
With this tool in hand, you can remove the old or unwanted Apple ID to activate your iPhone as a fresh new one. You can remove passwords, Touch ID and Face ID from iOS devices quickly and effectively.

4,000,000+ Downloads
Unlock a locked/broken/crashed/damaged iPhone without data loss.
Remove iPhone and iTunes backup passwords at a super-fast speed.
Fully control the iPhone to set up Apple ID and other features.
Not affected and tracked remotely by the old Apple ID.
Compatible with the latest iOS 18/iPadOS 18 systems.
How to Unlock Your iPhone to Create New Apple ID
Step 1 Access Apeaksoft iOS Unlocker on your computer. Connect your device to the computer and choose the Remove Apple ID section and tap Trust the computer on your iPhone.
If you fail to create an Apple ID because you forget the passwords or are restricted by Screen Time limits, then you can continue with Wipe Passcode and Screen Time, respectively.
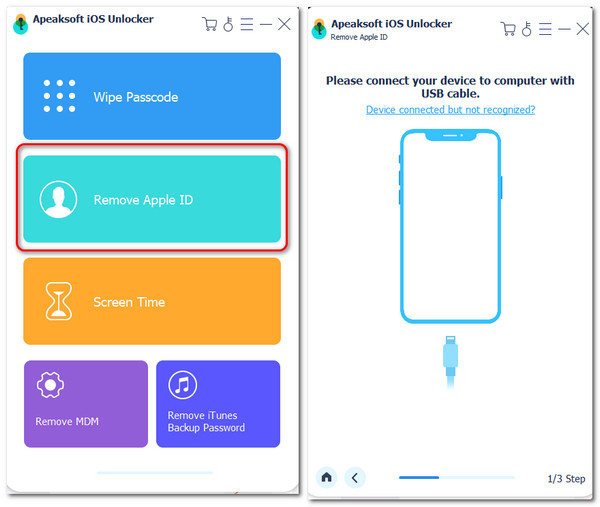
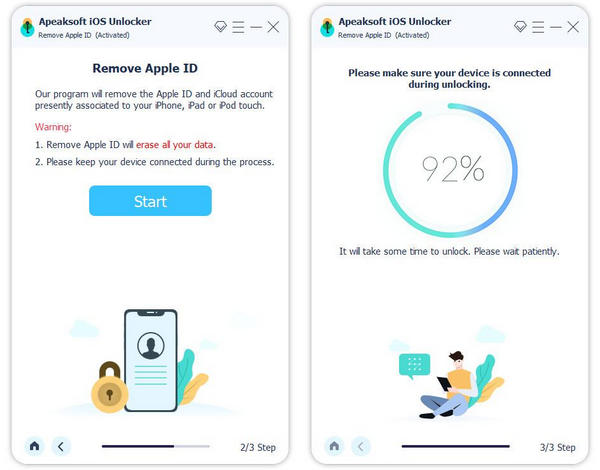
Step 2 Make sure you have disabled Find My on your iPhone. (If not, follow the on-screen instructions to reset the settings) Then click the Start button.
Step 3 Wait until the program completes the unlocking process. After that, you can reboot your iPhone and set up a new Apple ID account as we mentioned in Part 2.
Part 4. FAQs of Apple ID Set-up
How to create an Apple ID for a Child?
According to Apple's rule, child no less than 13 can create an Apple ID on their own. You can visit Settings > Family > Add Member > Create Child on the latest iPhone/Mac system and fill in all information for registration.
What can I do when My Macbook Apple ID couldn't be created because of a server error?
This may happen because of the account limits per device (3 IDs/device). You can switch to another Apple device as an alternative to create a new Apple ID as you want.
Can I create an Apple ID without a credit card?
Sure. When registering for an Apple ID, you can choose None when you fill in the payment method column and go on with the set-up process.
Conclusion
To make an Apple ID is a straightforward process that grants you access to a plethora of services and features within the Apple ecosystem. With your Apple ID, you can seamlessly sync and access your data across multiple devices, purchase, and download content from the App Store and iTunes, and enjoy exclusive Apple services. You can also learn to unlock your iPhone with Apeaksoft iOS Unlocker to enjoy the full potential of Apple's offerings and embark on a seamless digital journey.


