In a public place, you hear the phone notification ring, and then pick up your phone to check your phone. However, you find nothing, and the notification sound is from others around you. What a big embarrass!
Fortunately, only you knew what happened to you just now.
However, for avoiding the next embarrass, you should change your notification sound on your phone.
This post shows us the full guide to change the notification sounds on iPhone and Android, whether you want to change the system app (Email, Message, Calendar, etc.) notification sound, or customize the third-party app ringtone like Facebook, Instagram, Twitter, etc.

- Part 1. How to Change and Customize Notification Sounds on Android
- Part 2. How to Change and Customize Notification Sounds on iPhone
- Part 3. How to Change Notification Sounds of Third-Party Apps
- Part 4. How to Create and Add Favorite Notification Sounds to iPhone and Android
Part 1. How to Change and Customize Notification Sounds on Android
1Change and Customize Notification Sounds on Android Phone
For changing the notification sounds on Android phone, you just need to complete it via the settings. Here, take Samsung Galaxy S5, as the example to show the simple steps.
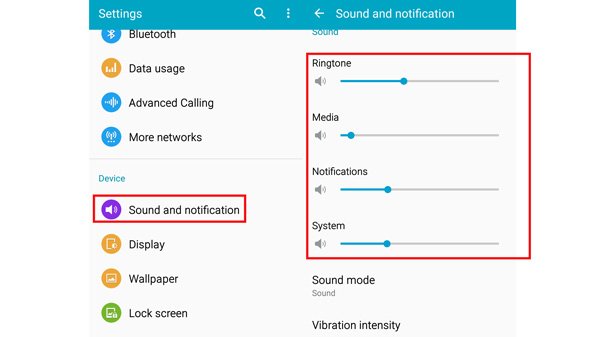
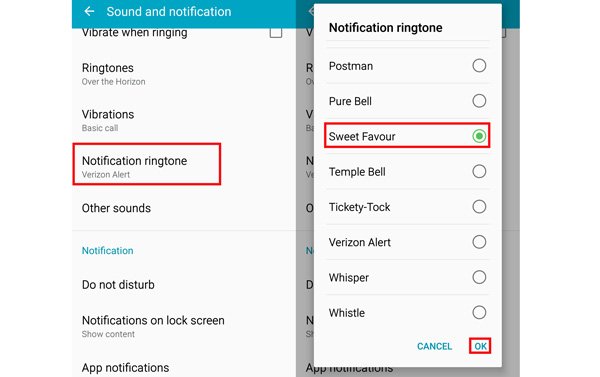
Step 1Adjust notification sound volumeGo to “Settings” and then “Sound and notification”. Under the “Sound” option, you are given the freedom to adjust the sound volume of “Ringtones”, “Media”, “Notification” and “System”.
 Step 2Change system notification sounds
Scroll down to find “Notification ringtone” and you will see all the built-in sounds. Tap it to hear it, and then just select the sound you want and hit “OK” to change the notification sounds.
 Step 3Change apps notification sounds (Call/Email/Calendar)
In the screen of “Sound and notification”, scroll down to find “Other sounds” and tap it > Navigate “Samsung applications” and you will see “Call” (including Voicemail), “Email”, and “Calendar” > Tap one of them (e.g. Calendar) > Hit “Notification sound” to hear the sound and select it as the app notification sound.
You could customize the notification sound for the three apps specifically.
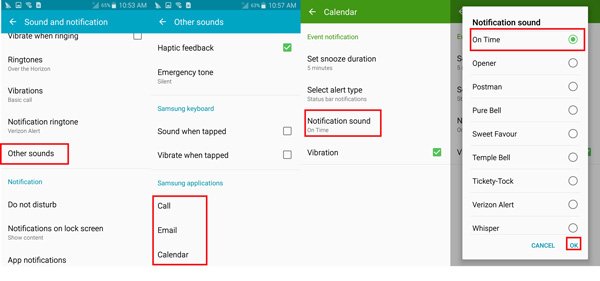
Note: For some Android devices, the Messages app notification sound can also be set directly here.
2FAQs of Changing Notification Sounds on Android Phone
1. Can I use other ringtones as the notification sounds?
Actually, you can. For customizing other tones as the notification sounds, you are given 2 methods currently.
- One is downloading the ringtone app, e.g. Zedge, which can help you customize the notification sounds from its library, instead of built-in sounds.
- The other method is adding the MP3 ringtone to your Android phone for changing.
The second method works for most Android phones like Xiaomi, Huawei, ZTE, LG, Motorola, etc., and Samsung does not allow you to set notification sound from its outside library.
2. How to custom the notification sound for some a contact?
Android phone gives you the permission to change the notification sound for a certain contact.
Still, take Samsung Galaxy S5 as the example.
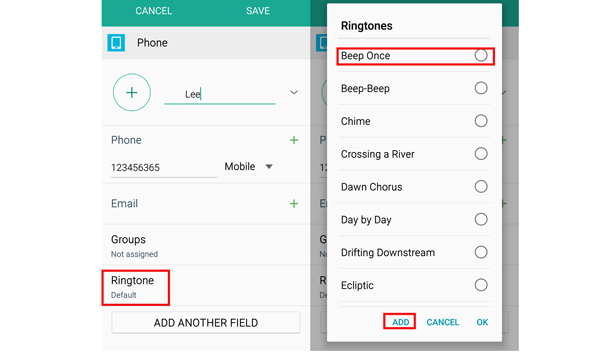
Just go to the “Contact” app on your phone, select the specific contact, find the edit option, and then scroll down to find “Ringtone” option. Then you just need to hear the sound and set it as the contact notification sound. It also lets you add another sound from your music library.
3. How to change notification sound for per app?
Apart from the system apps from the Android phone manufactures, your phone creates no pre-settings to change notification sound from third-party apps. You need to visit the third-party app like Facebook, Instagram, etc., one by one and change the notification sounds separately.
Part 2. How to Change and Customize Notification Sounds on iPhone
For changing iPhone notification sounds, the steps are shown as blows.
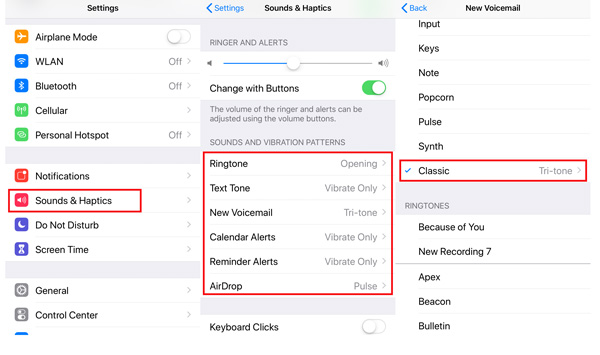
Step 1Start sound settingsGo to “Settings” > “Sounds & Haptics” on iPhone 7 and later, or “Sounds” on iPhone 6s Plus, 6s and before to enter the sound settings.
Step 2Change notification sounds for appsHere, you could custom notification sounds for such apps as “Ringtone”, “Text Tone”, “New Voicemail”, “New Mail”, “Send Mail”, “Calendar Alerts”, “Reminder Alerts”, and “AirDrop”.
Tap one of them, and you will be given two options to select from “ALERT TONES” or “RINGTONES” list.
You can go to check if the notification sounds work after setting by asking your friend to call or send text messages to you. (Notification sounds not working on iPhone?)
- 1. If you have purchased ringtones from iTunes Store, or download ringtones to iPhone, the extra ringtones will show in the “RINGTONE” list, which lets you customize your favorite sounds for notification freely.
- 2. For some other system app sounds’ changing, e.g. Alarm, you should go to the specific app for settings.
- 3. For other third-party apps, you have to go to the app itself and change the notification sounds. That’s what next part will show you.
Part 3. How to Change Notification Sounds of Third-Party Apps
Third-party apps are separate from the phone system, so it is hardly to find the universal solution to change the notification sounds of all the apps.
The steps of changing notification sounds for apps work similarly, and here we only take Facebook Messenger as the example to show you the process.
Run Facebook Messenger app on your phone > Tap your profile picture in the top left corner to enter “Settings” > Hit “Notification & Sounds” > Select “Notification sound” and “Free call ringtone” separately to change the sounds.
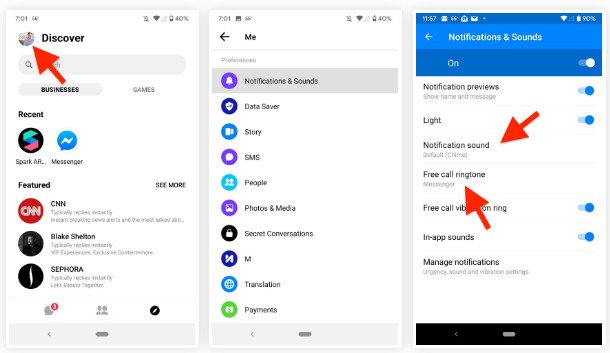
Note: The available sounds list is different based on different phone models, because, Facebook does not custom sounds for you, other than the default ringtones from your phone system’s notification sounds.
You could also change notification sounds for other apps like Instagram, Twitter, etc., by opening the app.
Part 4. How to Create and Add Favorite Notification Sounds to iPhone and Android
From the above description, one thing you may notice that it is an easy task to change the notification sounds among the default system ringtones. However, for changing the sounds into your customized favorite tones, you need to create and add them into your phone.
Apeaksoft MobieTrans is the iPhone and Android ringtone creator and helps add the ringtone to device directly. Not only adding files from Android or iPhone, you could also add music files from your computer locally for ringtone creation.
Free download MobieTrans on your computer, and run it after installing this software by following the on-screen instructions.
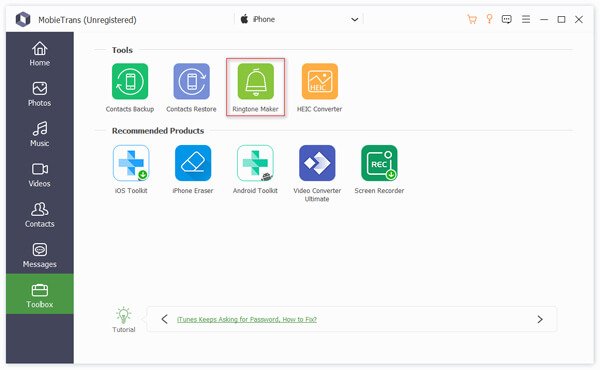
Then connect your iPhone or Android phone to computer with the USB cable, and this software will detect your phone automatically. Then click “Ringtone Maker” at the bottom.
 Step 2Add audio file
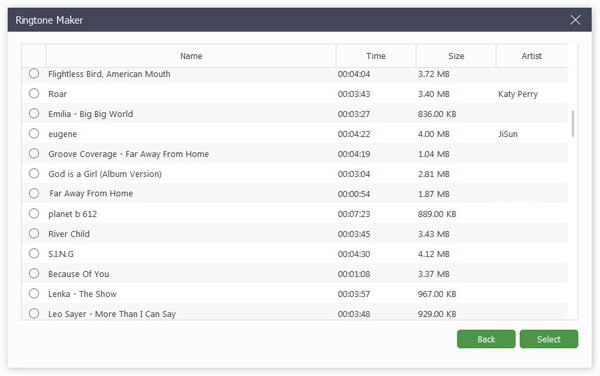
In the pop up window, select “Add file from device” or “Add file from PC” > Choose the music files you want to create into ringtone and click “Next” to proceed.
 Step 3Create ringtone and add to iPhone/Android
Set the starting point and ending point by dragging the pointer. Alternatively, you are able to set the value of the starting and ending point.
The play button also lets you play the whole music files and the trimmed part.
Tick the box before “Add to device” and click “Generate” to start to create and add the ringtones to your iPhone or Android directly.
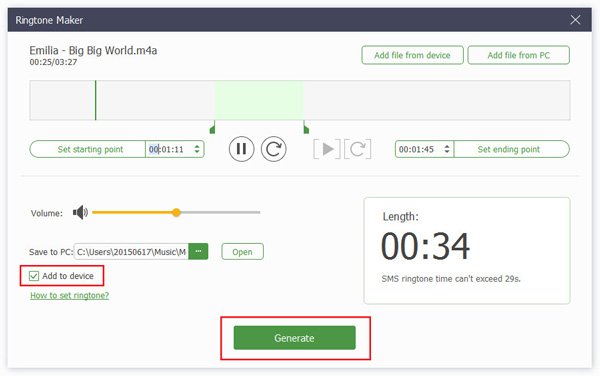
Note: The M4R ringtone length is not more than 40 seconds for iPhone, and no limit for MP3 tone on Android phone.
Certainly, you may say iTunes can also help you create ringtones. However, the process of syncing to iPhone is a little complicated. Those who tried that way can tell the truth exactly.
Conclusion
Nobody wants to clash with others, so does notification sound. You could change the alert tones via settings on iPhone and Android. For some apps, you are also given the options to custom the ringtones. For those third-party apps, you have to visit the apps themselves to make the notification sound changes. The last important tip is that you could also make the sounds for your notification easily with the software.
Now, it comes to your turn to tell your story.
Does this post solve your problem? What is your problem when changing the notification sound? Let me know by leaving your comments below.

