iPhone Disabled Connect to iTunes? Follow Us to Restore It
When you pick up your iPad and get ready to use it, only to see a message on the screen saying your iPad disabled connect to iTunes, it can be a moment of anxiety. It's often frustrating whether the device is locked because of frequent typing of the wrong password or for some other reason. Many users don't know how to restore the normal function of their devices, especially for fear of losing data or not being able to unlock it. Fortunately, solving this problem is not complicated. This article will guide you with effective unlocking methods to help you quickly resume regular use and avoid unnecessary trouble.
PAGE CONTENT:
Part 1. Why Is iPad Disabled Connect to iTunes
Before we get to the unlocking method, we first need to understand the prompts for why the iPad disabled connect to iTunes. Only by understanding the causes can we better prevent and solve the problem. Here are common causes to iPad or iPhone disabled connect to iTunes:
USB connection
When your iPhone not showing up in iTunes, the most common reason is a USB cable or port issue. This may be due to damaged data cables, poor USB port contact, or the USB port not supporting data transfer.
iTunes version
If you're using an older version of iTunes, you may not be able to recognize or connect to your iPad. Apple regularly updates iTunes to make sure it's compatible with the device.
Equipment system failure
If the iPad's operating system malfunctions or crashes, it could fail to connect to iTunes properly. For example, when an iPad has startup problems, or the system is stuck, iTunes may not recognize the device, causing it to fail to connect.
iTunes configuration Settings
If iTunes is not set up correctly, or certain features in iTunes are disabled, it may also cause the device to fail to connect. For example, firewalls or security software may prevent iTunes from communicating with the iPad properly, affecting the connection.
Recovery or DFU mode
Typically, you go into these modes to repair your device or do a restore, but if you don't do it properly, here's iTunes not recognizing iPhone.
After understanding these reasons, you can take targeted solutions to restore the standard connection between iPad and iTunes.
Part 2. How to Resolve Error When Connecting Devices to iTunes
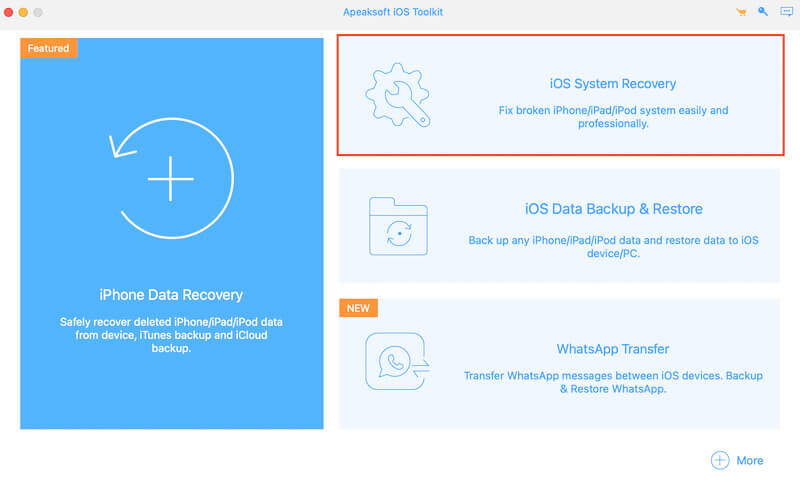
If you don't have time to go through all of the above reasons that may be causing your iPad disabled connect to iTunes, let's focus on a professional solution, Apeaksoft iOS System Recovery. It not only automatically solves the problem of connecting your device to iTunes but also effectively fixes other iOS system faults, providing a convenient and safe way to restore the normal function of your device quickly.
Professional tool to resolve errors when connecting devices to iTunes
- Solve connection problems, devices stuck, unable to start, and other iOS system failures in one click.
- The high success rate ensures the repair effect and returns your device to normal.
- 100% secure to ensure the integrity of user data.
- Compatible with iPad, iPhone, and other devices, supports all iOS versions.
Secure Download
Secure Download

Step 1. Click the above button to install the program, click to open and run it, and select the iOS System Recovery section on the main page.
Step 2. Using the original USB cable, connect the iPad to the computer and make sure the connection is stable. According to the system detection results, the Standard mode should be selected to ensure that no data is lost during the repair process.

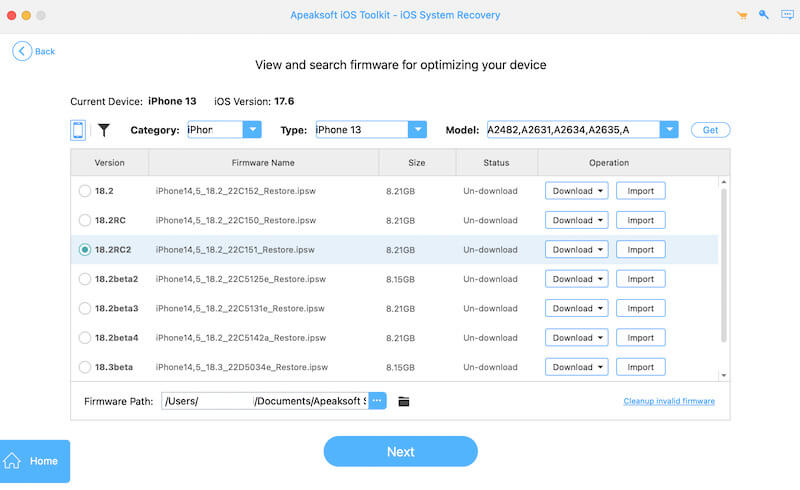
Step 3. Then click the Download button corresponding to your iPad's firmware package to ensure it is the latest version to improve the recovery success rate.
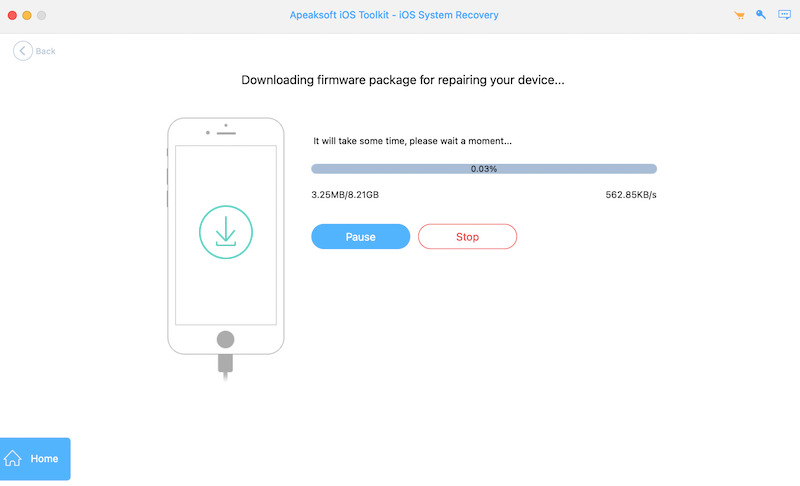
Step 4. When the download is complete, click the Recover button. The program will begin repairing your iPad system. During this process, ensure your iPad remains connected and you do nothing else. After the repair process, your iPad should connect to iTunes normally.
Part 3. How to Unlock iPad Disabled Connect to iTunes via Recovery Mode
If you prefer to use Apple's official approach, Recovery Mode is also a viable solution when your iPad disabled connect to iTunes. Before you begin, check that you have the latest version of iTunes. If you have an older version, it may affect the recovery process.
Step 1. First, you need to force the iPad into recovery mode. Different models have different operation methods:
iPad with Face ID:
Quickly press and release the volume up and volume down buttons, respectively. Then, press and hold the power button at the top until the recovery mode interface appears on the screen.
iPad with Home button:
Turn the iPad off. Hold down the Home button while you connect your iPad to your computer. Do not release it until the recovery mode screen is displayed.

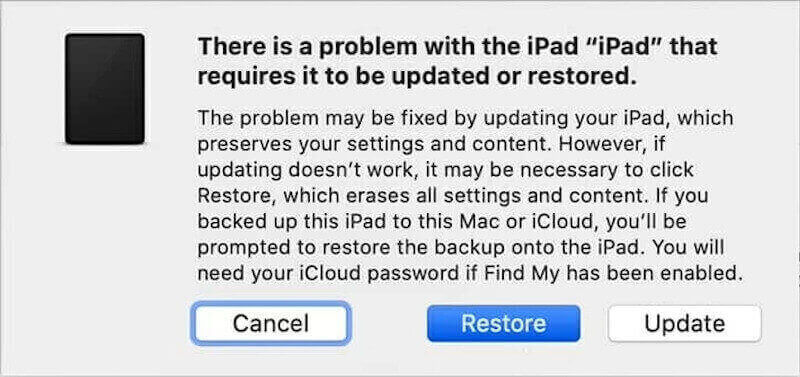
Step 2. After the successful connection, iTunes will automatically pop up a prompt to detect the iPad in recovery mode and provide the two options shown in the figure. Click Restore, and iTunes will download and install the latest iPad version, wiping all data and passwords from the device.
After restoring the iPad will automatically restart and enter the initial setting screen. At this point, you can reset your device or do iOS data recovery from an iCloud backup.
Part 4. Fix iPad Disabled Connect to iTunes by Wiping Data
If you're looking for another solution to iTunes not recognizing iPhone or iPad, simply erasing the device's data is the last viable option.
Erase Directly
If your iPad still works and you remember the passcode, you can erase the data directly from Settings.
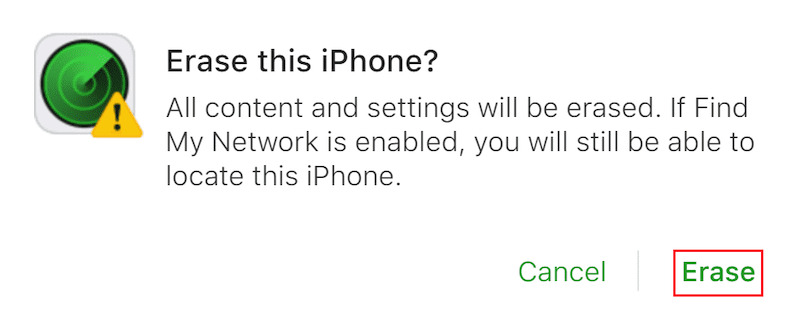
Step 1. Open the Settings app and go to General Options. Find the Reset button and click enter.
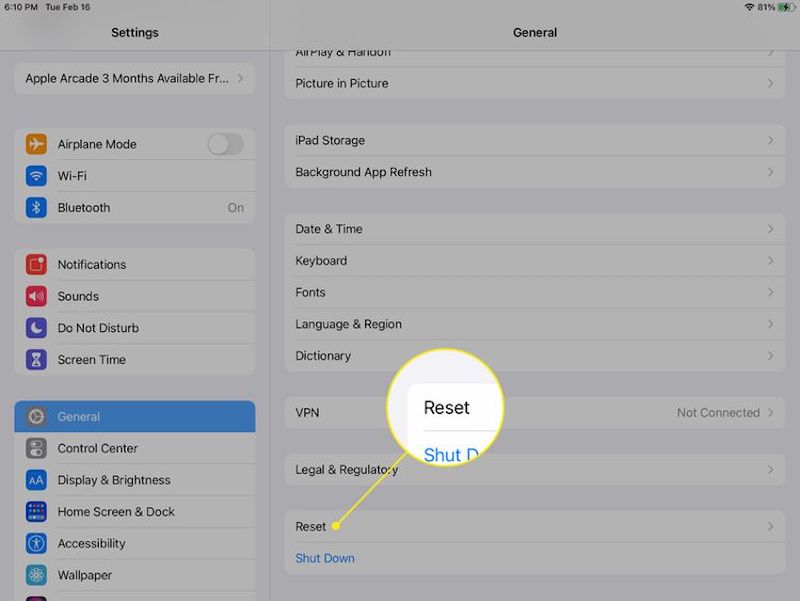
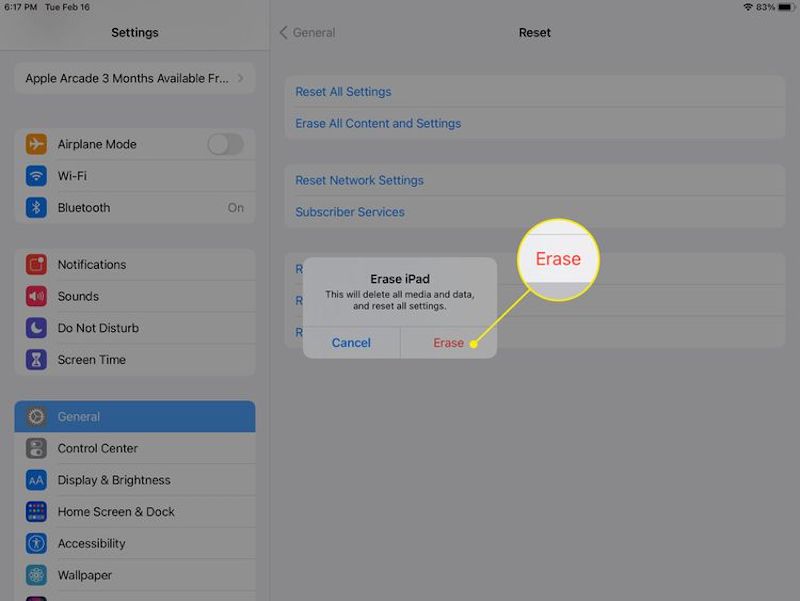
Step 2. Choose Erase All Content and Settings and click Continue.

Step 3. You may be asked to type your Apple ID password to confirm that you did it yourself. Finally, click the Erase button here, and the iPad will automatically restart in factory settings so you can reset the device or restore the backup.
iCloud
If you can't access your device, such as if it's disabled or you've forgotten iPhone password, you can use iCloud to erase data remotely.
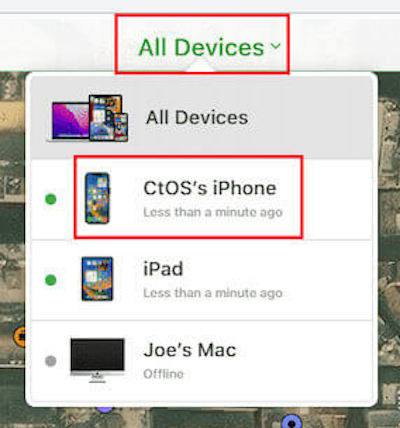
Step 1. Sign in to iCloud with your Apple ID. Go to the Find My page and select the iPhone or iPad you need to erase from the list of All Devices.
Step 2. Then tap the Erase iPhone option, and enter your Apple ID password for verification.
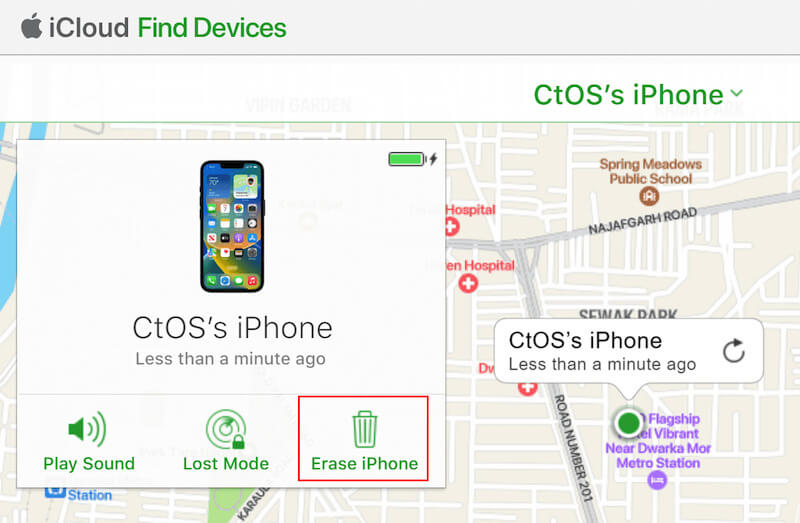
Step 3. After clicking the Erase button to confirm, iCloud will remotely erase all data on your iPad and revert to factory Settings. Once the device wipe is complete, you can reset your iPad.
Conclusion
Overall, the problem of an iPad or iPhone disabled connect to iTunes is not unsolvable. With many features built into the Apple system, you can effectively unlock your device and resume regular use. If you want to solve problems quickly and safely, Apeaksoft iOS System Recovery is recommended. Which approach do you prefer? If you have any questions, please leave them in the comments section, and let's discuss them!
Related Articles
If you encounter the error of connecting to the Apple ID server on your device, you will find our concrete troubleshooting helpful.
If you are experiencing problems with your iPhone not connecting to iTunes, you have come to the right place. This article will sort out 10 ways to help you.
One of the most annoying errors users encounter is cannot connect to App Store on iPhone and iPad. Here we will guide you to resolve the issue.
If you use the iTunes Store, you may have come across this error message that, cannot connect to iTunes Store. Learn how to solve this problem quickly.
