Many people are finding ways to remove audio from video, for they are not satisfied with the sound, or there is some noise in background.
Actually, the audio has great importance to video and can affect the quality of your video more or less.
Therefore, learning how to remove audio from video, such as remove background noise from video is very necessary.
Here we recommend the best solutions to you. In this guide, we will introduce 4 easy but professional ways to remove audio from MP4, MKV, AVI, MOV, FLV, SWF, WMV, etc. You can remove audio from video on Windows computer, Mac, or just online.

- Part 1: How to Remove Audio from Video on Windows and Mac (Easiest)
- Part 2: Remove Sound from Video on PC with Windows Movie Maker
- Part 3: Remove Audio from Video on Mac with iMovie
- Part 4: How to Remove Audio Track from Video Online
Part 1: How to Remove Audio from Video on Windows and Mac (Easiest)
The first way we want to recommend to you also is the easiest way. You can remove audio from video with a strongly recommended software called Video Converter Ultimate.

4,000,000+ Downloads
Remove audio track from video direclty.
Support audio removal from MP4, MOV, WMV, MKV, AVI, etc.
Change or add audio track (s) of video file.
Convert, edit and enhance video quality before removing.
Step 1. Download Video Converter Ultimate
First of all, you need to download Video Converter Ultimate to your computer. Then you can install this software according to the guide it gives you.
Step 2. Launch Video Converter Ultimate
After you are successfully finishing the installation, you are able to launch Video Converter Ultimate on your computer. And you can see the main interface as the next image shows to you.
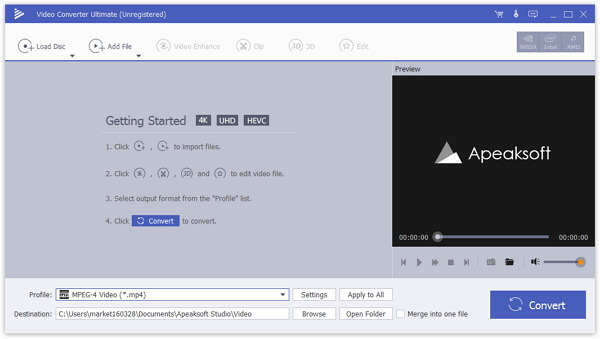
Step 3. Add video to the program
Now you can click Add File button, which is on the toolbar to add the video you want to remove audio from. When it is added, you can click the audio track button.
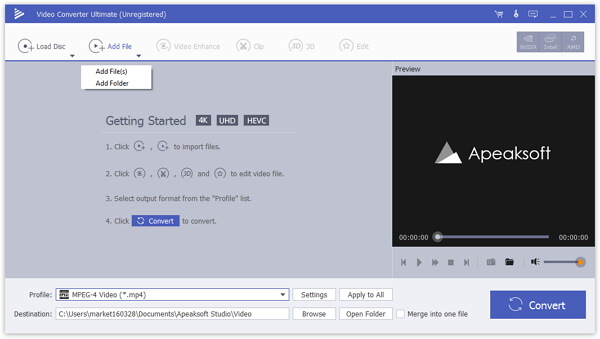
Step 4. Remove audio from video
Then find the current audio track from the video, and it provides you two options for audio processing. To remove sound from video, just remove the audio track from your video or mute video.
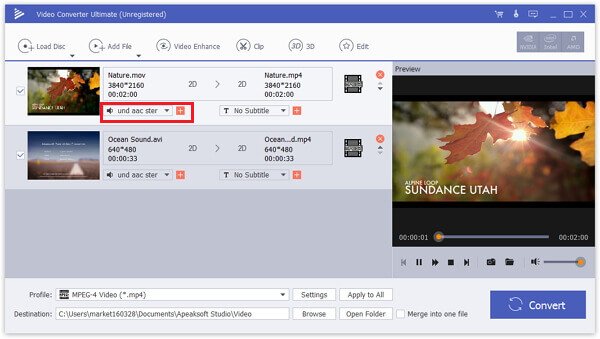
Step 5. Save your audio file to computer
Once you done everything, just choose the correct format and destination you want to save, and then click on Convert button to save the audio file. It takes no time to remove the audio and save the video file.
What is more important, you can also add your own audio track or external audio track with a different language to the video within the program. Video Converter Ultimate just provides the ultimate solution as for the case.
If you want to remove audio from video on iPhone or iPad, then you can transfer videos from iPhone/iPad to computer, and then put movies on iPad iPhone.
Part 2: Remove Sound from Video on PC with Windows Movie Maker
For Windows users, you can remove sound from video on your PC with Windows Movie Maker. It is a powerful feature specially for Windows which you can use to remove audio from MP4, MKV or other format videos. And the following steps will help you remove sound from video using Windows Movie Maker.
Step 1. Download and install Windows Movie Maker on your Windows computer and then launch it.
Step 2. Click on "add video and photos" in this program to import the video you want to remove sound from.
Step 3. Now click "File" and then "Save movie". Next scroll down to click on "Audio only".
Step 4. Then you need to rename the audio file and it will be saved in a default format.

Part 3: Remove Audio from Video on Mac with iMovie
The third way is particular for Mac users. If you are a Mac user, it is very easy for you to remove audio from video with iMovie. iMovie is a wonderful software which is developed by Apple and can help you remove background noise in a quick yet professional way. If you are Mac users and looking for the way to remove audio from video on Mac, just follow the next detailed steps.
Step 1. Launch iMovie on your Mac. (Click it there to get iMovie for Windows computer.)
Step 2. You can simply add the video you want to remove sound from by dragging and dropping it to the program timeline. Or you can click on File and then choose Add Files to load this video. Add the wrong video? Just delete video from iMovie.
Step 3. Now click on Settings option in the menu bar to view the Audio codec option.
Step 4. Then choose the Disable audio option and next you need to click on Apply to all. After you have done these things, click on OK.
Apart from the audio silence feature, you are able to apply its other effects like add transition effects, add text and captions into video, etc., on iMovie.
Step 5. In the last, you need to click on the Convert button to begin to remove audio from your MP4 video file.
After deleting the audio from the video, you are able to add another background music for the video easily.

Part 4: How to Remove Audio Track from Video Online
You can also remove audio track from MKV or MP4 file online. This way is very easy and convenient for you to follow. And here we recommend you an online website called AudioRemover to help you remove audio from video. But you only can load video file up to 500 MB in this website. You can also search for other online website to remove sound from video.
Step 1. Open your browser on your computer and then search www.audioremover.com.
Step 2. Now you can select video file and load it to this website by clicking Browse. Be attention you can only load the video file up to 500 MB.
Step 3. Simply click on Remove Audio and wait for this website to remove audio from video for you.

Similar software that can remove audio track from video is QuickTime Player, VLC, Premiere, etc. You can also try them.
Conclusion
In this article, we list 4 best ways for both Windows and Mac users to remove audio from video, as well as remove sound from video online, and with the best software we recommend to you. And we believe that you can get the skill of removing background noise from video after you read this useful article. If you like this article, just share it with your friends.

