Google Photos app is one of the most popular media manager on iPhone and Android device. Google introduced the artificial intelligent technology into the app, so it can automatically rotate your pictures if they are in the wrong orientation. When it comes to rotate a video in Google Photos, you can do it manually. Though the app just starts providing video editing tools, it does include the capacity to rotate videos. Read this article carefully and you can learn everything you should know about the feature.

- Part 1. Rotate a Video with Google Photos on iPhone and Android
- Part 2. What You Cannot Do When Rotating Videos in Google Photos
- Part 3. Best Alternative of Google Photos for Rotating Videos
- Part 4. FAQs of Rotating Video in Google Photos
Part 1. Rotate a Video with Google Photos on iPhone and Android
According a recent survey, Google Photos app is popular among both Android and iOS users. In fact, iPhone users are more likely to manage their photos and videos with Google Photos app. Fortunately, users can get the consistent experience in Google Photos on iPhone and Android device. The steps below are available to both iPhone and Android phone.
Step 1 Firstly, upload the video that you want to rotate to Google Photos app from your Camera Roll or Photo Gallery. Once you turn on the Back up & sync feature in Settings screen, your videos will go to Google Photos backup automatically.
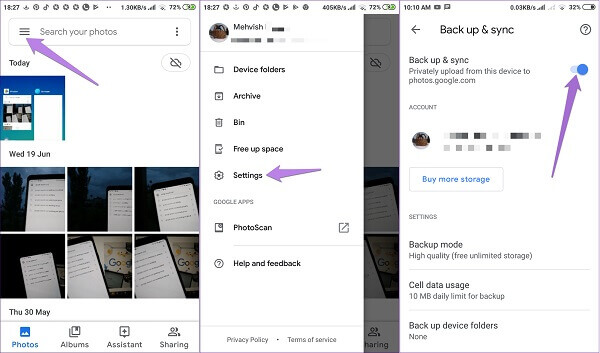
Tip: If the automatic backup feature is not working, go to Camera Roll or Photo Gallery on your handset, select the desired video, tap Share button and select Google Photos.
Step 2 Go back to the Photos tab in Google Photos to display all media files in your account and find the desired video. Tap the video to open it in the video player screen.
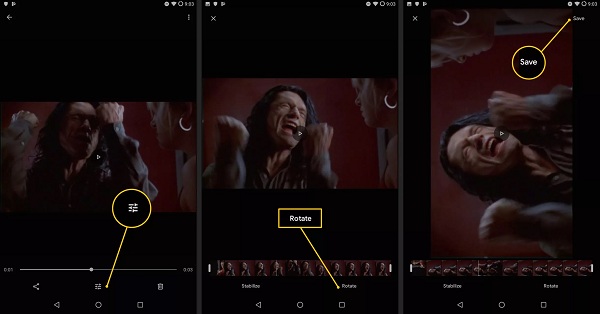
Step 3 Tap the Adjust button below the timeline and then touch the Rotate tool until the video turns to the way you want it to. After that, tap the Save button at the top right corner to save it to Google Photos.
You may in interested in rotating videos on iPhone directly.
Part 2. What You Cannot Do When Rotating Videos in Google Photos
There are somethings you should know when using the video rotating in Google Photos:
- This feature is only available to videos uploaded to your Google Photos app. You cannot use it for local videos in your Camera Roll or Photo Gallery. Similarly, you cannot rotate videos downloaded from the internet before backing up to Google Photos.
- Google Photos cannot rotate multiple videos in batch. In another world, it can only process one video per time. If you have a lot of videos need in the wrong orientation, you’d better look for a more powerful tool.
- Google Photos cannot rotate videos clockwise. One time you tap the Rotate button in Google Photos, the video will be rotated 90 degree counterclockwise. You are allowed to tap the Rotate button for multiple times.
Part 3. Best Alternative of Google Photos for Rotating Videos
As mentioned previously, Google Photos cannot batch rotate photos on mobile devices. Alternatively, Apeaksoft Video Converter Ultimate can meet your need. Moreover, it offers more bonus tools, such as:
Apeaksoft Video Converter Ultimate
- Rotate multiple videos at the same time using multi-thread.
- Support almost all video formats, such as MP4, AVI, MKV, etc.
- Keep the original video and audio quality while editing.
- Integrate extensive video editing tools, like crop, clip, and more.
- Transcode videos for playback on iPhone and Android device.
Briefly speaking, Video Converter Ultimate is the fast way to rotate videos without Google Photos on computer.
How to Rotate Videos without Google Photos
Step 1 Get the best alternative to Google Photos
Firstly, download the videos you want to rotate from Google Photos to your computer. Download and install the best video editor software on your machine and launch it from your desktop. Click the Add File menu on the top ribbon and import all videos.
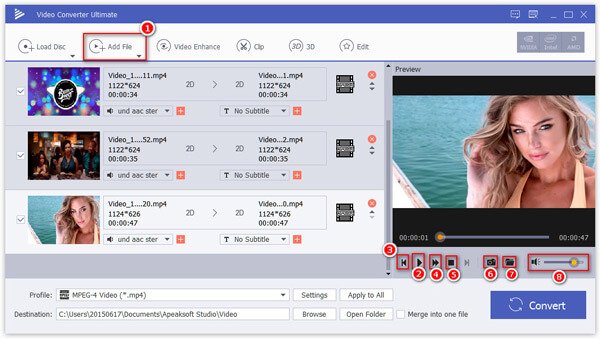
Step 2 Rotate photos in batch
Click the Edit menu on the top ribbon to open the built-in video editor. Then go to the Rotate tab and you will get all options for rotating videos downloaded from Google Photos. Press the Rotate 90 clockwise or Rotate 90 counterclockwise option until your videos looks proper. Click the Apply button to confirm it. Then do the same to other videos.
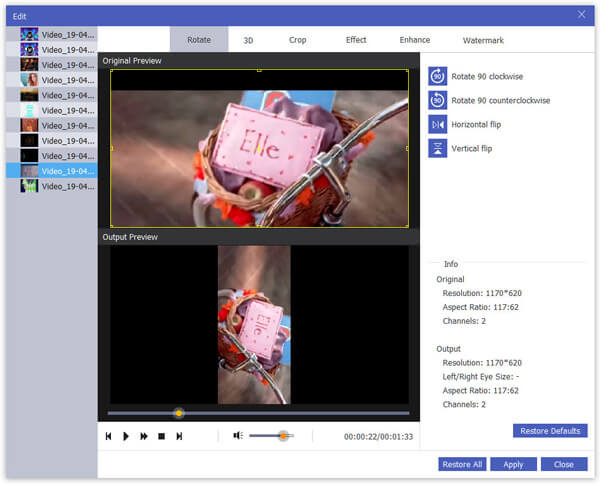
Step 3 Export rotated photos
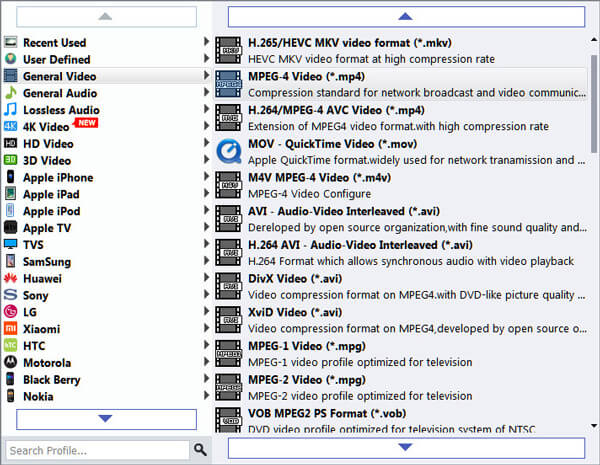
After rotating all videos, go back to the main interface. Select a proper video format or target device from the Profile drop-down option. Then set the destination directory by hitting the Browse button. Finally, click on the Convert button to save rotated videos to your computer. Next, you can upload them to Google Photos and access the videos on any device.
Part 4: FAQs of Rotating Video in Google Photos
How do you make a video 180 degrees in Google Photos?
Once you reach the video player screen in Google Photos, tap the Adjust button, and press Rotate twice. Then you video will be rotated in 180 degrees in Google Photos app.
Can you rotate a video in Google Drive?
No, you cannot get any video or photo editing tools in Google Drive. Alternatively, Google Photos has become an independent service for media file management. You can rotate a video in Google Photos app. The good news is that the photos uploaded to Google Drive will go to Google Photos automatically.
How do I change a video from portrait to landscape?
If a video was captured in portrait and your phone was tilted to landscape, you are able to rotate it in Google Photos app. However, if you shot the video in portrait mode and it filmed that way, you have to use a movie editor, such as Windows Movie Maker or iMovie.
Conclusion
This guide shows you how to rotate a video in Google Photos on iPhone and Android phone. Since Google Photos becomes increasingly popular, Google introduced more and more features into the service including some basic video editing tools. Now, you should understand how to do it. However, we suggest you try Apeaksoft Video Converter Ultimate to batch process your videos. More questions? Please leave a message below this post.


