If you zoom in a digital photo far enough, you will see it is like a mosaic formed by small tiles, which in photography are called pixels. The amount of pixels determines your image resolution, quality, and file size. Sometimes, you have to resize image pixels. To get better quality, for example, you can increase pixels on your photo. When posting a photo on the web, you’d better reduce the pixels of the photo. This guide shows you the easiest methods to get the job done.
- Part 1. How to Increase Image Pixels Online
- Part 2. How to Resize Image Pixels on a Desktop
- Part 3. FAQs about How to Change Pixels of Image
Part 1. What Is iPhone Safe Mode
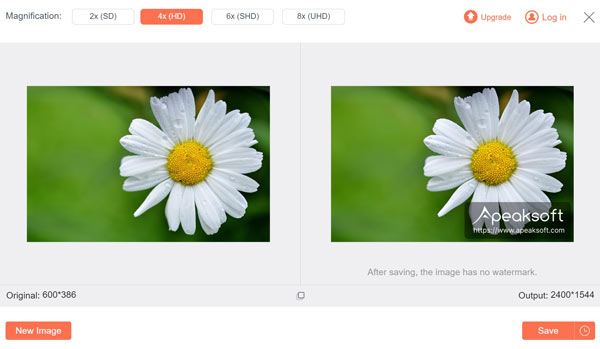
The easiest way to enhance photo quality is a good image pixel resizer online, such as Apeaksoft Free Image Upscaler. Unlike other online photo editors, this app is completely free of charge. It won’t ask you to view ads or sign up with your personal information.
 Recommendation
 - Increase pixels on photos online.
- Free to use without any restrictions.
- Support popular image formats.
- Preview the output before download.
Here are the steps to increase image pixels online for free:
Step 1Access the best online image pixel resizer in a web browser.

Step 2AClick the Upload your photo button and open the desired image from your hard disk. Then choose an appropriate preset next to Magnification.

Step 3View the effect in the Output panel. If you are satisfied, click on the Save button to download the result.
Part 2. How to Resize Image Pixels on a Desktop
Compared to online apps, desktop image pixel resizers are stable. Plus, they do not need an internet connection when working. We demonstrate three ways to do the job on Windows and Mac below.
How to Resize Image Pixel with MS Paint
MS Paint is the built-in photo editor on Windows 11/10/8/7 and earlier. Many people believe it is too simple to retouch their photos. In fact, it is enough to resize image pixels on your PC if you do not need advanced features.

Step 1Locate the image that you want to edit in an Explorer Window, right-click on it, choose Open with, and select Paint.
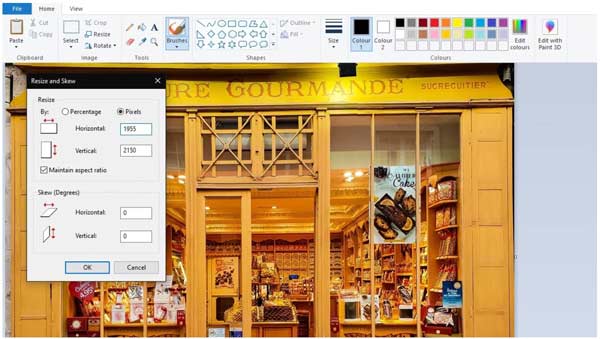
Step 2Press the Resize menu in the Image panel on the top menu bar. That will open the Resize and Skew dialog.
Step 3Select Pixels under the Resize section. If you do not want to distort the image, check the box next to Maintain aspect ratio. Enter the new size in the Horizontal or Vertical box. Then the other option will change accordingly.
Step 4Click the OK button to confirm changing pixels on the photo. Then export the resized photo in the File menu.
How to Change Image Pixels Using Mac Preview
Preview is the built-in photo editor on Mac OS X. In other words, you can change image pixels using the app without installing anything on your computer. It allows you to either increase or reduce image quickly.

Step 1Find the target image in the Finder app, and double-click on it to open the image in the Preview app. If Preview is not the default photo viewer on your Mac, right-click the image, and open it with Preview.
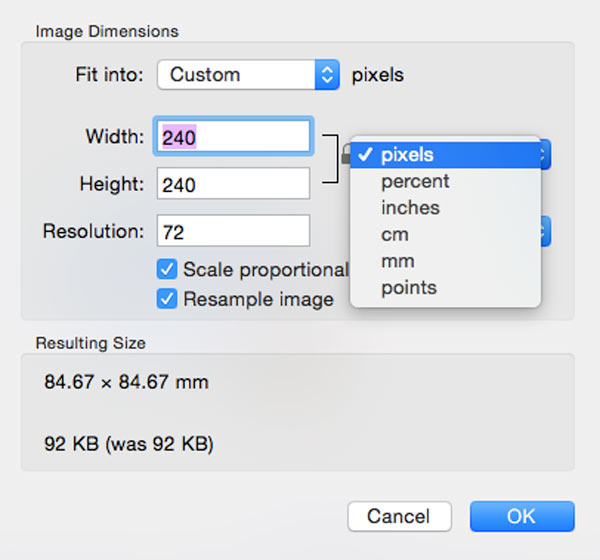
Step 2Click the Edit button with a Pen icon on the top toolbar. That will expand the photo editor bar. Then click the Resize icon. Or go to the Tools menu on the top menu bar, and choose Adjust Size.
Step 3Make sure to lock the aspect ratio if you want to keep the original ratio between the width and height. Pull down the unit option, and choose pixels.
Step 4Reset the Width or Height option based on your needs. Hit the OK button to confirm the changes. Then save the image.
How to Change Pixels of an Image by Photoshop
As a professional photo editor, Adobe Photoshop is widely used among studios and photographers. Changing the pixels of an image is just a basic feature in the software. Here are the steps:

Step 1Open an image in your Photoshop.
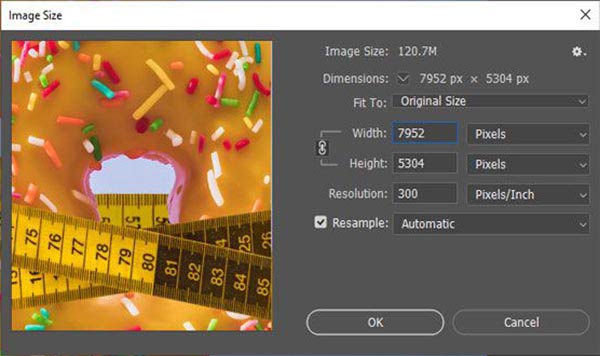
Step 2Go to the Image menu on the top ribbon, and choose Image Size to launch the Image Size dialog.
Step 3Click the link icon for Width and Height to lock the aspect ratio. Pull down the option next to the Width box, and choose Pixels. Then change the value of Width according to your needs.
Step 4Hit the OK button to confirm the changes once you are satisfied. Next, go to the File menu on the menu bar, and choose Save As. Enter a filename, select the destination folder, and choose a proper image format. Finally, save the result.
Part 3. FAQs about How to Change Pixels of Image
Is bigger or smaller pixel size better?
In theory, having more smaller pixels is better than having fewer large pixels. A small pixel captures fewer photons and thus the image includes more noise. In other words, smaller pixels produce better image quality.
What is the best image format for resizing?
The most common image formats include JPEG, PNG, GIF, and more. Since the PNG format can hold 24 bits per pixel as well as an RGB color palette. It is considered the best image format for resizing and editing.
Is pixels the same as resolution?
You can measure resolution in three different ways, sample per inch, pixel per inch, or dots per inch. They are different but they are related. Pixel is the smallest element in a digital image while resolution is the number of horizontal and vertical pixels in an image.
Conclusion
This guide has explained how to change the pixels of a photo online and on your desktop. The preinstalled photo editors, MS Paint and Preview, are the easiest options to modify image pixels on Windows and Mac OS X. Adobe Photoshop is the professional option to do the job. Apeaksoft Free Image Upscaler is a portable way to increase image pixels. If you have other questions about this topic, please feel free to leave a message below.


