Cropping an image is a way to cut out the edges of an image and remove unwanted parts. The resulting image becomes smaller and may have a new aspect ratio without distortion. That removes irrelevant content from an image and lets others focus on the main subject. Plus, that meets the rules of social media and speeds up image upload while maintaining the content. This tutorial demonstrates the easiest methods to get the job done.

- Part 1. How to Crop an Image Online
- Part 2. How to Crop an Image on Your Desktop
- Part 3. How to Crop a Picture from Photos on iPhone
- Part 4. FAQs about How to Crop a Picture
Part 1. How to Crop an Image Online
Compared to desktop software, online photo editors are more portable and convenient. You can access them with an internet connection and process your images on any device. Apeaksoft Free Background Eraser, for example, is one of the best options to crop images online. It won't ask you to install anything on your hard disk or sign up with your personal information. The web app supports popular image formats, like JPG, JPEG, PNG, and GIF. As its name indicates, the app is completely free of charge. Another advantage is the built-in AI, which protects the image quality as much as possible.
Step 1 Access https://www.apeaksoft.com/background-eraser/ in a web browser. It is available to almost all browsers.
Step 2 Click the Upload your photo button to upload an image from your computer. Or drag and drop it into the dotted box directly.

Step 3 Then go to the Edit tab from the left sidebar, and choose the Crop tool on the top ribbon. Move the cropping box until you get the desired result. Once you are satisfied, click the Download button to download the cropped image.

Part 2. How to Crop an Image on Your Desktop
Way 1: How to Crop an Image on Mac with Preview
The Preview app is the default photo editor for macOS. Although it just includes the basic photo editing features, it is enough to crop an image on Mac. The app is preinstalled on every Mac computer and laptop.
Step 1 Find the target image in the Finder app, right-click on it, and open it in the Preview app. If Preview is your default image editor, double-click the image to open it in Preview.
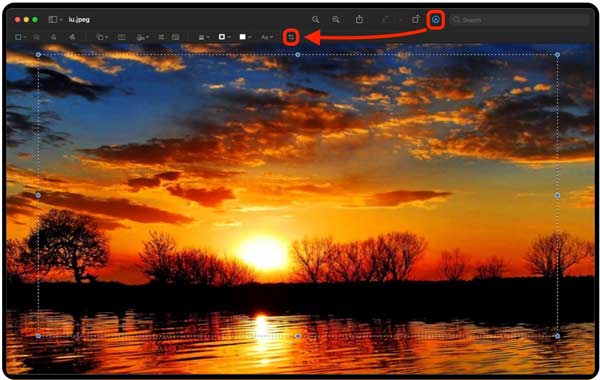
Step 2 Press the Markup button on the top ribbon to expand the toolbar.
Step 3 Click the right top point of the area that you want to keep, and drag your mouse to enclose the entire selected area.
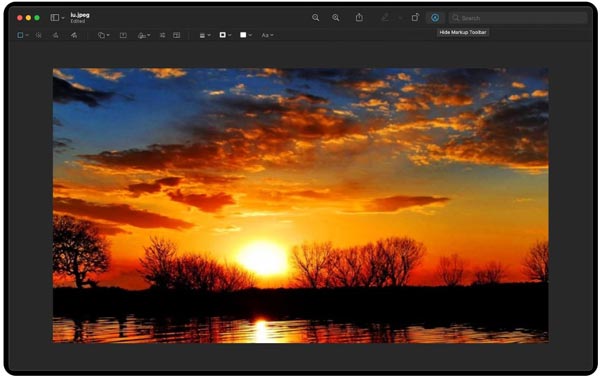
Step 4 ess the Crop button on the toolbar to crop the image on Mac immediately. Then save the result as a new image or replace the original image.
Way 2: How to Crop a Picture on PC Using MS Paint
MS Paint is the built-in photo editor on PCs. It lets you resize and crop a picture on PCs without installing any software. Therefore, it is the easiest way to reduce the dimensions of images on Windows 11/10/8/7 quickly.
Step 1 Right-click on an image in an Explorer window, choose Open with, and select Paint.
Step 2 Click the Select button on the top menu bar. If you need to select a regular area, choose Rectangular selection, then click and drag your cursor over the desired area. To select an irregular area, choose Free-form selection, and draw around the desired area.
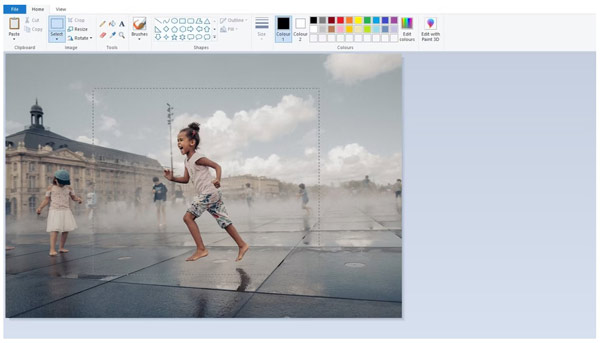
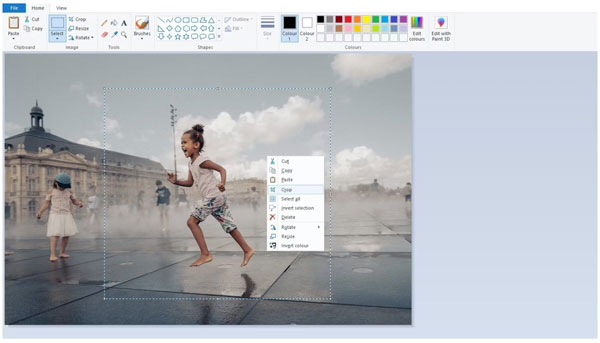
Step 3 Click the Crop button in the Image panel on the top ribbon. Or right-click on the selected area, and choose Crop on the context menu.
Step 4 Finally, go to the File menu, choose Save as, and pick an appropriate image format. Then enter a filename, select a location folder, and hit the Save button.
Way 3: How to Crop a Photo with Adobe Photoshop
It is difficult to crop an image into a square in MS Paint. Fortunately, you can do it with Photoshop quickly. As a professional photo editor, it's already installed on many people's desktops.
Step 1 Open a picture in your Photoshop.
Step 2 Choose the Crop tool on the left toolbar, and you will see an overlay dividing the image into thirds.
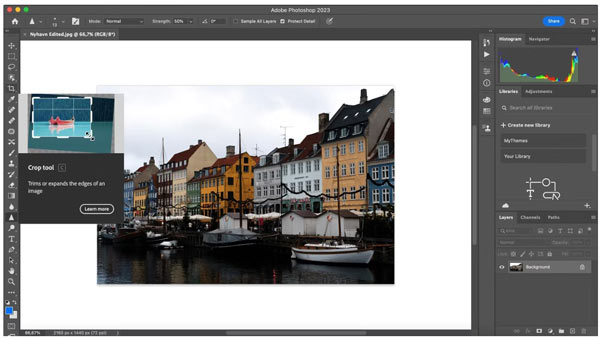
Step 3 Drag the corner handles around the part that you want to keep. You can drag the corner handles to adjust the selection. The grid overlay lets you crop the picture precisely.
Tip: If you want to cut the picture into a square, hold down the Shift button while dragging your cursor.
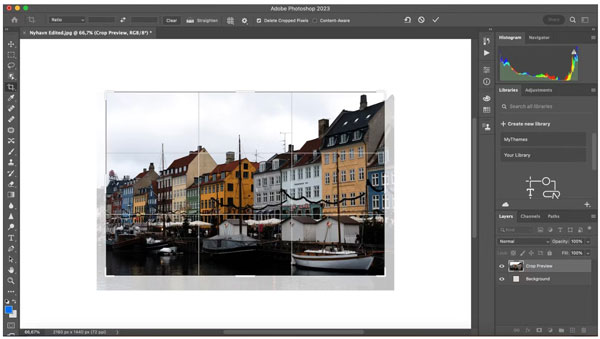
Step 4 Finalize your selection by pressing the Enter or Return key on your keyboard to confirm the action. Then save the smaller image.
Also learn:Part 3. How to Crop a Picture from Photos on iPhone
To help users conveniently use their iPhones and iPads, Apple added lots of features to iOS. The photo editor in your Photos app, for example, enables you to crop photos on your iPhone quickly. That makes it the easiest way to do the job on your iPhone or iPad.
Step 1 Run the Photos app from your home screen, find the desired photo, and tap the thumbnail to open it.

Step 2 Zoom in the desired amount, and tap the Crop button on the top of your screen on iOS 17 or above, and you will see the cropping box. If you want to change the aspect ratio, long-press the Crop button, and choose your favorite one.
For iOS 16 or earlier, tap the Edit button on the top right corner, and choose Crop at the bottom to display the cropping box.
Step 3 Move the edges of the cropping box until you select the area that you wish to keep.

Step 4 At last, tap the Done button on the top of iOS 17 or above, or the bottom right corner of iOS 16 or earlier. That will save the original version of the photo.
Part 4. FAQs about How to Crop a Picture
Does cropping photos reduce quality?
Yes. When you crop an image, you are essentially losing specific pixels. Those pixels are tiny building blocks that make up your photo. The more you remove, the more you are chiseling away from the overall quality. Nevertheless, a few photo editors can enhance image quality during the process.
Is it better to zoom in or crop a photo?
Zooming is changing the length of your photo. It gives you more details of the photo, but won't modify the dimensions. Cropping an image means trimming parts of the image away to make it smaller. However, it won't show you more details. Whether you zoom or crop a photo depends on your purpose.
Will cropping affect JPEG?
Yes, image cropping can affect the resolution and quality of a digital photo. When you crop a photo, you are effectively reducing its pixel dimensions. That leads to a decrease in the overall image quality if significant portions are removed.
Conclusion
This guide has demonstrated five ways to image crop on Windows, Mac, and iPhone. So that you can remove unwanted parts and create smaller images. You can pick an appropriate tool according to your situation. Apeaksoft Free Background Eraser, for example, is the easiest way to produce smaller images online for free. If you have other questions about this topic, please contact us by leaving a message below.


