How to Delete Messages on iPhone in Five Easy Methods
iPhone users can talk through iMessage conveniently for free using the network. Therefore, we need to know how to delete messages on iPhones to protect our privacy and organize our iPhone data. In this article, you will learn how to delete one message, multiple messages, and delete message conversations on your iPhone. We also provide a solution for permanently erasing iPhone messages so they can't be recovered.
PAGE CONTENT:
Part 1: Delete One or Multiple Messages
The first method is to solve the problem of how to delete text messages individually or multiply from one conversation. We can delete some messages to hide certain information and protect our privacy or just erase some messages we feel uncomfortable with. Please note that this method only deletes messages on your own iPhone. If you wonder how to delete text messages on iPhone for both sides, you must get the other side's device or hack into their iCloud and delete them. Or withdraw the message you sent within 2 minutes.
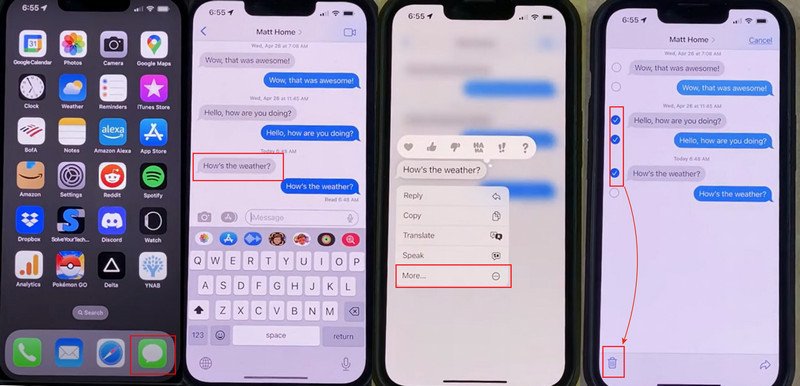
Step 1. Open the Messages app and tap the conversation that contains messages you want to delete.
Step 2. Tap and hold one message you want to delete, and tap More.
Step 3. Now tap the trash button on the bottom and delete it. If there are other messages you want to delete in this conversation, check them and tap Delete X Messages.
Part 2: Delete One Message Conversation
Maybe you want to delete all messages from one company that has sent you many verification codes that have already expired. If you wonder how to delete all messages on your iPhone from one conversation, why not just delete this conversation directly? In this method, let me show you how to delete one message conversation with an easy gesture. Similarly, this method will only wipe the message on your own iPhone but not the other side's device.
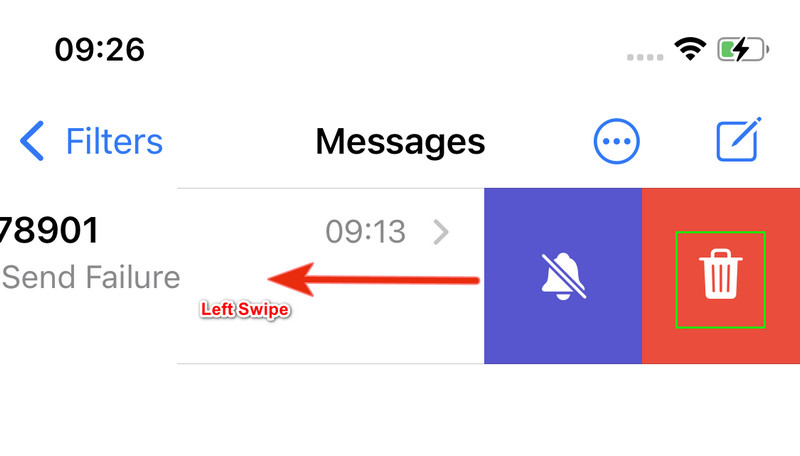
Step 1. Open the Message app on your iPhone. Press one conversation and left-swipe.
Step 2. You will see a red trash button; tap it, and you can delete this conversation.
Part 3: Delete Multiple Message Conversations
If you haven't cleared your message for a long time, there must be many messages similar to those mentioned in Part 2. Now, what you need is to delete multiple conversations at one time since deleting them one by one is a little bit time-consuming. This method is also super easy. However, be careful before you confirm to delete them because you may accidentally delete conversations you want to keep without knowing. Over 30 days, recovering deleted messages on an iPhone would be hard.
Let's see how to delete iMessage conversations in bulk.
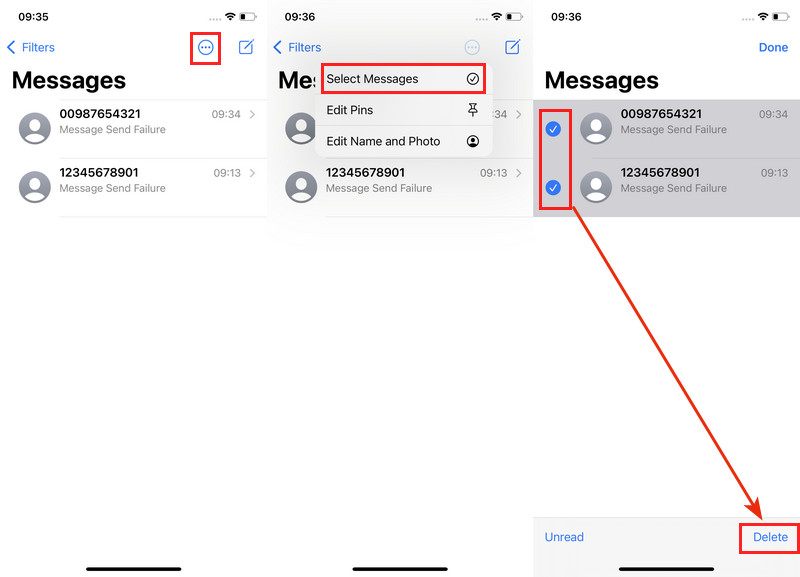
Step 1. Open Message on your iPhone.
Step 2. Tap the three dots button on the top. Then, tap Select Message.
Step 3. Check the boxes before the conversations you want to delete, and then tap Delete at the bottom. Tap Delete again to confirm, and tap Done on the top.
All the three above methods just delete messages from your iPhone temporarily. You can also recover them through iCloud or iPhone Message Recently Delete. Even after 30 days and your iPhone says messages are permanently deleted, they can be easily recovered because those messages are not really erased and hidden somewhere on your iPhone.
Therefore, if you wonder how to delete iPhone messages so that they can never be recovered, read Part 4 and find the solution.
Part 4: Delete iPhone Message to Unrecoverable
Generally, when we delete messages normally on an iPhone, even permanently, they are not really deleted but kept somewhere on the iPhone. If we want to delete them thoroughly from your iPhone, you must use a third-party program. Apeaksoft iPhone Eraser is here to help you.
It is a professional erasing tool that deletes data thoroughly from the iPhone. With its advanced algorithm, it erases personal data, bank information and passwords, and no one can recover them again. Don't worry if you can't operate this program properly because you can easily delete your iPhone message without technical skills.
Besides, this program also clears the iPhone cache automatically to free up iPhone storage and speed up the iPhone. You can also multiply uninstall apps on your iPhone using this program.
The Best Tool to Delete iPhone Message to Unrecoverable
- Delete iPhone messages so that they are unrecoverable.
- Erase personal data, bank information, passwords and other sensitive data.
- Has an intuitive interface and is easy to use.
- Support the latest iOS system.
Secure Download
Secure Download

Let's see how do you erase text messages on an iPhone.
Step 1. Download this program from the above two links. Double-click to install and launch it. Then, connect your iPhone to this computer using a USB cable. You should tap the Trust button on your iPhone so that your computer can detect your iPhone successfully.
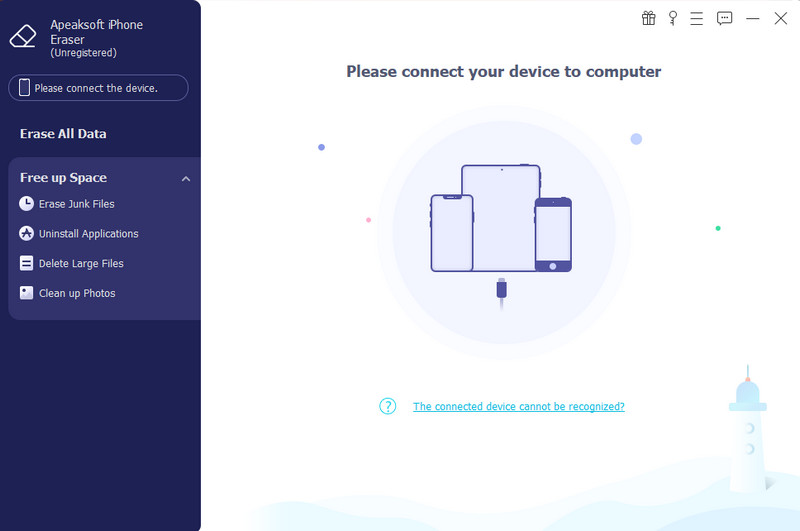
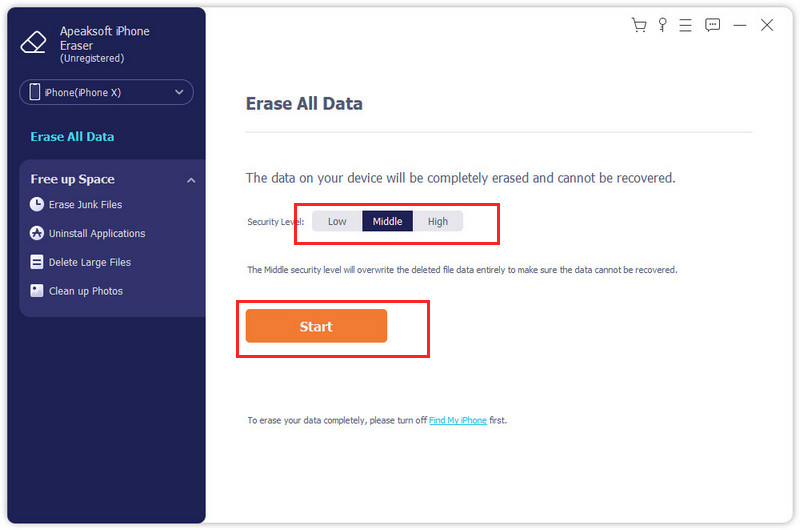
Step 2. Click the Erase All Data tab on the left. Here, you can erase data from three levels: low, middle, and high.
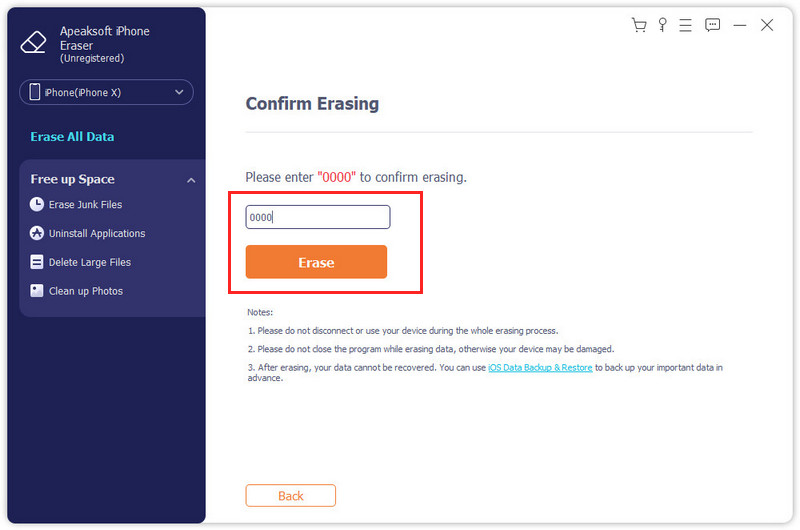
Step 3. After choosing one level, input 0000 to confirm the erasing. In a few minutes, your message will be erased to unrecoverable.
Tips:
1. To make sure your iPhone or iPad can be detected by your Windows or Mac computer successfully, install the latest version of iTunes on your computer in advance. Please note you should launch the program first and then connect your iPhone to ensure quick detection.
2. When selecting levels, lower levels offer faster speeds, while higher levels make message recovery more difficult. The middle level is enough to erase messages so they can never be recovered.
Part 5: Set Automatically Deleting of iPhone Message
We receive numerous messages every day, most of which are valid and useful for a limited time. The iPhone will accumulate many useless messages if we don't clear them regularly. Therefore, we can set automatic deletion on iPhone messages, and the iPhone will clear messages that are being kept longer than a specific time.
Please note that regular deletion will clear all messages indiscriminately, including verification code messages and your personal messages. Therefore, be careful to set auto-deleting or backup important messages before auto-deleting.
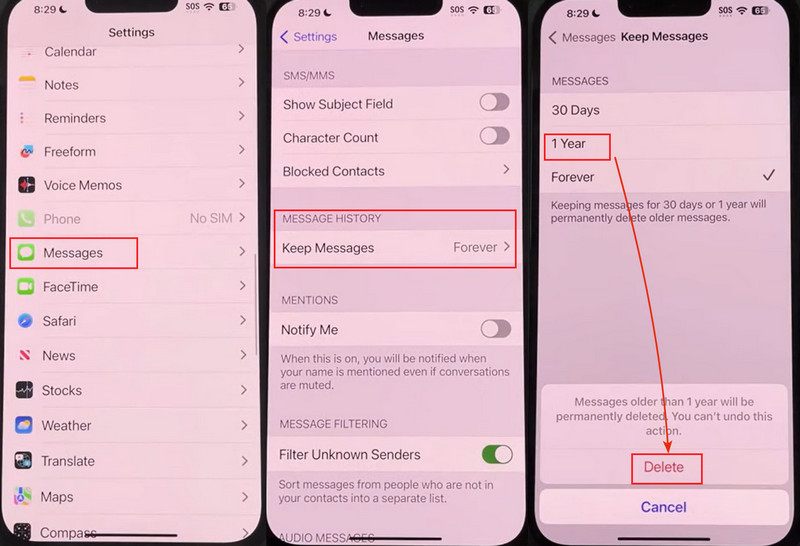
Step 1. Open the Settings app on your iPhone, scroll down and tap Messages.
Step 2. Navigate to Message History and tap Keep Message.
Step 3. Select from keep message for 30 days and 1 Year and confirm deleting.
Conclusion
This article introduces five ways to solve the problem: how to delete text messages on iPhone.
Three of them are normal deleting operations: delete one and multiple messages and conversations. The other fourth method teaches you how to permanently delete text messages so anyone can never recover them using a professional erasing tool, Apeaksoft iPhone Eraser. The last one illustrates how to set the automatic deletion of messages and helps you organize your messages.
Related Articles
Here are four effective ways to recover deleted text messages and iMessages from your iPad with or without a backup file.
Read the 2024 guide here and get 4 efficient ways to recover deleted iMessages and text messages with or without backup oniPhone 16/15/14/X, etc.
It's not easy to recover deleted messages in Slack because there's no direct data recovery. But some Slack message features can make it.
Time to organize contacts! Here are six ways to delete contacts. If you want to delete multiple contacts at one time on your iPhone, don't miss this post.

