How to Delete Google Chrome Browser Cache - Step by Step
Google Chrome, one of the most wAidely used browsers all over the world, provides users with a variety of useful functions. However, the more you use it, the more cache it will produce. This tutorial will show you how to delete the cache in Chrome and provide several tips for regular maintenance.
PAGE CONTENT:
Part 1. Importance of Clearing Cache in Browsers
There are four main reasons for clearing the browser cache in Chrome.
First, to improve the browsing experience. Although the browser cache can speed up the loading time of a page, it will slow down the loading speed the other way around if not cleared for a long time.
Second, to solve the web display problem. Sometimes, the old cache expires due to the page updates, which is no longer applicable. For example, we may see a disordered layout, unloadable pictures and other display problems.
Third, to release storage space. Too much cache accumulation means too much of a burden on your device, thus preventing you from saving other useful files.
Lastly, to protect user privacy. The cache may contain important information like login credentials. Regular cleaning of the cache can reduce the risk of privacy breaches.
Part 2. Step-by-Step Guide to Clear Cache in Chrome
So, do you know how to clear the cache in Chrome? In this section, we will teach you three practical ways to delete all the cache in Chrome.
1. Accessing settings
The most regular way to clear cache and cookies in Chrome is to adjust its settings. Here, we provide a step-by-step guide:
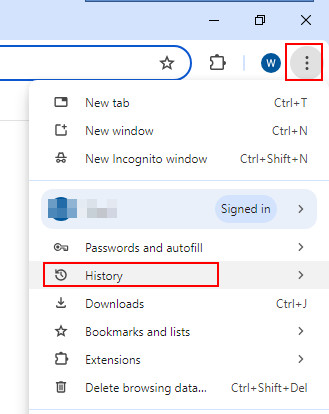
Step 1. Open Chrome on your computer first. Then go to the top-right corner to find a three-dot pattern, click it and choose History in the following list.
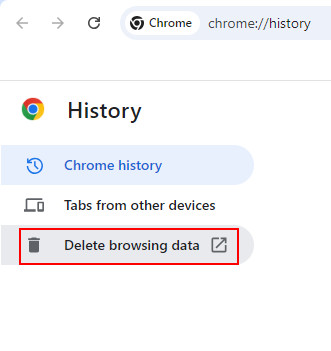
Step 2. Select Delete browsing data under the History column.
Step 3. Turn to the Advanced option, change the Time range to All time, and check the first four boxes to clear browsing history, download history, cookies and other site data, and cached images and files. After selection, tap Delete data in the bottom right corner of the pop-up.
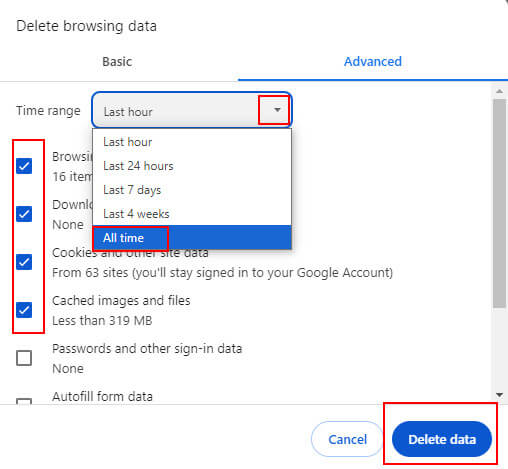
You can also reach the page above by pressing your keyboard shortcut Ctrl + Shift + Delete simultaneously.
2. Using a desktop shortcut
You can also clear Google cache via the desktop shortcut on Windows. The steps are below:
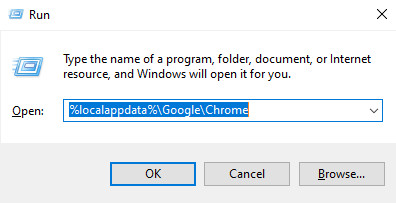
Step 1. Press Windows + R on your keyboard simultaneously.
Step 2. Then you will see a Run box pop up.
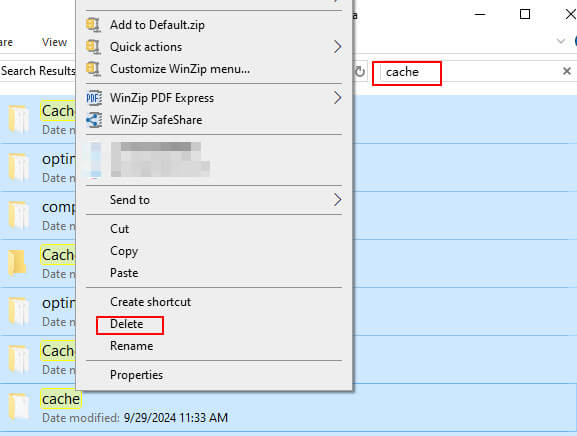
Input %localappdata%\Google\Chrome\User Data in the address bar. Then, on the pop-up page, input cache in the search box on the upper right.
Step 3. Press Ctrl + A to choose all the cache files, then right-click one of them and select Delete to clear them.
3. Using Apeaksoft Mac Cleaner
If you are a Mac user, we highly recommend Apeaksoft Mac Cleaner to you.
As a cleaning tool tailored for Mac, Apeaksoft Mac Cleaner has many features:
• Besides cache, you can also clear other junk files like iPhoto junk, email junk, iTunes junk, large & old files, etc., via it.
• The whole process can be completed in a short time.
• It is 100% secure when speeding up Mac.
• You can easily see how much each file type takes of your CPU, memory, and disk space.
• It has many other functions for Mac, including but not limited to uninstalling apps, optimizing Mac, managing files, cleaning privacy information, hiding files, and decompressing RAP files.
Download button:
Secure Download
Here are the steps to erase the cache in Chrome:
Step 1. Download Apeaksoft Mac Cleaner on your Mac by clicking the button above. Open it in Finder after installation.
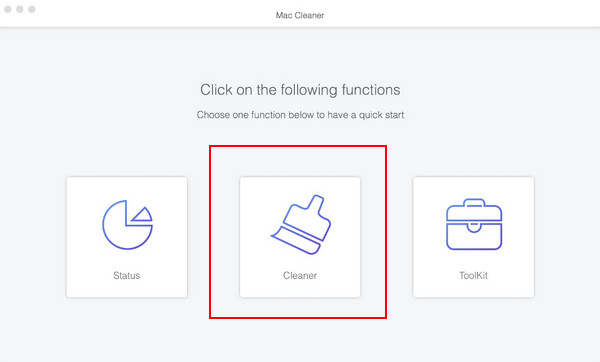
Step 2. Choose the middle function - Cleaner on the main interface.
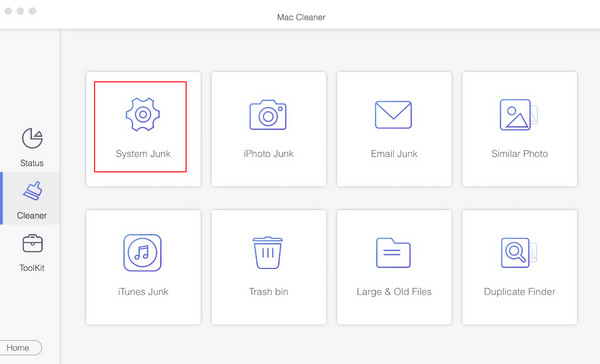
Then, choose the System Junk option on the following page.
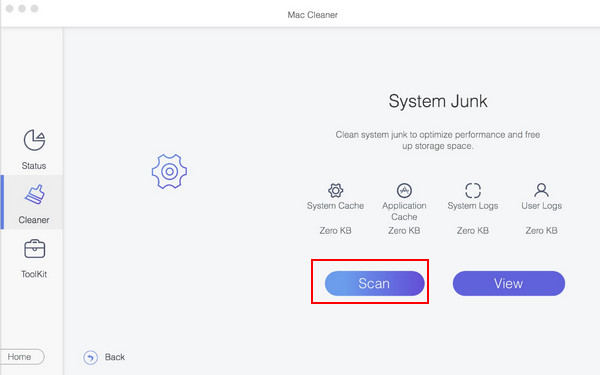
Tap Scan first to allow the app to scan your Mac for junk files. Then click View after scanning.
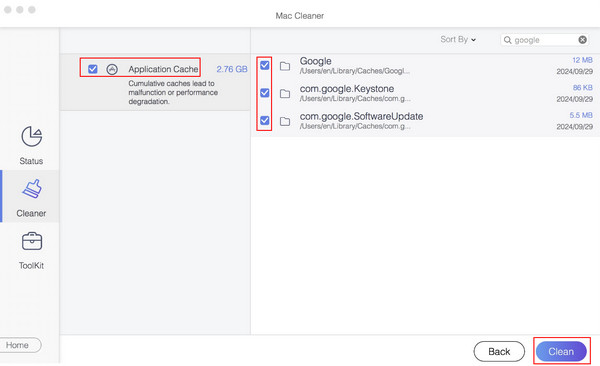
Step 3. Only check Application Cache in the left navigation bar, then input google in the search box in the upper-right corner and check all the related files. Tap Clean at the low-right corner.
Part 3. Clearing the Cache for a Specific Site
Sometimes, you don't want to clear the cache in Chrome for the whole part but for a specific site. Here, we will show you how to remove cache from Chrome for a specific site via settings, address bar, and dev tools.
Using Chrome Settings
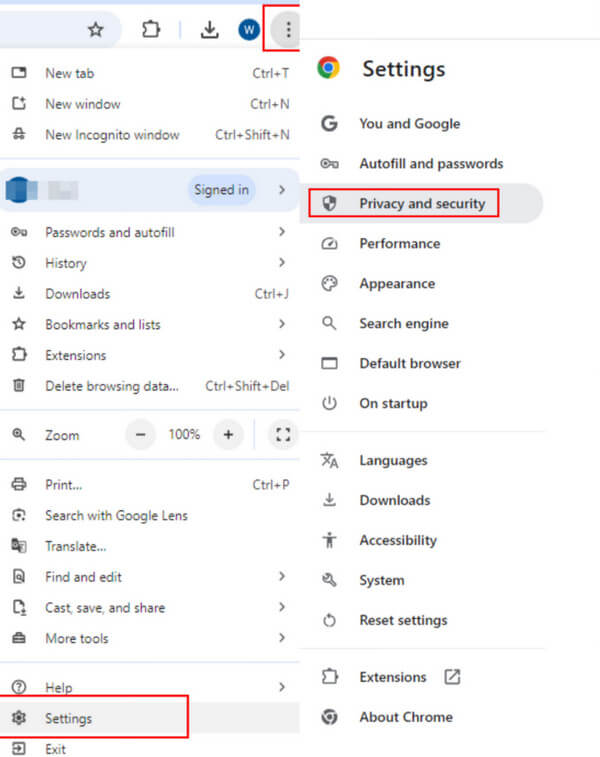
Step 1. Click the three dots in the upper right of the page and choose Settings in the following list. Then, select the Privacy and security option.
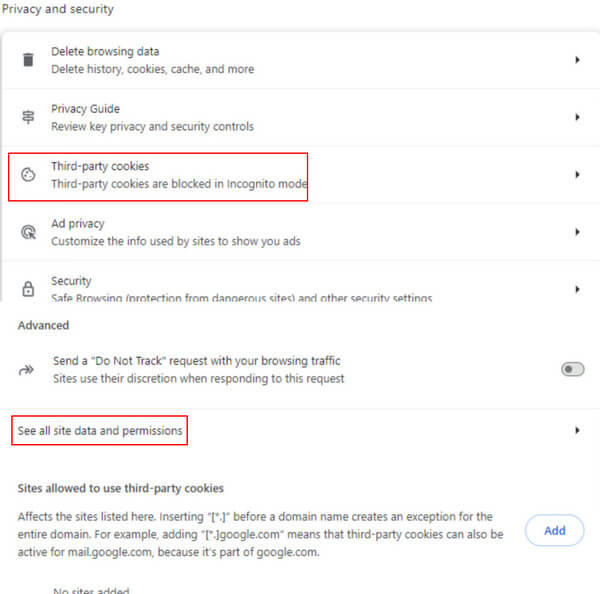
Step 2. Choose Third-party cookies and find See all site data and permissions on the following page.
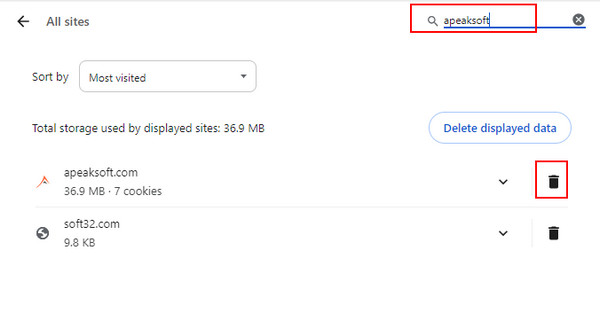
Step 3. You can type the domain name in the search box, and the related data will be displayed below. Click the dustbin-like pattern to delete them.
Editing from the address bar
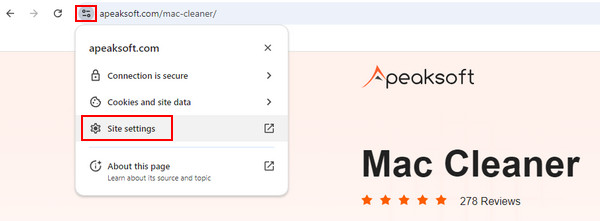
Step 1. Tap the pattern before the web link in the URL bar. Select Site settings in the following list.
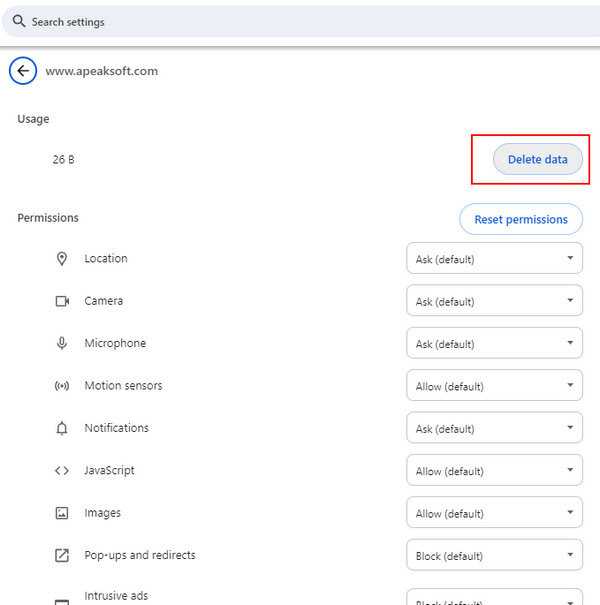
Step 2. Press the Delete data button on the right of the pop-up to finish your task.
Via the Developer Tools
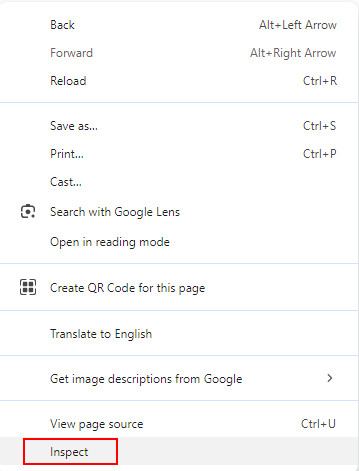
Step 1. Open the website, right-click on the page and choose Inspect (the last one) to open the Chrome Developer Tools. Or you can just press F12 on your keyboard.
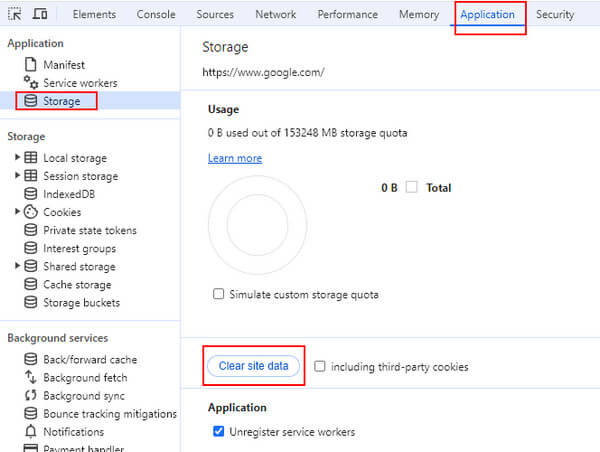
Step 2. Choose Application in the top navigation bar, then pick Storage on the left. Go to the right page to find Clear site data in blue and click it.
Part 4. Get Rid of the Chrome Cache Once and for All with One Click
If you find it troublesome to clear the browser cache Chrome every once in a while specifically, you can try the following 2 methods for convenience. But they are only advisable under certain circumstances.
Turning on auto-delete mode
Step 1. Go to the three-dot menu in the top right to choose settings and then select Privacy and security.
Step 2. Go to the right side and choose Site settings.
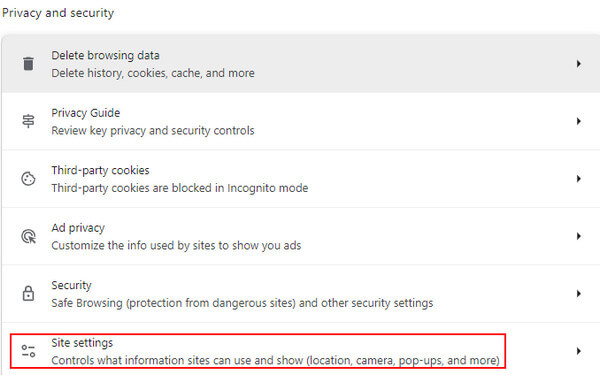
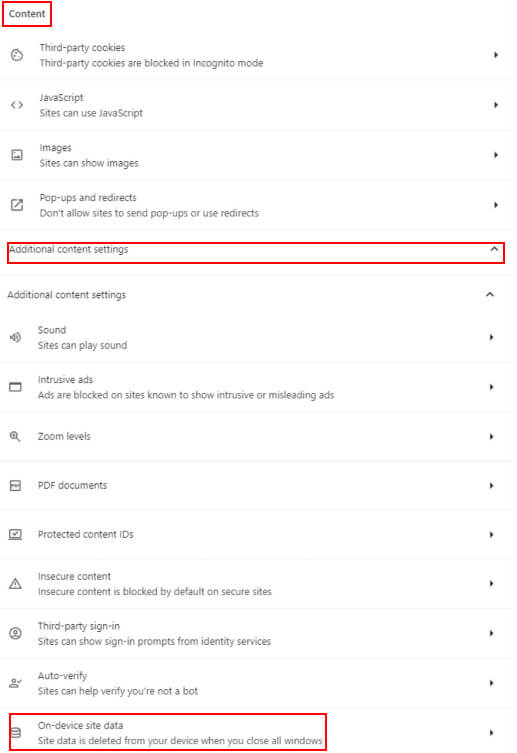
Step 3. Locate the Content bar, turn on Additional content settings, and scroll down to select On-device site data.
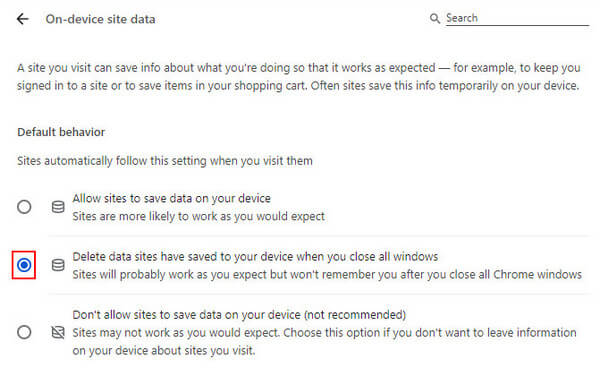
Step 4. Check Delete data sites have saved to your device when you close all windows on the following page.
Using Incognito Mode
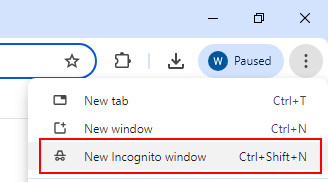
You can also get rid of the cache by using Chrome incognito mode. Within this mode, you will not leave any browsing data, including browsing history, cookies and site cache.
To open your Chrome incognito mode, you can go to the upper right corner to click the three-dot menu and choose New Incognito Window in the following list.
If you browse an important document in private mode and forget to save it accidentally, there are solutions to see Incognito history on your computer.
Part 5. Tips for Regular Maintenance
1. Back up important data in advance.
2. Avoid deleting system files by mistake.
3. Shut down the running application.
4. Be cautious when you choose Mac cleaners.
5. Keep a moderate cleaning frequency.
Conclusion
How to delete the browser cache in Chrome? Now you have the answer. Hope you will find the most suitable way to erase cache in Chrome.
Related Articles
How do you clear cache and cookies on Mac Safari? How to clear history in Safari? You can get a detailed guide to clear Safari cache on Mac from this post.
Chrome can restore bookmarks you've deleted, but not make it easy. Here is a step-by-step guide to tell you how to restore Chrome bookmarks effectively.
If you have no idea how to uninstall Google Chrome completely, you can follow the tutorial to remove or reset Google Chrome browser on any device easily.
How do you clear the cache on Firefox? Should you often clear it? Come and learn how to delete cache files in Firefox and when to clear them.

