Why you cannot delete songs from iTunes? Even if you have updated to the latest iTunes version, you should find the delete option is not available. When you need to manage the music files on iPhone via iTunes, the deleted music from a playlist will be back, or you cannot remove music from iTunes without any reason. Here you should learn more about the reasons and the troubleshooting from the article.

- Part 1: Why Cannot Delete Songs from iTunes
- Part 2: The Ultimate Guide to Delete Songs from iTunes
- Part 3: How to Remove Songs from iTunes on PC/Mac
- Part 4: How to Delete Songs from iTunes on iOS/Android
- Part 5: FAQs about Deleting Songs from iTunes
Part 1: Why Cannot Delete Songs from iTunes
If you have already turned on the automatic sync feature, you won't delete the music files. Here are the other reasons that you cannot delete the songs from iTunes for your reference.
1. Make sure you have been not selected a song in a Smart Playlist with the Live Updating feature enabled. When iTunes is automatic syncing your songs it does not allow you to erase your songs.
2. If the iOS devices have been not updated to the latest version, there might be some bugs that need to be fixed. Just check the iOS version from the iPhone or iPad beforehand.
3. When the resource you get for these songs is not from iTunes, you cannot delete them on iTunes directly.
4. Corrupt iTunes library or components should be another reason for iTunes not allowing you to erase songs on your iPhone.
Part 2: The Ultimate Guide to Delete Songs from iTunes
Apeaksoft iPhone Eraser provides an easy method to erase all data, wipe out the junk files, uninstall apps, delete large files, and clean up photos. If you cannot delete music from iTunes directly, it can wipe out the iTunes cache without removing all files. Moreover, you can delete iTunes library throughly.

4,000,000+ Downloads
Remove all data and settings from iPhone permanently and securely.
Delete the iTunes caches and remove songs from iTunes completely.
Provide 3 different erasing modes to clear up the data of your iOS device.
Export the desired music to your computer before cleaning up the music.
How to Delete Songs from iTunes via iPhone Eraser
Step 1 Install Apeaksoft iPhone Eraser on your computer. Plug your iPhone into the computer via the original Lightning cable. Launch the program and it will automatically recognize your iPhone.
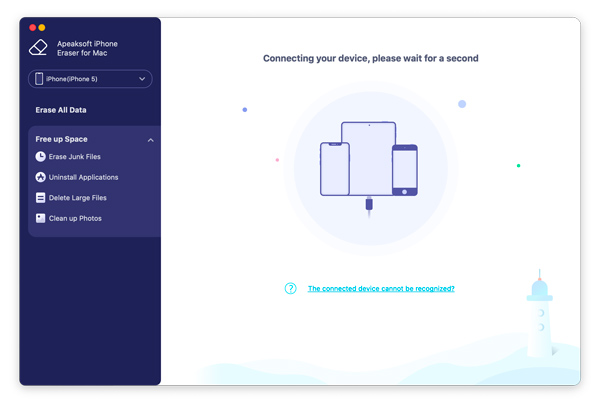
Step 2 Choose the Free up Space option on the left pane click the Quick Scan button. Select the Erase Junk Files option, which will start scanning your iPhone automatically to detect the iTunes caches.
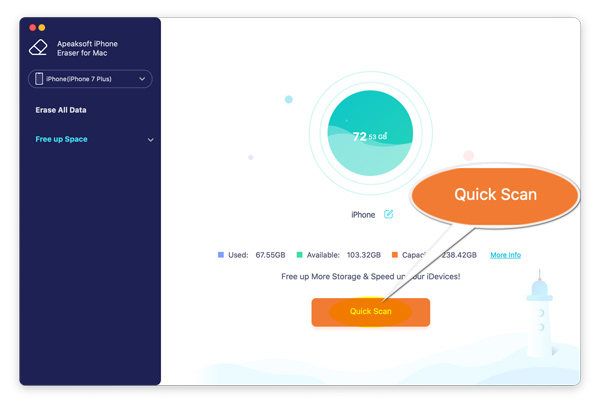
Step 3 Check the iTunes Cache option to check more specific data files, such as the songs from iTunes. Select the songs you want to delete and click Erase to clean them up.
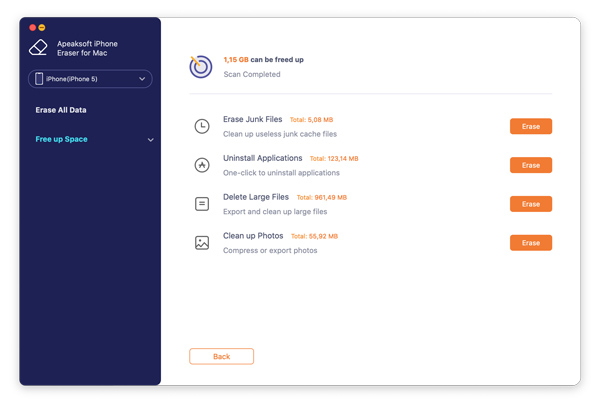
If you still cannot delete songs from iTunes, you can simply turn your iPhone into a new one via the Erase All Data option. It will remove all content and settings, including the music files.
Part 3: How to Remove Songs from iTunes on PC/Mac
iTunes works on Windows and Mac, which you easily store and organize your music files the way you want. If you do not want to keep some music tracks in iTunes, or need to fix the problem that cannot delete songs from iTunes, here are the steps you should follow.
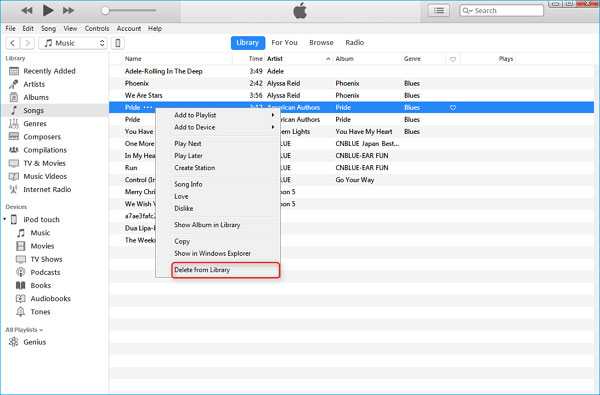
Step 1 Launch iTunes on your MacBook or Windows PC. Click on the drop-down menu at the top and select the Music option. After that, choose the Library menu in the navigation bar.
Step 2 Click on the Songs button, which is in the left sidebar to view all of your songs stored in iTunes. Choose the music files you cannot delete from iTunes on the right-hand side pane.

Step 3 Select the song and right-click on it. From the available options, click the Delete from Library option. There is a prompt asking if you would like to delete the song. Click on the Remove Song button.
Part 4: How to Delete Songs from iTunes on iOS Devices
If you want to delete songs from iTunes on your iPhone or iPad, you can still access the music tracks without storing them on your device. Moreover, you can also download the songs to your iPhone again when the music track is bought from iTunes.
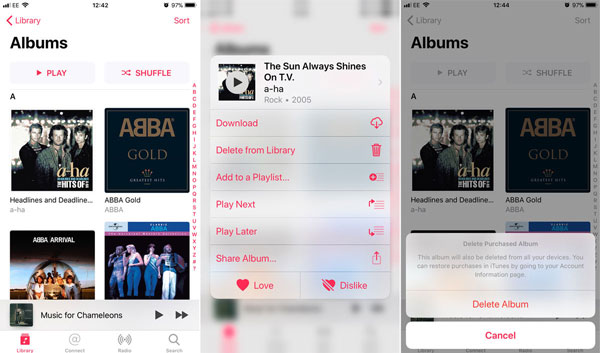
Step 1Open the Music app on your iPhone/iPad. From the Library tab, you can find out songs or albums you want to delete. It enables you to delete the music files in batches.
Step 2Force-press the song/album you want to delete, you can get options through the drop-down menu. Choose the Delete from Library option to delete the music files from iTunes.
Step 3Tap on the Remove button or the Remove Download button from the menu that appears. If you don't have the music backed up, you might lose the album or have to re-import it to iTunes.
Part 5: FAQs about Deleting Songs from iTunes
What are the differences between Delete from Library and Remove Downloads?
Delete from Library will remove the playlist itself from your media library. Remove Downloads will leave the playlist in your library, but remove the music files associated with the songs in that playlist from your phone, thus freeing up storage.
What happens to your iPhone when deleting Music?
When you delete your songs directly on iTunes, it erases the music from all devices on which your iTunes is connected. If you have deleted the songs from your iPhone without syncing, the deletion results appear immediately. The results will appear on your iPhone when you will sync next time.
Is it possible to access the music you have deleted?
Yes. Any music tracks you buy from the iTunes store are always available to download again if you delete them. Moreover, you can subscribe to iTunes Match and Apple Music to download any track from your collection and listen to it whenever you want.
Conclusion
If you cannot delete songs from iTunes, here are some workable methods you can follow. Just check the built-in methods to clean up the music files on PC, Mac, or iOS devices. Apeaksoft iPhone Eraser is the ultimate way to remove the iTunes caches and clean up your iPhone. Click to check the best iTunes library cleaner.

