Your iPhone is a versatile companion, assisting you in navigation and offering various location-based services. It also maintains a record of your location history, which can be beneficial for activities like tracking your movements or improving location-based app services.
In this comprehensive guide, we will explore what iPhone location history is, how to check your location history, and how to protect your privacy while doing so. And we will recommend you an excellent program – iPhone Location Changer. Whether you are curious about your past whereabouts or concerned about your data privacy, this guide will provide you with the information you need.

- Part 1: What is iPhone Location History
- Part 2: Methods for Checking iPhone Location History
- Part 3: Simulate Location without Data Leakage
- Part 4: FAQs: How to Check Location History on iPhone
Part 1: What is iPhone Location History?
iPhone location history refers to the recorded data of your past locations and movements. It includes a chronological list of places you've visited and is gathered from various sources, including GPS, Wi-Fi networks, and cell tower information. This data can be utilized by apps and services to provide location-based recommendations, such as restaurant suggestions, weather updates, or fitness tracking.
Part 2: Methods for Checking iPhone Location History
Solution 1: Access Location History by Native iOS Settings
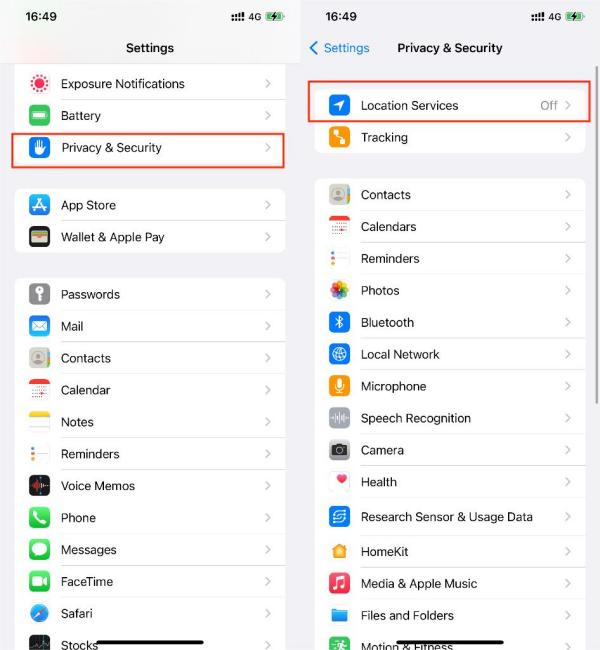
Step 1 Open your iPhone's settings. Scroll down and tap on Privacy. Select Location Services.
Step 2 Scroll down to find System Services at the bottom. Tap on Significant Locations. You might be prompted to authenticate with Face ID, Touch ID, or your passcode.
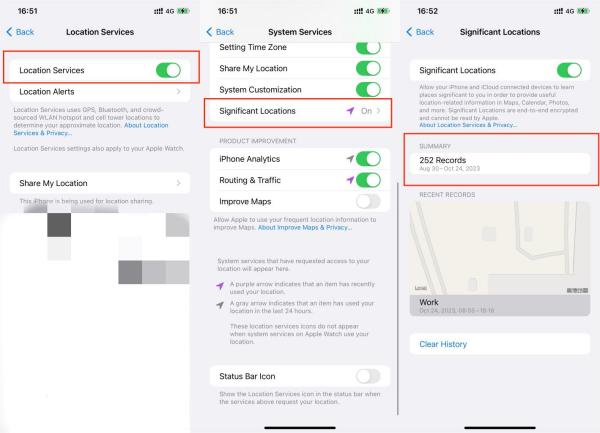
Here, you'll find a list of frequently visited places along with a map. You can tap on each entry to see more details about your visits.
Solution 2: Find Location History in Google Maps
Google Maps can also be a valuable tool for checking your location history, especially if you use it for navigation.
Step 1Open the Google MapsUnlock your iPhone and locate the Google Maps app on your home screen. The app icon features a colorful map pin.
Step 2Access your Google accountIn the top right corner of the Google Maps app, you'll see your profile picture or initial. Tap on it to access your Google account settings. Inside your Google account settings, you'll find a list of options related to your Google Maps usage. Look for Your data in Maps and turn on location history. This is where you can manage and explore data related to your location history.
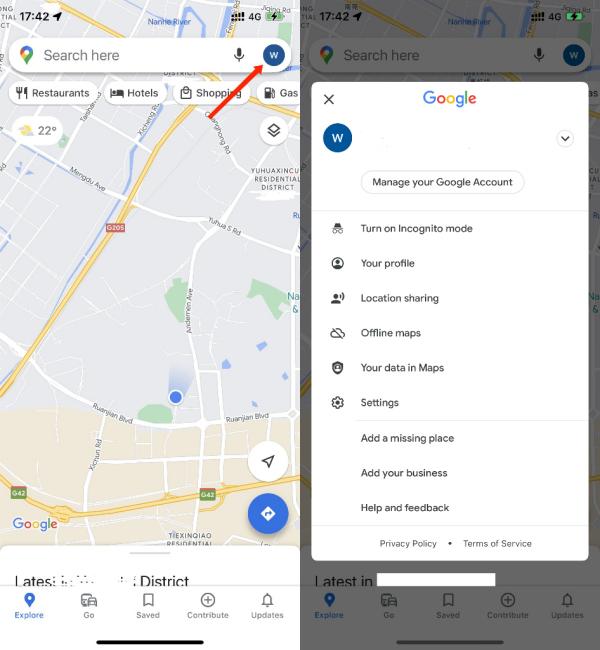 Step 3Explore your Location History with Timeline
Within Your data in Maps, you'll find various features related to your map activity and location history. To view your location history, tap on the Timeline option. Your location history will now be displayed in a user-friendly interface. You can explore your past locations in two main formats: a map view and a chronological list. The map will show the specific places you've visited, while the chronological list provides a detailed record of your movements over time.
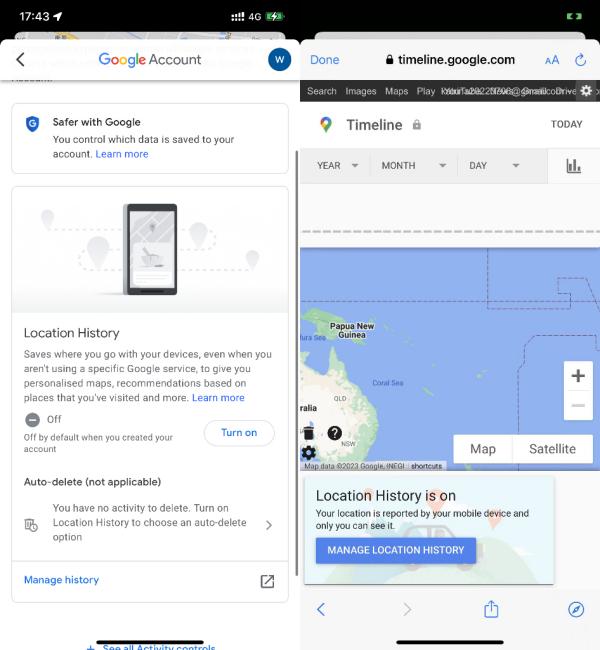 Step 4Customize and Interact
Google Maps allows you to interact with your location history. You can customize the date range to see specific periods, view location details, or even edit location entries if needed. This feature is handy for retracing your steps, recalling memorable journeys, or simply satisfying your curiosity about where you've been.
By following these steps, you can make the most of Google Maps' location history feature to track your past adventures and gain valuable insights into your travel patterns.
Part 3: Simulate Location without Data Leakage
There are tools available that can help you simulate your iPhone's location without compromising your privacy. Apeaksoft iPhone Location Changer is the most suitable app for you. You follow the steps below to use this powerful app. Here's how you can do it without leaking your real location.
Step 1 Download and install the program from our website. Connect your iPhone to your computer using a USB cable. After setting your preferred location, tap the Start to Modify or a similar option, depending on the app's interface. This will initiate the location-changing process.
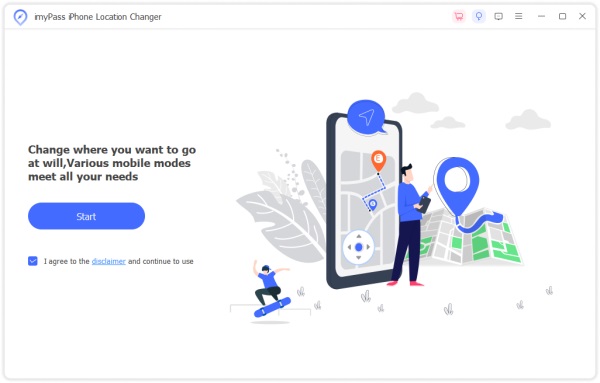
Permission Settings: Ensure that the app has the necessary permissions to function correctly. These permissions might include access to your location services and possibly other settings based on the app's requirements.
Step 2 Select Modify Location. Simulate your iPhone's location. Once you have Apeaksoft iPhone Location Changer set up, you can start simulating your iPhone's location. Here's how:
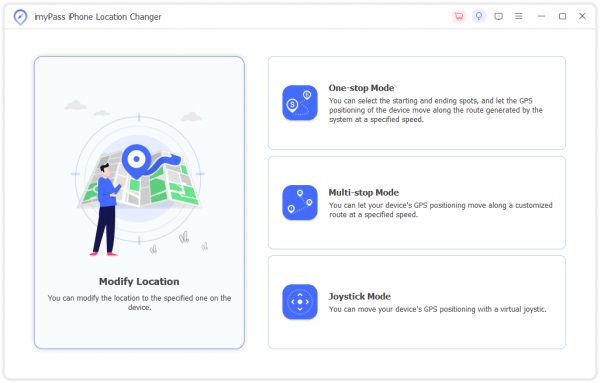
Step 2 Choose the location you want. Apeaksoft iPhone Location Changer provides you with a map interface. You can choose a new location by tapping on the map or entering specific latitude and longitude coordinates. This flexibility allows you to pinpoint a location precisely.
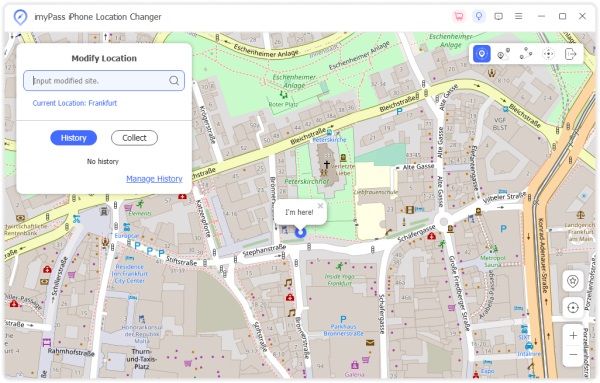
Then you can check if the location changed on your iPhone.
The app also offers options to control the movement speed between simulated locations, which is beneficial for creating realistic location simulations. And you can check the stimulated location history here.
Using the Simulated Location: Your iPhone will now report the chosen location to any apps or services that request it. For example, if you use a navigation app or a weather app, they will receive the simulated location instead of your real one. Ensure you're in control of your location data and enjoy the benefits of location-based services without compromising your privacy. Stay informed, stay secure.
Apeaksoft iPhone Location Changer is a valuable tool for maintaining your privacy while simulating your iPhone's location. Protecting your location data is essential in the modern age of digital information, and this application allows you to use location-based services without revealing your true whereabouts. By understanding how to use Apeaksoft iPhone Location Changer and being mindful of privacy considerations, you can confidently explore applications and services, knowing that your personal information remains secure. Remember to use such tools responsibly and in accordance with the law to ensure a safe and respectful online experience.
Further Reading:
Step-by-step Tutorial to See Location on Your iPhone or iPad
Useful Ways to Hide Your Location on Your iPhone Quickly
Part 4: FAQs: How to Check Location History on iPhone
Can I see all my location history?
Yes, you can access and review a significant portion of your location history on your iPhone through the methods described in this guide. Your iPhone collects data from various sources, including GPS and Wi-Fi networks to create a history of your past locations.
Is there an app that tracks my location history?
Many apps track your location history for various purposes, enhancing your overall user experience. Some of the most commonly used apps that track location history include Google Maps, Apple Maps, fitness tracking apps and social media platforms. You can typically view your location history within these apps, allowing you to retrace your steps and recall past locations you've visited.
Can someone see my location on iPhone?
Yes, someone can see your location on an iPhone if you share it with them. You can share your location with specific contacts using Apple's "Find My" app or through third-party messaging apps like WhatsApp. It's essential to be cautious about who you share your location with and to review your privacy settings regularly.
Conclusion
Checking your iPhone location history can be a valuable way to keep track of your activities and access location-based services. You can check them in your settings or Google Map. However, it's crucial to prioritize your privacy and ensure that your data is not compromised. By following the methods outlined in this guide and being cautious about the apps you use and how you share your location, you can enjoy the benefits of location history without risking your privacy. Safeguarding your data while exploring your location history is key to maintaining control over your personal information.

