It makes sense that Apple stops iTunes when you consider that iTunes is too plump and full of bugs. In fact, iPhone users are not panic when they heard about the news, partly because they are more comfortable to use iCloud for data management, transfer and backup.
Now, iCloud is available on Windows 11 and earlier systems. This is great news for people who own an iOS device and a PC. In this article, we will show you a concrete guide of iCloud control panel for PCs.

- Part 1: What is iCloud for Windows
- Part 2: How to Set up and Use iCloud on Windows 10
- Part 3: What You Can Do When iCloud Not Working on Windows 10
Part 1: What is iCloud for Windows
iCloud for Windows is the iCloud control panel on PC. The user interface is much like the control panel for Mac. It allows you to:
- 1. Upload photos and videos from your PC for accessing on iOS.
- 2. Invite your family members to share your photos and videos.
- 3. Access or add documents on every device with iCloud Drive.
- 4. Keep your email, contacts, calendars and reminders up to date.
- 5. Update your IE, Firefox, or Chrome bookmarks with Safari bookmarks.
- 6. Manage your iCloud preferences, storage and items.
- 7. Sync photos with the Photos app on Windows 10.
Apparently, iCloud for Windows 10/8/7/XP is a convenient way to manage, sync and access your iCloud on PC.
Part 2: How to Set up and Use iCloud on Windows 10
To set up and use iCloud on Windows 10, you have to get the latest version of iTunes, Outlook 2010-2016, and a web browser.
How to Set up iCloud on Windows 10
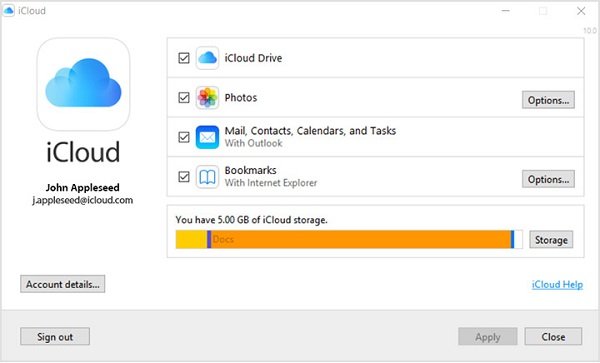
Step 1. Open your web browser, access the iCloud for Windows page, and click the Download button to get the installer. Another way to get iCloud on Windows 10 is the Microsoft App Store.
Tip: Make sure to download the right version; otherwise, you will encounter the iCloud for windows installer error.
Step 2. Double-click on the installer file to install iCloud control panel to your computer. If prompted, agree to the Terms & Conditions. Then restart your PC to complete the installation.
Step 3. Launch iCloud for Windows from your desktop, enter your Apple ID and other details, click Sign In button. If you have enabled two-factor authentication, turn on your iPhone and enter the six-digit code appears on your screen.
Step 4. With all this done, you will see the iCloud control panel and start using iCloud on Windows 10.
How to Sync Photos from iCloud on Windows 10
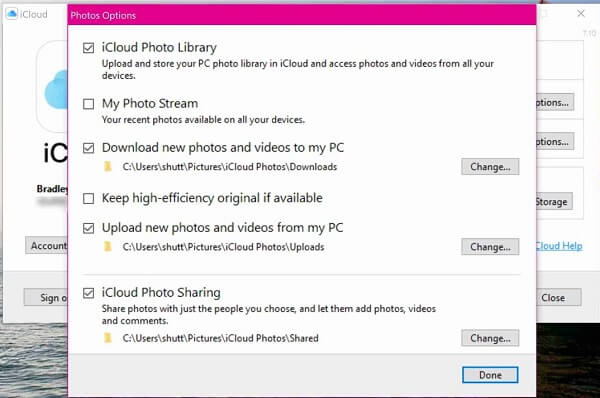
Step 1. Open iCloud for Windows 10, and click the Options button next to Photos.
Step 2. Check iCloud Photo Library and My Photo Stream. Then set the photo download and upload folders by hitting the Change button.
Step 3. Click the Done button to confirm it. Then the photos in your iCloud Photo Library will sync to PC, and the photos you add to the upload folder will go to iCloud automatically.
(Photos are not uploading to iCloud? Check the solutions here.)
How to See Your Files in iCloud Drive
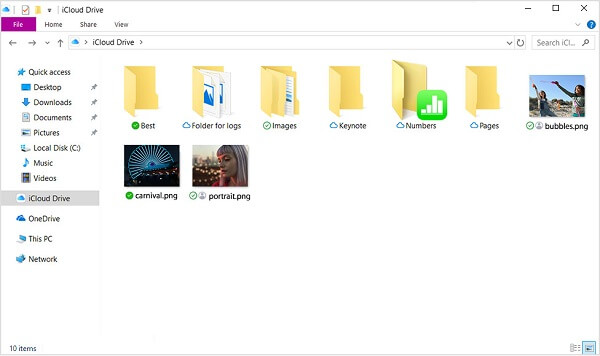
Once you turn on iCloud Drive in iCloud for Windows 10/7/XP, a folder called iCloud Drive will be created in your File Explorer. By default, it locates in C:\Users\.
All your files in iCloud Drive will be downloaded to the folder spontaneously. What you need to do is to open the folder and access the files as you wish.
How to Keep Your Mail, Contacts and More Update
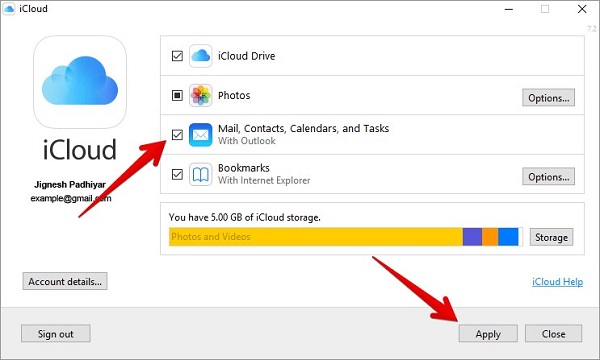
Step 1. Run iCloud for Windows 10, check the box next to Mail, Contacts, Calendars, and Tasks, and click Apply button.
Step 2. Turn on your iOS device, go to Settings > iCloud and enable corresponding options.
Then you can see your iCloud mail account in your Outlook.
You can also get the contacts from iCloud directly in this post.
How to Change iCloud Storage Plan in iCloud for Windows

Step 1. Check the status bar in iCloud for Windows 10, and click Storage button if you want to change it.
Step 2. On the popup dialog, choose a new plan and click Next to update iCloud for Windows.
Part 3: What You Can Do When iCloud Not Working on Windows 10
Some people reported that iCloud is not working on Windows 10. Apeaksoft iOS Data Backup & Restore is the best alternative.
- Back up all or selected data from iOS to PC quickly.
- Support a wide range of data types.
- Available to all devices running iOS 18/17/16/15/14 or earlier.
- Restore lost files from iOS backup simply.
How to Use The Best Alternative to iCloud for Windows
Step 1. Get the best alternative to iCloud
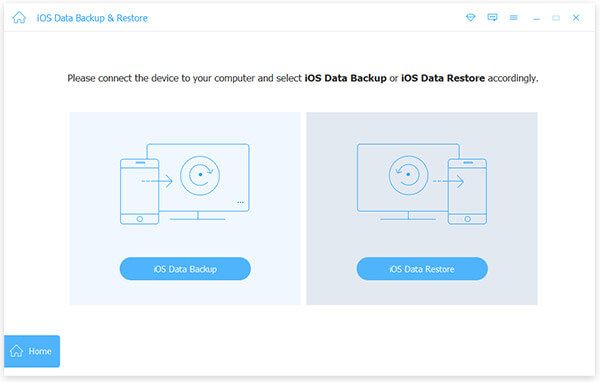
Launch iOS Data Backup & Restore after you installed it on your PC.
Once hook up your iPhone to your computer, it will detect your device.
Step 2. Back up your iPhone
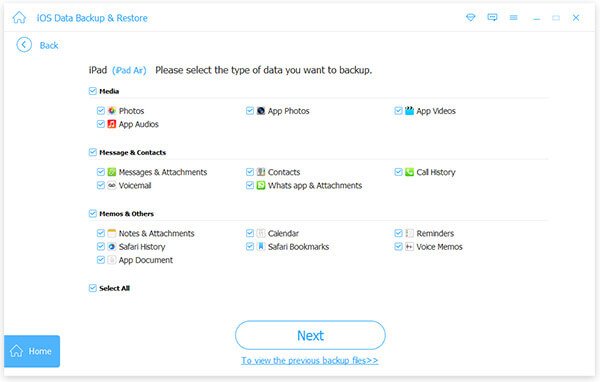
To download files from iPhone to PC, click iOS Data Backup button on the main interface. Select the data types you want to download and click Next button. Here you will be presented two options, Standard backup and Encrypted backup. Select one based on your need and hit the Start button to begin backup.
Tip: To back up entire iPhone, check the box next to Select All on the data type window.
Step 3. Restore lost files from backup
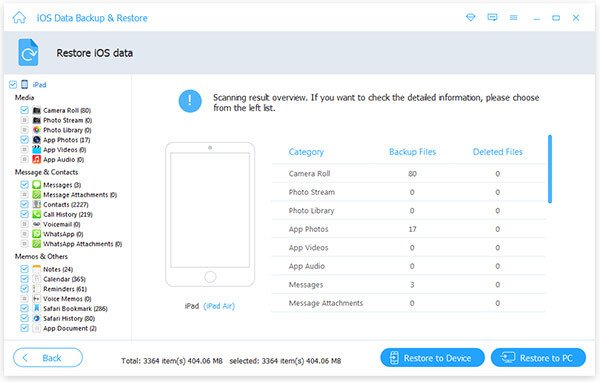
When you want to get back lost files from iPhone, select iOS Data Restore, choose the proper backup file, and click View Now to open it. Then you can preview all data in the iOS backup by categories. Check all files you want to retrieve, and click Restore to Device or Restore to PC button to initiate the process.
Conclusion
iCloud for Windows 10/8/7/XP is a convenient way to sync your data between iCloud and PC. It works in the similar way with iCloud for Mac. The difference is that you need to install iCloud Control Panel to Windows. If you read our tutorial carefully, you must master how to set up and use iCloud for Windows. Plus, we also shared one of the best alternatives to iCloud, Apeaksoft iOS Data Backup & Restore. If you have better suggestions, please feel free to leave your messages below this post.

