iCloud provides a convenient way to backup various iOS data on your iPhone/iPad/iPod in daily life. However, there are still users feel confused about how to do backup iOS data to iCloud, like backing up music to iCloud.
According to Apple, there are two services to store music for iOS, Apple music and iTunes Match. You are allowed to save up to 100000 songs to iCloud without taking up your cloud storage. In this tutorial, we are going to tell you how to back up music to iCloud through these services correctly.

- Part 1: How to Backup Music to iCloud manually
- Part 2: How to Backup Music to iCloud with iCloud Music Library
- Part 3: How to Transfer Music to Computer
Actually, iCloud can backup purchased history for music, movies, apps and books, photos and videos in your Camera Roll, iOS settings, like home screen layout, ringtone, various app data, call history and messages. But you should know, the music and other media files not purchased from iTunes cannot be synced to iCloud.
Part 1: How to Backup Music to iCloud manually
As said before, when you create an iCloud backup for entire iPhone, it includes the purchased history of music. To do it, follow the steps below.
Step 1. Open the Settings app from your home screen. Make sure that your iOS device is connected to a stable Wi-Fi network.
Step 2. Tap on your name and then navigate to "iCloud". Here you can decide to back up more data types, such as Contacts, Calendars, Safari and more. If you have a third party music app, head to "Settings" > [your name]-> "iCloud" > "Storage" > "Manage Storage", tap on "Show All Apps" under "Choose Data to Back Up" and enable the music app and other apps to back up.
Note: iCloud is able to back up the third party music app data as other apps, but the songs may be invalid due to copyright problems.
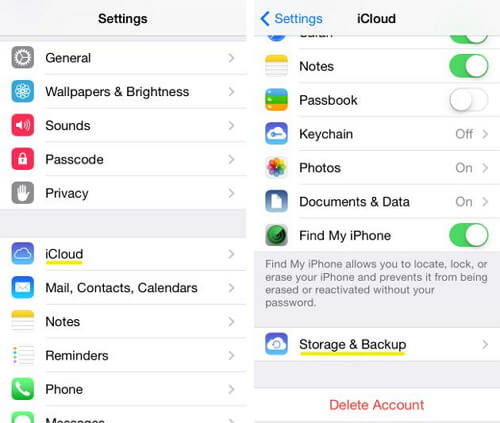
Step 3. Back to the iCloud settings screen after setup, tap on the Backup option. Place the switch next to "iCloud Backup" option to "ON" position and tap on "Back Up Now" to backup music to iCloud immediately. It may take dozens of minutes to an hour to create an iCloud backup. Click here if the iCloud backup won't turn on.
Part 2: How to Backup Music to iCloud with iCloud Music Library
If you are a music fans and prefer to listen to music on your iOS device, you may have heard of iCloud Music Library. It is a feature of iTunes Match service, which is a dedicated tool to back up music to iCloud. The biggest advantage is that the music backup in iCloud Music Library does not take up your iCloud storage. But iTunes Match is a subscription service, costs $49.99 per year.
On the other hand, iCloud Music Library works with both Apple Music subscription and iTunes Match service. If you have subscribed an Apple Music account, both iCloud Music Library and subscription music are available. If you only subscribe iTunes Match, you can only visit the iCloud Music Library.
Backup iTunes music to iCloud Music Library, it can be completed as follows.
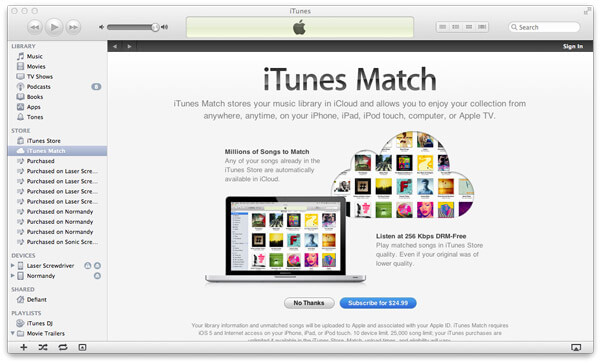
Step 1. Open the latest version of iTunes on your computer, click "Store" on the top ribbon and then find "iTunes Match" at the right side of the window. Click on it to open iTunes Match window.
Step 2. On the window, click "Subscribe for $24.99" and input your Apple ID and password that you use to purchase content from the iTunes Store on the popup dialog.
Step 3. Follow the on-screen instructions to complete subscription. Next, iTunes will scan your iTunes media library automatically.
Step 4. When it is done, turn on "iCloud Music Library" and click "Add This Computer" to upload and match the music in iTunes media library to iCloud Music Library.
Step 5. If you have multiple iTunes media library on different computers, repeat the operations above to back up music to iCloud Music Library.
Back up music to iCloud Music Library from Apple Music
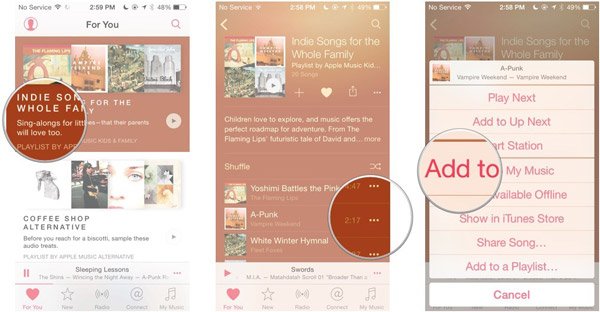
Step 1. Open the Music app on your iOS device and locate to the song you want to back up to iCloud Music Library manually.
Step 2. Tap on the "More" button with three dots on the right side of the song.
Step 3. Select Add to My Music on the menu list to add the song to iCloud Music Library. Check this post if Apple Music app not working.
Part 3: How to Transfer Music to Computer
Though iCloud is a portable music backup service that allows you to listen to your music on any Apple devices, we suggest you to create a copy of your music on hard drive, in addition to backup music to iCloud. Apeaksoft iPhone Transfer could meet such demand. Its key features include:
- Save music, photos, videos and other content from iOS devices to computer or another mobile device.
- Support a variety of data types, like audio, video, image, contact, call log, PDF and other documents.
- Keep original quality and format of your music during transferring.
- Work on iPhone XS/XR/X/8/7/6/6s/5/SE/4, iPad Pro/Air/mini or earlier, and iPod touch.
- Compatible with Windows 11/10/8/8.1/7/XP and macOS 15.
In short, it is the best way to back up your music besides backing up music to iCloud.
How to transfer music from iPhone to computer
Step 1. Get the best music transfer software installed on your computer
Download and install iPhone Transfer to your computer. It offers one version for Windows and Mac respectively. Connect your iPhone to your computer via the lightning cord. Launch iPhone Transfer to detect your device.

Step 2. Preview music on iPhone for transfer
Click "Media", and then choose "Music" on the catalogue. Next, you can view all current music in the detail window, and select desired ones to save on your computer.
Step 3. Transfer music to computer
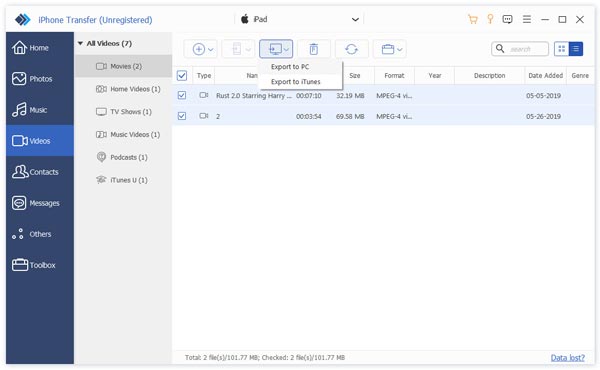
After selecting, unfold the "Export to" menu on top of the window and select "Export to PC" or "Export to Mac" to start transferring the selected songs from iPhone to iPhone instantly. With the same method, you can easily transfer iPhone contacts, call logs, videos, photos and more.
As you can see, there are several ways to back up music to iCloud. And now you should understand how to do that using these methods based on our guides. After backing up music to iCloud, we suggest you to make a copy of your favorite songs on your computer with Apeaksoft iPhone Transfer. That could avoid music loss when something wrong on your iCloud account.

