Is there any good way to prevent accidental data loss? Since mobile phones play a more and more important role in people's daily life, it would be a disaster if you lost any important iOS data.
However, you may lose iPhone files due to various causes, like failed iOS 18 update, jailbreak, system errors, app crashes and physical damages.
You'd better backup iPhone to iTunes in advance. In that case, even your iPhone is broken or stolen, you still get a chance to restore iPhone data from iTunes backup safely and quickly. This article aims to show you how to backup iPhone to iTunes.

- Part 1: How to Backup iPhone/iPad to iTunes
- Part 2: How to Backup iPhone/iPad without iTunes
- Bonus Tips: How to Backup & Restore iPhone with iOS Data Backup & Restore
Part 1. How to Backup iPhone/iPad to iTunes
The first thing you need to do before backing up iPhone to iTunes is to install the latest iTunes version. Otherwise you will fail to make a copy of your iPhone and iPad. In spite of common iPhone data backup process, you can use iTunes to make an encrypted backup file to protect private information if necessary. You had better write down the password for iTunes backup. If you forgot the encrypted password, you are not able to access iPhone encryptions unless you enter the correct forgotten iPhone password.
How to Backup iPhone to PC/Mac with iTunes
Step 1. Launch iTunes with trusting computer
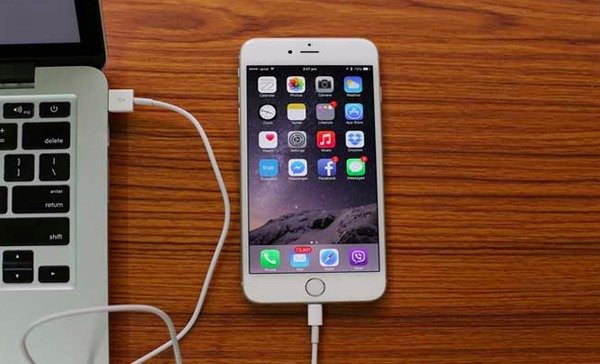
Use a lightning USB cable to connect iPhone to your computer. Launch iTunes and wait until iTunes detect your iPhone entirely. If it is your first time to backup iPhone with iTunes, you need to unlock your iPhone and trust this computer with the on-screen instruction.
Then iTunes will detect your iPhone. iPhone fails to connect to iTunes?
Step 2. Set iPhone to iTunes backup settings
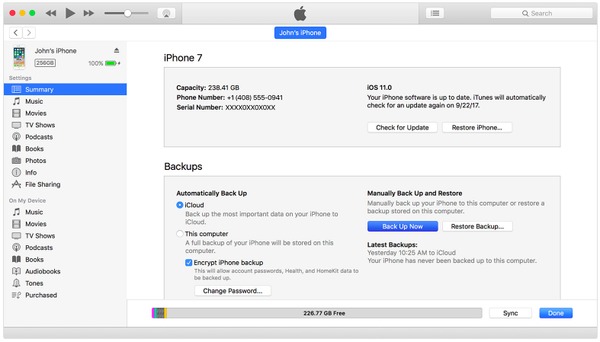
Choose your iPhone device and then you can see basic information of your iOS device. Backups section in the Summary page. Tick This Computer button under Automatically Back Up list. Thus, the further iTunes backup files will be stored in the pointed folder automatically. Click Encrypt iPhone backup to set an iTunes backup password if you want save something private.
Step 3. Backup iPhone to Mac or Windows with iTunes
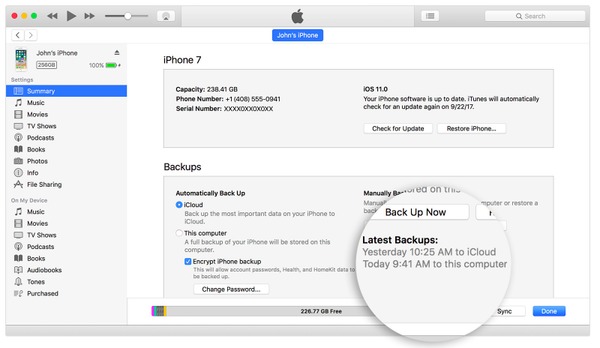
Move to "Manually Back Up and Restore" section and hit "Back Up Now" button below. Wait until iTunes backup your iPhone content successfully. Click "Done" in the lower right corner when you are finished. Later, you can see the accurate date and time under "Latest Backups".
After that, you can directly click "Restore Backup" to restore the backup you did just now to your iPhone. For those iTunes purchase restore, you need to sign in your iTunes account.
Notes:
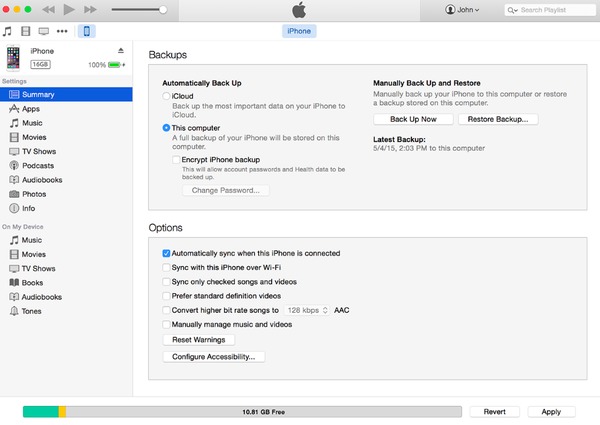
1. If you scroll down summary menu of iTunes, you can see many iTunes backup settings. Tick or untick "Automatically sync when the iPhone is connected" option according to your needs. There is also another option you can choose named "Sync when this iPhone over Wi-Fi". Just tap "Revert" or "Apply" to reset or save your change.
2. iTunes will back up the whole data on your iPhone to this computer. If you need to backup selected data, e.g. photos, you had better backup iPhone without iTunes.
Best Way to Backup iPhone to iTunes
If you want to quickly backup various iPhone or iPad data to iTunes, you can rely on the professional iOS data transferring too, iPhone Transfer. It highly supports any popular data type like contact, music, photo, video, call history, and more. You are allowed to view detailed information of each data and then backup some of them to your iTunes or computer.

4,000,000+ Downloads
Transfer various iOS data from iPhone to computer.
Support contacts, messages, videos, music, photos, call logs, etc.
Export iPhone files to another iPhone.
Compatible with iPhone 16/15/14/13/12/11/X, etc.
Step 1. Run iPhone Transfer
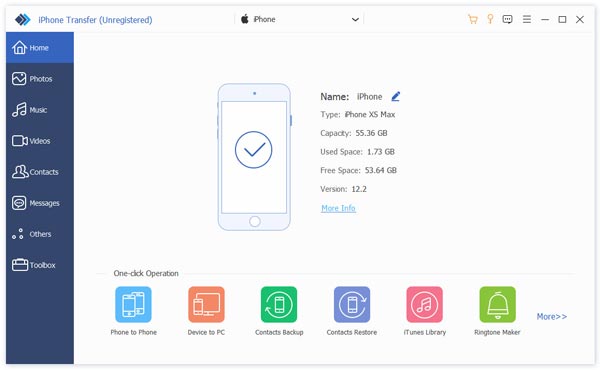
Free download, install and launch this iPhone data transfer software on your computer. Connect your iPhone to it using USB cable. It will automatically detect your iOS device.
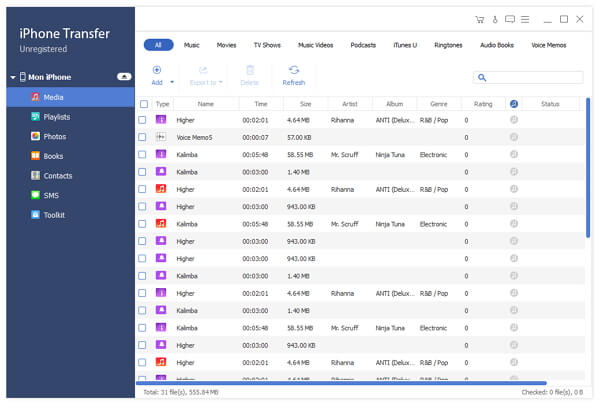
Step 2. View iPhone data
On the left control, you can see many frequently-used iOS files are listed in categories there. Click specific data type based on your need. Then you can preview the detailed information of each data on the right window.
Step 3. Backup iPhone to iTunes
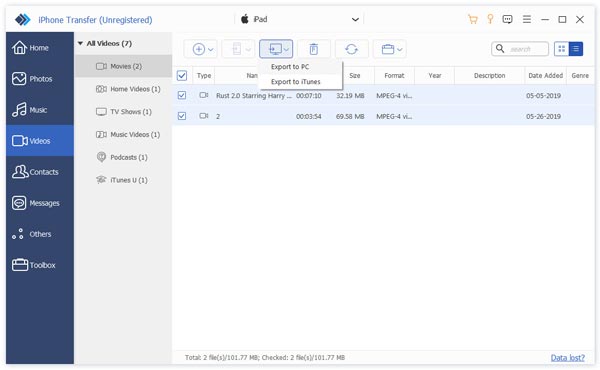
Tick the checkbox in front of each data you want to back up to iTunes from iPhone. Click the "Export to" menu and choose "Export to iTunes Library". After that, all selected iPhone files will be copied to iTunes.
Part 2.How to Backup iPhone/iPad without iTunes
If your iPhone cannot be recognized by the computer, or there is no enough storage space in hard disk, then you can backup iPhone and iPad using iCloud. You can get 5 GB free storage space to manage iPhone content. Apple iCloud allows users to backup iPhone wirelessly. Thus, you do not need to connect iPhone to a computer. As a result, the wireless network condition really matters. This iPhone to iCloud backup will take you a long time if your Wi-Fi connection is poor.
How to Backup iPhone to Computer with iCloud
Step 1. Launch iCloud settings
Connect your iPhone to a Wi-Fi network. Open "Settings" app on your iPhone.
iOS 10.2 and earlier: Click "iCloud" option and then choose "Backup".
iOS 10.2 and later: Hit your name, tap "iCloud" and then select "Backup".
Step 2. Backup iPhone to iCloud without a computer
Turn on "iCloud Backup" button to slide it to the green state. For iOS 10.2 or earlier, choose "Backup" instead. Click "Back Up Now" button below to start backing up iPhone without iTunes. When the process ends, go back to "Back Up Now" option to check your latest iCloud backup with accurate date and time.
Then you just need to wait patiently to backup iPhone to iCloud. For data backup, you can access the iPhone backup in the detailed guides here.
Note: iCloud can back up your iPhone and iPad automatically when this iPhone is plugged in a power source, locked and connected to Wi-Fi.
Supported Data Types to Back up from iPhone to a Computer Using iCloud
- Purchased history of music, movies, apps and books
- Photos and videos
- iPhone settings
- Home screen layout and folders
- Application data
- Ringtones
Bonus Tips: How to Backup & Restore iPhone with iOS Data Backup & Restore
Apeaksoft iOS Data Backup & Restore is your versatile iTunes alternative program that can backup and restore iPhone to Windows PC and Mac in one click. You are able to get all iTunes features without its side effects. In another word, you can make an encrypted backup and backup all iPhone data without overwrite the old one. Thus, it is your better choice to backup iPhone without iTunes or iCloud.
Furthermore, iOS Data Backup & Restore allows you to preview after backup and before restoring data without hassle. Similar with iTunes and iCloud Apple apps, iOS Data Backup & Restore is highly compatible with all latest iOS devices like iPhone 16/15/14/13/12/11/X, etc. iPad and iPod generations. Well, the supported files to back up from iPhone/iPad/iPod are contacts, messages, call history, notes, photos, calendar, reminder, voicemail, WhatsApp & attachments, Voice memos, Safari bookmarks/history and App photos/audio/video/document.
All in all, you can use iOS Data Backup & Restore to backup iPhone to laptop and restore it in case any valuable iOS data loss. If you only want to backup iPhone to iTunes, you can also get a step-by-step guide from above paragraphs. Contact us if you are still confused about the iPhone to iTunes backup process. Please let us know if there is a better choice to back up an iPhone to iTunes.

