Concrete Guide to Back up iPhone Automatically or Manually
Limited internal storage capacity is still a big problem for iPhone users. In other words, they cannot save all files on their handsets and have to free up space regularly. Moreover, to avoid data loss, most actions should start at backup, such as updating software, troubleshooting, and factory resetting on an iPhone. The good news is that you have multiple ways to back up an iPhone to iCloud, MacBook, or PC. This comprehensive tutorial demonstrates each way in detail.
PAGE CONTENT:
- Part 1. Why iPhone Backup is Necessary
- Part 2. The Best Way to Back up iPhone to Computer
- Part 3. How to Back up iPhone via iCloud
- Part 4. How to Back up iPhone via iTunes
- Part 5. How to Back up iPhone via Finder
- Part 6. How to Back up iPhone Using Apple Devices
- Part 7: How to Back up iPhone to External Hard Drive
Part 1. Why iPhone Backup is Necessary
iPhone backup refers to keeping a copy of all the information or specific data types on your iPhone. By default, the iPhone won’t automatically back up your data. Obviously, it is not a good idea to carry all important data with us in our bags or pockets. The full backup of an iPhone with app data ensures your data, settings, apps, games, and more are safe. It is helpful in the following cases:
1. When you upgrade to a new mobile device, you can transfer backup to a new iPhone or Android phone without losing data.
2. When your iPhone runs into problems, such as software update failure, being stuck in a specific screen, a black screen, and more, you can get back your data from a backup after a factory reset.
3. When you install a beta version of iOS or downgrade to an old version, having a backup helps you restore essential data.
4. When jailbreaking an iPhone, a backup is the only way to recover your data and files.Today, you can decide to either back up your iPhone to cloud storage or your computer. There are benefits and shortcomings for each method. Using cloud storage means you do not have to rely on a computer, and you can back up your iPhone anytime and anywhere. However, cloud services usually offer limited storage capacity. If you use a computer instead, you can encrypt your backup. Plus, it is available even if your iPhone backup is so big.
5. When you delete something important on your iPhone, you can use the iPhone backup to recover important data, like recovering deleted Instagram messages, etc.
Part 2. The Best Way to Back up iPhone to Computer
As mentioned previously, backing up an iPhone to the computer is fast and easy. Moreover, you can back up as much data as you wish. More importantly, it allows you to password-protect your iPhone backup. From this point, we recommend Apeaksoft iOS Data Backup & Restore. It can meet all your needs for iPhone backup. Plus, the software is pretty easy to learn and use.
Best iPhone Backup Tool
- Back up an entire iPhone or specific file types easily.
- Integrate military-grade encryption technology.
- Available to a wide range of data types, like photos, contact, SMS, etc.
- Restore iPhone backup to your computer or handset.
- Support the latest versions of iOS and iPhones.
Secure Download
Secure Download

How to Back up an iPhone to a Computer
Step 1. Connect to your iPhone
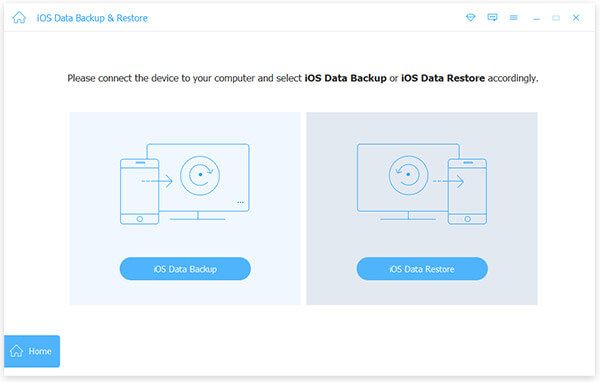
Install the best iPhone backup too on your PC and launch it from your desktop. There is another version for Mac users. Choose iOS Data Backup & Restore to enter the main interface, and click iOS Data Backup. Next, connect your iPhone to the PC with a Lightning cable.
Step 2. Encrypt iPhone backup
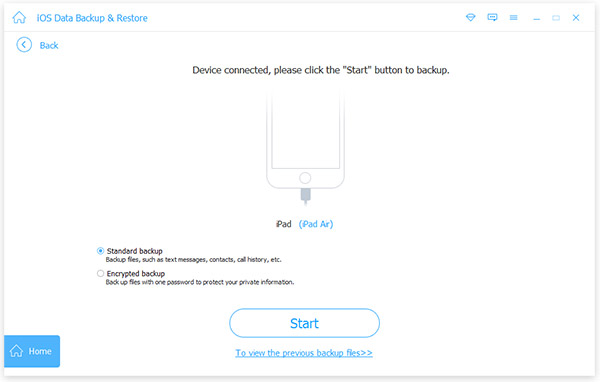
Once your iPhone is recognized, you will be asked to select the backup type. If you wish to protect your iPhone backup, select the Encrypted backup option, and create a password. If not, select the Standard backup option to move on directly.
Step 3. Back up the iPhone
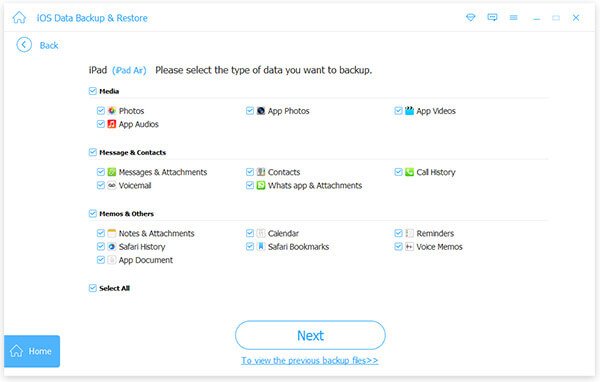
On the data type screen, select what you want to back up on your iPhone, like media files, messages and contacts, and more. If you intend to back up the entire iPhone, tick the checkbox of Select All. At last, click on the Next button, and set a destination folder to save the backup. Then the software will initiate the backup. How long does an iPhone backup take is determined by the amount of data on your device.
Note: For iOS 13 and newer, you need to enter you’re your iPhone passcode to backup Safari history, call logs, and FaceTime calls. When it is done, you can check the backup file to make sure the iPhone is backed up successfully.
Part 3. How to Back up iPhone via iCloud
There are lots of cloud storage available for iPhone users. Some users, for example, back up their iPhones to One Drive or Google Drive. Nevertheless, iCloud is still the primary cloud storage for iPhone users since it was developed by Apple for all iOS customers.
By default, Apple offers 5GB of free storage for each account, so you can clear iCloud storage to prepare for you next backup. Moreover, you can subscribe to iCloud+ to expand the storage capacity to 50GB for $0.99 per month to 12TB for $69.99 per month.
iCloud backups include all the data and settings stored on your iPhone that don’t already sync to iCloud. It does not include Contacts, Calendars, Notes, iMessage, SMS, and MMS that have synced to iCloud, photos if you turned on iCloud Photos, Apple Pay settings, Face ID or Touch ID, iCloud Music Library, and App Store information.
How to Back up iPhone via iCloud Manually

Step 1. Connect your iPhone to a stable Wi-Fi network.
Step 2. Run the Settings app, tap on your profile, and choose the iCloud option.
Step 3. Head to iCloud Backup, and press the Back Up Now button to begin manually backing up your iPhone. You can check the date and time of the last backup under the button.
Note: If you are prompted that your iCloud does not have enough space, you have to free up the storage or buy more iCloud storage.
How to Back up iPhone to iCloud Automatically
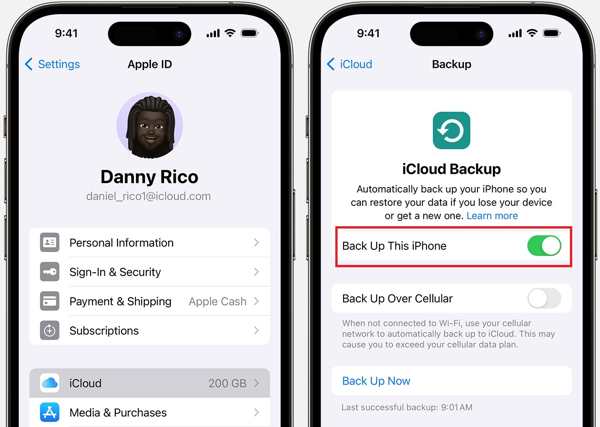
Step 1. To automatically back up your iPhone, open the Settings app from your home screen.
Step 2. Tap on your profile, and navigate to iCloud and iCloud Backup.
Step 3. Toggle on the switch of Back Up This iPhone. Once your iPhone connects to a Wi-Fi network, the iOS backup will initiate automatically.
Note: Automatic backup works in the background, even if your iPhone screen is locked.
Part 4. How to Back up iPhone via iTunes
iTunes is a well-known data manager for iPhone users. If you want to back up an iPhone on Windows or macOS Mojave and older for free, iTunes is a good choice. iTunes backups include a wide array of data types on your iPhone, such as purchased music, apps and books, Camera Roll, contacts, app data, home screen and app layout, ringtones, iMessage, SMS, and MMS.
Step 1. Start the latest version of iTunes or install it from Apple’s official website.
Step 2. Hook up your device to your computer with a USB cable when you need to back up your iPhone to your laptop.

Step 3. Click the Phone button at the upper left side when iTunes detects your handset.
Step 4. Then go to the Summary tab from the left side, and locate the Backups section on the right panel.
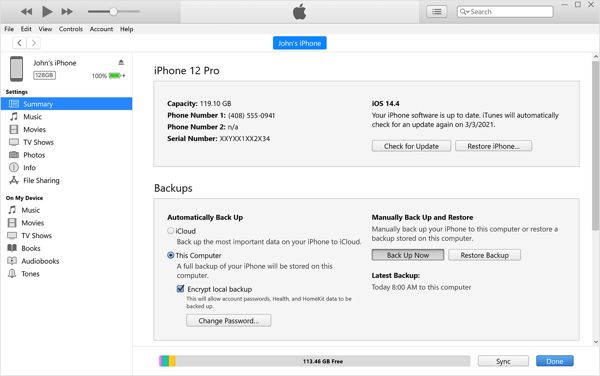
Step 5. Make sure to select This Computer. If you hope to encrypt the backup, check the box of Encrypt local backup, and leave a password.
Step 6. Next, click on the Back Up Now button to begin backing up your iPhone to your computer.
Part 5. How to Back up iPhone via Finder
Apple has stopped iTunes since macOS Catalina. Instead, you can back up your iPhone with app data on macOS Catalina or later using Finder. So that you will have a copy of your data in case your iPhone is ever screen broken, lost, or damaged.
Step 1. Open the Finder app on your Mac, and connect your iPhone to your computer with a USB cable. If prompted, make sure to trust this computer.
Step 2. Select your iPhone on the left side after it is detected.
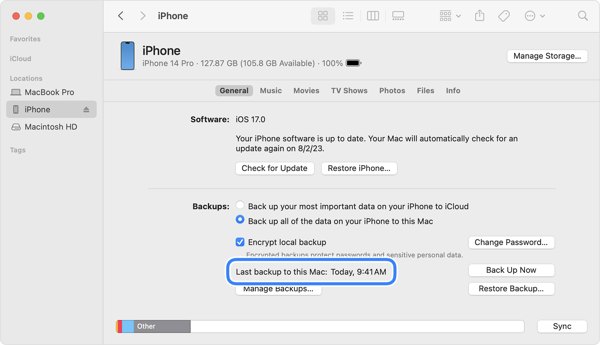
Step 3. Then go to the General tab, and move to the Backups section.
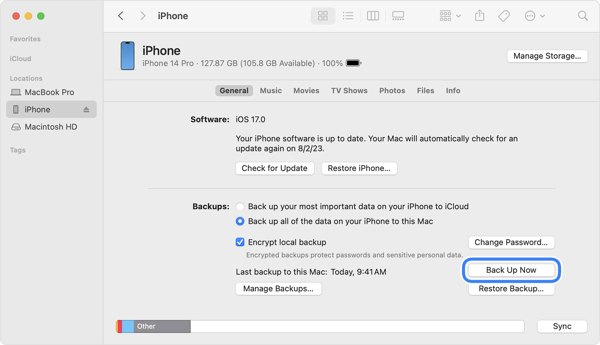
Step 4. Select Back up all of the data on your iPhone to this Mac, and click the Back Up Now button.
Note: If you want to create an encrypted iPhone backup, check the box of Encrypt local backup, and create a password before clicking the Back Up Now button. When transferring the backup to a new iPhone, you need to enter the password.
Part 6. How to Back up iPhone Using Apple Devices
Apple Devices is a new app to back up iPhone without iTunes on Windows 11. In fact, it is available for Windows 10 version 19045.0 and higher. You can install it from Microsoft Store or Apple’s website for free.
Step 1. Run the Apple Devices app, and connect your iPhone to your Windows 11 laptop or computer with a compatible cable.

Step 2. When prompted, click the Trust button in the app. Then turn to your iPhone, tap the Trust button on the prompt, and enter your device passcode to trust the computer.
Step 3. Once the connection is successful, open up the General page under your iPhone name.
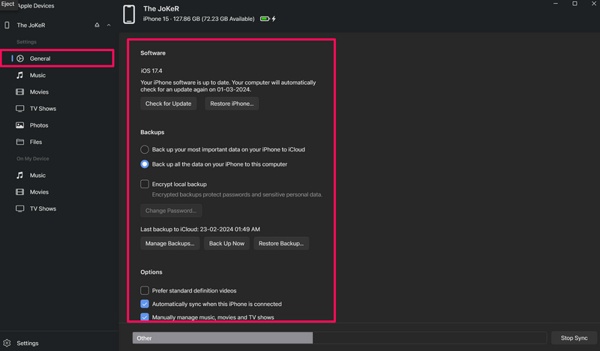
Step 4. Select Back up all the data on your iPhone to this computer under the Backups section.
Step 5. Finally, click on the Back Up Now button to start backing up your iPhone without iTunes.
Note: Similar to iTunes, the Apple Devices app only enables you to back up the entire iPhone. Moreover, the only way to recover your data is to restore the backup to your handset.
Part 7: How to Back up iPhone to External Hard Drive
Backing up an iPhone to an external hard drive is a good option to keep a copy of your data when your cloud service or computer does not have enough storage. Unfortunately, you cannot back up your iOS device to an external hard drive directly. Alternatively, you have to back up your iPhone to a computer using iTunes, Finder, Apple Devices, or third-party iPhone backup software. Then transfer the backup to an external hard drive.
Where to find iPhone Backup
On Windows 11/10/8/7, the directory is C:UsersUsernameAppDataRoamingApple ComputerMobileSyncBackup.
On Windows XP, the path is C:Documents and SettingsUsernameApplication DataApple ComputerMobileSyncBackup.
On Mac, iPhone backups are stored in ~/Library/Application Support/MobileSync/Backup/.
Then copy the backup folder and paste it onto your external drive. Make sure that the external drive has enough space for your iPhone backups.
When you need to use the iPhone backups on your external hard drive, you need to transfer them to a computer. Plus, you also need a proper iPhone backup extractor.
Conclusion
Now, you should learn six ways to back up your iPhone. iCloud is the official cloud storage for iPhone users to back up and sync data. iTunes is still an important way to make a copy of iPhone data on a computer. Finder is the counterpart of iTunes on macOS Catalina. The Apple Devices app is a new way to back up an iOS device on Windows 11. If you do not have enough space, an external hard drive is a good place to store your backups. Apeaksoft iOS Data Backup & Restore is the best option to back up and restore iPhones for beginners.
Related Articles
You can backup text messages on iPhone to the cloud or physical storage. In that case, your important messages will be protected from loss.
Read and learn how to backup iPhone without passcode. You can also get 2 ways to erase the iPhone unlocking password safely.
Where is the iPhone backup location? How to access iPhone backup? Here are 2 easy ways to access iPhone backup from iTunes/iCloud on Windows 10/8/7 and Mac.
If the backup cannot be completed on iCloud, don't worry; you can easily fix it, keep the data from loss, and maintain the device.
