How to Back up Pictures on Android to Cloud or Computer
It is well known that digital cameras become less and less popular. Instead, people increasingly take photos using their smartphones and tablets. It is never a bad time to back up your photos on an Android device because there is always a possibility that you may break it, drop it in water, lose it, or delete pictures by mistake. Backup is always a simple way to keep your images secure.
PAGE CONTENT:
Part 1: Ultimate Way to Back up Android Photos
Although it is not very difficult to back up images on Android devices, keeping the photo quality is a big challenge. Fortunately, Apeaksoft Android Data Backup & Restore is an excellent Android photo backup tool. It enables you to back up and restore photos on Android devices with your computer.
Best Android Photo Backup Tool
- Back up Android photos with a single click.
- Preview photos on Android for selective backup.
- Protect your photo quality using advanced technology.
- Encrypt Android photo backup with a password.
- Support a wide range of Android brands.
Secure Download
Secure Download

How to Back up Pictures on Your Android Phone
Step 1. Connect to your Android phone
Install the best Android photo backup software on your computer and launch it. Next, hook up your Android phone to the same computer with a USB cable. If prompted, tap Trust on your screen to trust this computer.
Tips: Make sure to enable USB Debugging mode on your Android device.
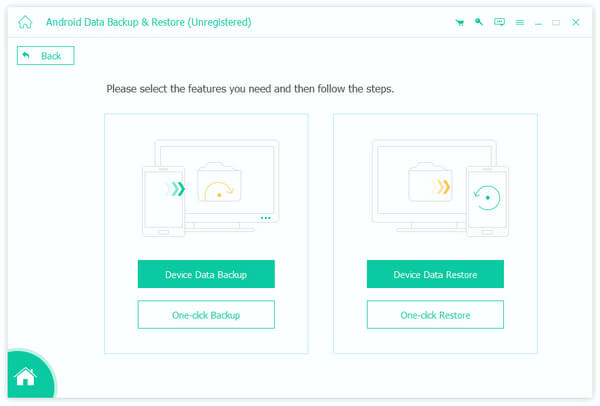
Step 2. Select the data type
Once your device is recognized, click on the Device Data Backup button to enter the data type window. Tick the checkbox next to Gallery.
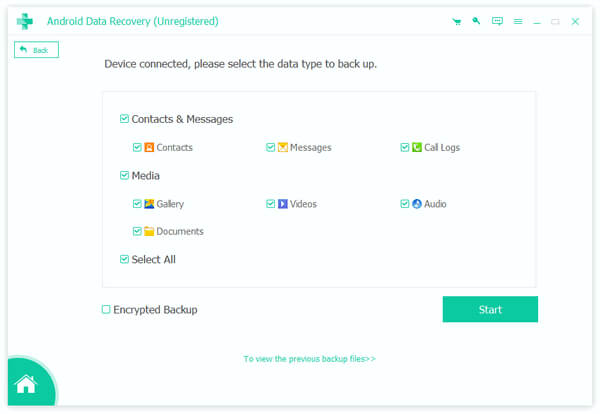
Step 3. Back up Android photos
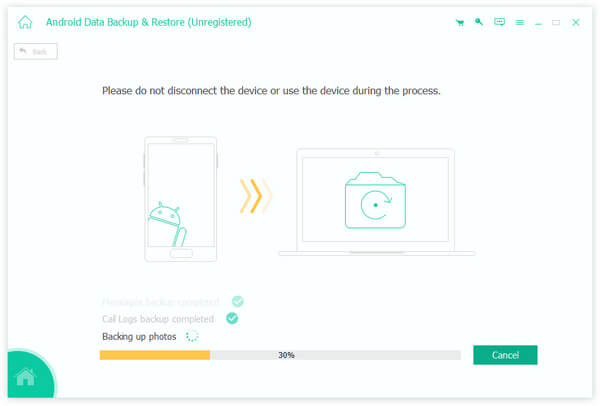
If you want to protect your private photos, check the box of Encrypted Backup and leave a password. Remember the password, and click the Start button. Then set a directory and begin backup photos from Gallery. You can also transfer videos from Android to the computer.
Part 2: How to Back up Android Photos to Google Photos
Cloud services are another way to back up pictures on Android devices. They do not require extra hardware, like a computer. All you need is a reliable internet connection. Google Photos, for instance, is designed to back up photos on smartphones wirelessly.
How to Back up Android Photos Automatically
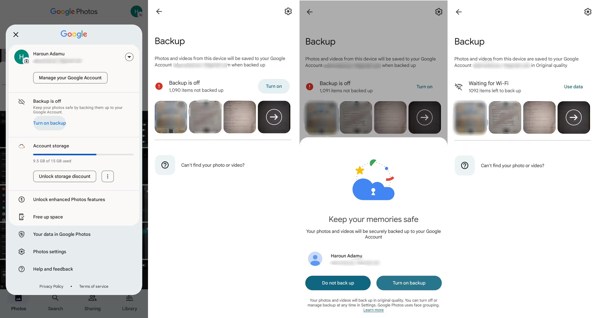
Step 1. Run your Google Photos app, and sign in to your Google account.
Step 2. Tap on your profile at the upper right corner, and tap Turn on backup to enter the backup screen.
Step 3. Hit Turn on, and tap Turn on backup if prompted. Then Google Photos will back up all photos from Gallery regularly when your device is online.
How to Back up Android Photos Manually
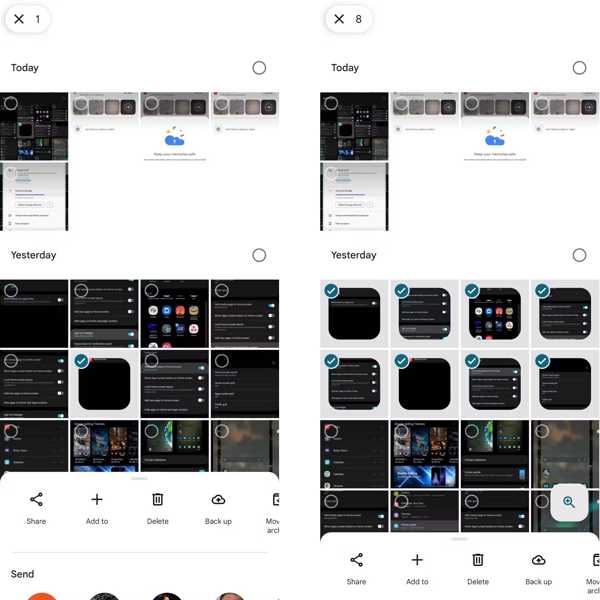
Step 1. Make sure to log in to Google Photos with your account.
Step 2. Touch each photo that you want to back up, and long press a picture until the context menu pops up.
Step 3. Tap Back up on the menu to begin backing up your pictures. If you hope to manually back up one image, press it, and tap the Upload button. If there's not enough storage, you can delete some unwanted photos to free up Google Photos storage
Part 3: How to Back up Photos on Specific Phones
How to Back up Photos on Samsung
Samsung developed several ways to back up smartphones; however, Samsung Cloud cannot back up Gallery photos. Smart Switch only backs up photos to a computer. The good news is you can back up Gallery on Samsung to OneDrive.
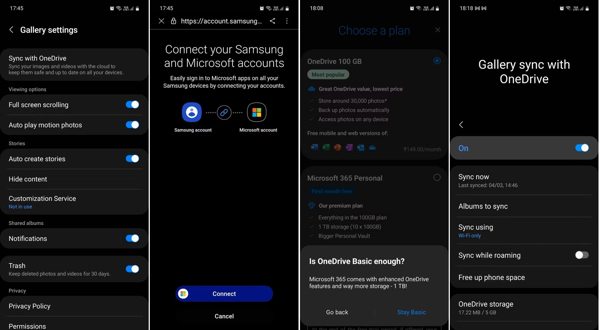
Step 1. Run the Samsung Gallery app, and tap the Menu button.
Step 2. Navigate to Settings, Sync with OneDrive, and tap Continue.
Step 3. Press Connect, and sign in to your Microsoft account, and link it to your Samsung account. Tap Next, and press Stay Basic if prompted to choose a subscription.
Step 4. At last, tap Done, and toggle on Sync with OneDrive. Then tap Sync now, and decide which albums to sync.
How to Back up Pictures on Pixel
The built-in backup feature is an easy way to back up photos on Android devices from Google. When you set up your Google Pixel phones, you need to sign in to your Google account. It lets you back up photos and other data on Pixel.
Step 1. Run the Settings app.
Step 2. Go to System, and choose Backup.
Step 3. Toggle on the Backup by Google One option, and tap Back up now.
How to Back up Images on OnePlus
The simple way to back up images on Android devices released by OnePlus is by transferring photos to a computer via a USB cable directly. Be aware this way is only available for unprotected photos.
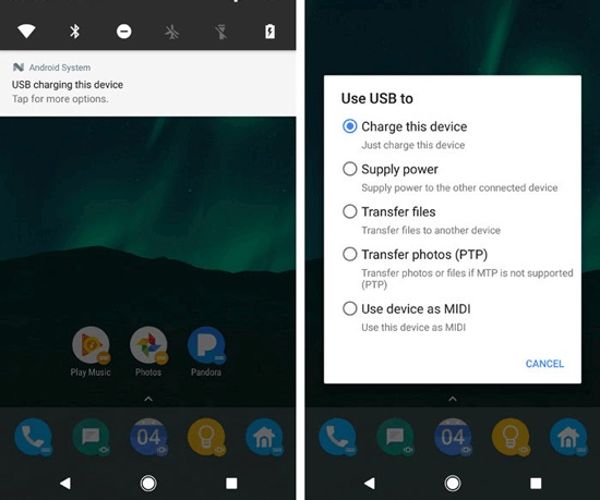
Step 1. Connect your OnePlus into the computer with a compatible cable.
Step 2. Pull down the drop-down screen, tap the notification bar, and select Transfer files mode on Use USB to dialog.
Step 3. Once the computer detects your phone, click your phone name in the File Explorer window, and copy and paste the photos to your hard drive.
How to Do Android Photo Backup on Motorola
For Motorola users, the official backup tool, Rescue and Smart Assistant, is a good option to back up images on Android devices. Before moving to the steps, you need to enable the USB debugging mode on your phone.
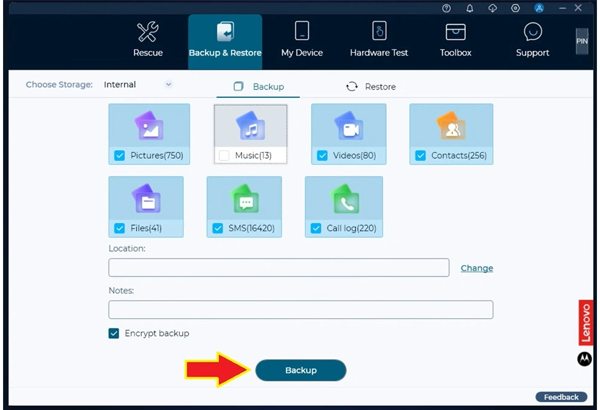
Step 1. Hook up your phone to your computer with a compatible cable. If prompted, tap Allow for USB debugging permissions. Then open Rescue and Smart Assistant on your computer.
Step 2. Then open the Device Help app on your phone, and enter the code that appears in Rescue and Smart Assistant.
Step 3. Wait for your device to be detected, switch to the Backup and Restore tab, tick the box next to Pictures, set the Location, and hit Backup.
Conclusion
This guide identified and demonstrated how to back up photos on Samsung, Google Pixel, OnePlus, Motorola, and more. You can pick an appropriate method and follow the workflow to back up your pictures. Apeaksoft Android Data Backup & Restore is the ultimate option for almost all Android devices. If you have other questions about this topic, please write them down below.
Related Articles
Android WhatsApp data backup gets stuck because of various potential reasons. However, you can fix them all in preparing or backing up.
How to backup Android phone to PC before factory reset or free up space? This page lists 3 ways help you to backup data from Android phone to PC in minutes.
Worry about your text messages got lost? Just follow 3 ways here to backup text messages and MMS on Android to computer, Google or SD card with/without an app.
There are five effective methods to transfer photos from iPhone to Android using Google Photos, email, a computer, and more.

