There are many ways to root Android and break the root restraint. Some are complicated and flexible; others are simple and suitable to beginners. vRoot is one of the simplest solutions to root Android phone. But many people are still not familiar with this popular tool, like whether it is worth to use, what vRoot can do, or how to use it to root an Android phone. In this post, we are going to answer these questions in detail. More importantly, you can learn the whole process of rooting Android without data loss.

- Part 1. Benefit to Root Android with Vroot
- Part 2. How to Root Android with Vroot
- Part 3. How to Backup Data before Rooting Android
Part 1. Benefit to Root Android with Vroot
The latest version is vRoot 1.7.8, which works on more than 8000 Android device models. It uses a simple rooting workflow for the beginners.
1. Root Android devices on PC.
2. Support one-click rooting Android phone.
3. It is able to root Android tablet and smartphone in recovery mode.
4. Work on most Android devices running Android Froyo/Gingerbread/Ice Cream Sandwich/Jelly Bean.
5. Customize your phone, like remove pre-installed apps, hack games, save battery power, and more.
6. The interface is user friendly and easy to find what you want.
7. vRoot is totally free to download and use.
Click here to learn more: Root with King Root.
Part 2. How to Root Android with Vroot
In this part, you can learn how to root Android using vRoot software.
Step 1: Charge your phone to at least 50% of battery capacity. Unlock your phone, go to Settings-> Applications-> Developer options and turn on USB Debugging mode.
If you cannot find the Developer options in Settings app, head to Settings-> About phone, and tap Build Number for 7 times quickly. This will activate the hidden Developer options.
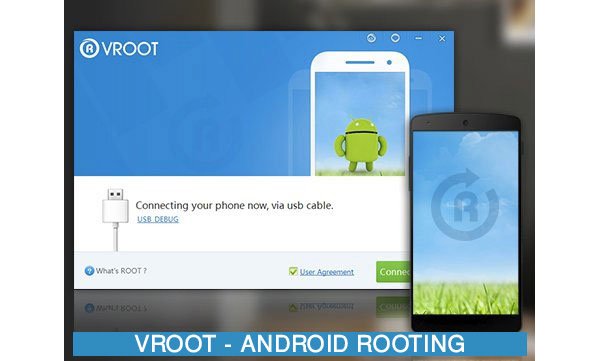
Step 2: Power on your PC, access vRoot official website, download and install the program on your computer. That needs a good Wi-Fi network. Connect your phone to the PC using a USB cord and launch the program.
Step 3: If you are ready, click on the Root button on the home interface. Then all you need to do is to wait for the process to finish. When your phone restart automatically, it means Android rooting is successful.
To increase the success rate, you’d better check if your phone is supported by vRoot on the website.
Reading more: Root with PingPong Root.
Part 3. How to Backup Data before Rooting Android
As mentioned, no one can guarantee that vRoot is always successful on rooting Android phone. Actually, any improper activity may lead to data damage and even system crash. From this point, we suggest you to back up your data using Apeaksoft Android Data Extraction. Its main features include:
1. It has the ability to make backups for Android tablets and smartphones with a single click.
2. Even if the smartphone is frozen, crashed, locked or black screen before rooting with vRoot, Android Data Extraction is able to fix the problem and back up data.
3. It supports all most all data types on Android devices, like contacts, messages, photos, call history, videos, music, documents, app data, and other items.
4. It could extract data from your Android phone and save them to computer in original status and quality as well as without interrupting existing data.
5. Another benefit is that this Android data backup software supports a wider range of devices, including the devices running Android O and earlier from Samsung, LG, Sony, MOTO, HTC, Google, Huawei, Xiaomi and other major manufacturers.
6. It backs up Android data to computer via USB cable, so it works without internet connection.
All in all, it is the best option to back up Android and avoid data loss before root with vRoot.
You can also read: Recover Deleted Files Android Unrooted.
How to back up data before rooting Android
Step 1: Install the best Android data backup tool on computer
Android Data Extraction offers two versions, one for Windows 10/8/8.1/7/XP and the other for Mac OS. Get the right version installed on your phone. Then hook up the Android phone that you want to root to your computer via USB cable. Open the backup tool; it will recognize your phone automatically, and click on the Start button to move on.
Step 2: Check your device model
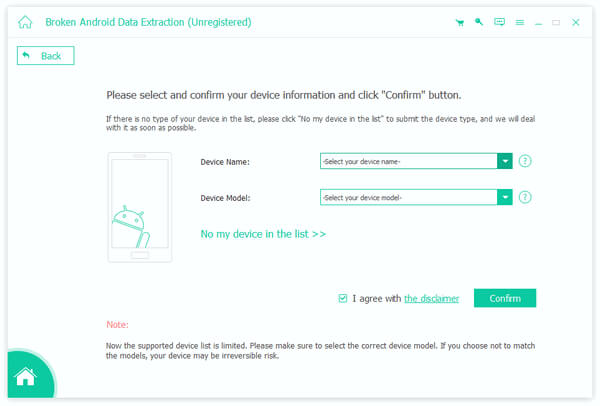
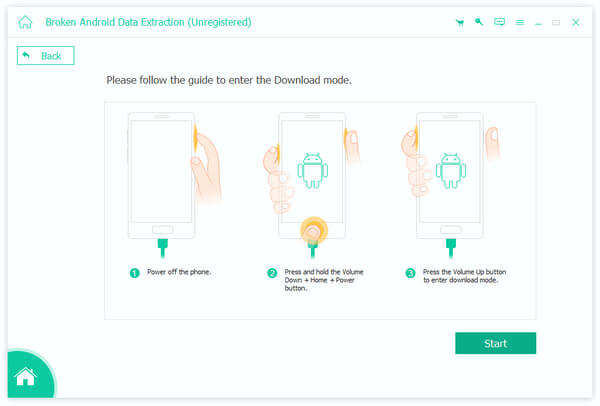
When you are taken to the device model window, check whether the program detects your phone model correctly. If not, expand the dropdown list and select your device model. Click on the Confirm button to go to the next window. Then follow the onscreen instructions to put your phone to download mode and hit the Start button to fix Android.
Step 3: Backup Android to computer before rooting with vRoot
After that, you will be presented the data type window. All data types available are on the left hand column, like Contacts, Messages, Call logs, Videos, and more. You can go to each data type and look at the content in detail. Select Contacts from left sidebar, for example, all contact names and phone numbers will show up on right panel. Here you can choose the contacts to back up by checking the boxes. Select all important data that you want to backup and click on the Recover button. When prompted, pick up a proper destination and initiate backup.
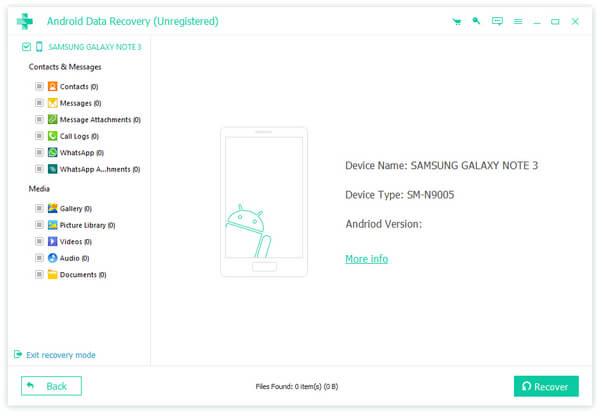
According to our research, Android Data Extraction only spends a few seconds to create a backup for entire Android phone.
Conclusion
We have introduced one of the most popular approaches to root Android devices, vRoot. First of all, you should read our introductions and reviews to decide whether vRoot is a proper tool for you. If sure, you can follow our step by step guide to break root restriction on your phone using this popular tool. If you worry about data loss, we suggest you to make a backup for your Android phone using Apeaksoft Android Data Extraction. It is not only easy to use, but also offering plentiful features. Now, you can feel free to root your phone at any time.

