Photos carry your fond memories or things you love, and you may want to take them out and review them in a while. The era of digitization has solved the problem of inconvenient storage of photos. You can store thousands of photos with just one mobile phone. However, the problem is that the photos will occupy a lot of memory, causing the system to run slowly or even unable to run. Thus, you must consider transferring photos from your iPhone to your computer and removing them to make more space. Here, you will get four ways to import photos from your iPhone to Windows and Mac computers.

- Part 1. The Best Tool to Transfer Photos from iPhone to PC
- Part 2. How to Transfer Photos from iPhone to Mac via AirDrop
- Part 3. How to Transfer Photos from iPhone to Computer with iCloud
- Part 4. How to Transfer Photos from iPhone to computer with USB
Part 1. The Best Tool to Transfer Photos from iPhone to PC
When you are wondering how to transfer photos from your iPhone to your computer, it's best to do it in one step so that no additional operations are required to output it. However, many transfer tools can only transfer without other functions. To improve your experience, the best transfer software recommended is Apeaksoft iPhone Transfer. It can transfer iOS data among your devices without any data loss. Moreover, you can manage and edit photos easily and handle music, videos, messages, etc.

4,000,000+ Downloads
Provide multiple transfer ways, including transfer from iOS devices to PC, PC to iOS devices and between iOS devices.
Varieties of data types can be transferred at high speed without data loss.
Backup files, like contacts, between iOS devices and PC.
Compatible with almost all iOS versions.
Step 1 First, you need to download Apeaksoft iPhone Transfer free on your computer, install it, and run it. Next, use a USB cable to connect your iPhone to the computer.
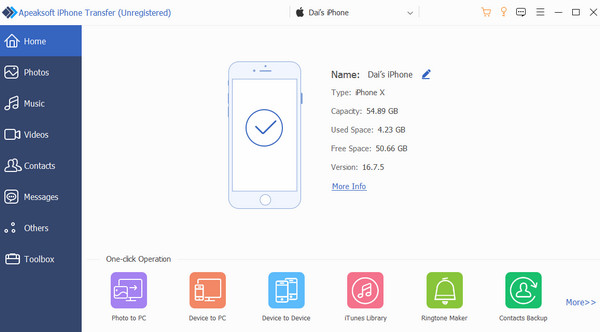
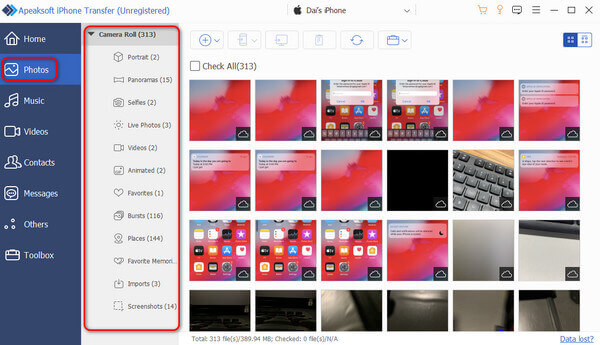
Step 2 Tap Trust when the Trust This Computer message pops up. The data on your phone will be automatically uploaded to the program. Select Photos in the left menu bar, and you will find that they are automatically categorized.
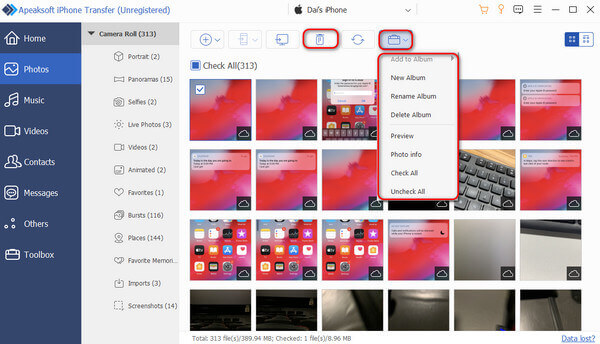
Step 3Click the Other Tools button on the far right above to preview the selected photo, view details, create a new album, and perform other operations.
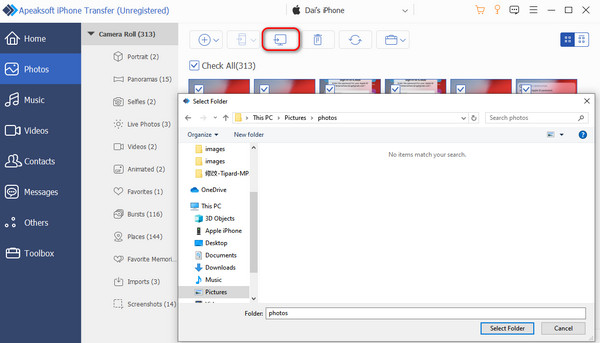
Step 4After checking out the photos, select the photos need to be transferred and click the Export to PC button to transfer photos from iPhone to PC.
During the above operation, you may accidentally delete the needed photos. Instead of trying to restore the phone to retrieve the originals, a faster and more convenient way is to extract the photos from the iPhone backup.
Part 2. How to Transfer Photos from iPhone to Mac via AirDrop
If your mobile phone and computer both use iOS systems, there is another most convenient method: directly AirDrop. It's a way of transferring files only between iOS devices without any third party; thus, you can also use it to instantly share photos with others nearby who have an iPhone, Mac or iPad. Moreover, there is no quality loss in photos transferred via AirDrop, and privacy is well protected.
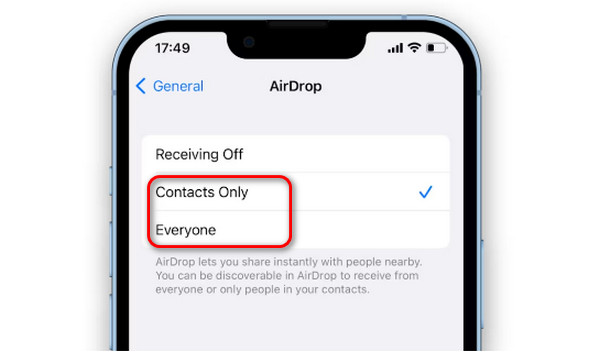
Step 1First, ensure your devices are on a Wi-Fi network and have Bluetooth. Go to Settings > General > AirDrop and choose Contacts Only or Everyone to turn on this function.
Step 2Select the photos you want to share in the Photos app, then tap the Share button in the lower-left corner of the page.
Step 3A preview window of all the selected photos will pop up, then choose AirDrop and select the available device to send to.

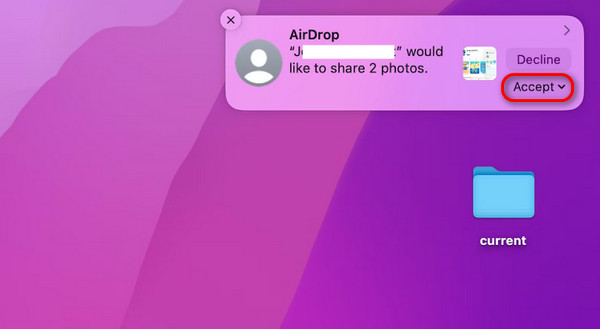
Step 4After clicking Accept on the sending device, the transfer process from iPhone to Mac begins. Transferring from Mac to iPhone is almost the same step. Depending on the number of photos to be transferred, you must wait a few seconds or longer.
Part 3. How to Transfer Photos from iPhone to Computer with iCloud
iCloud , a default software on Apple devices, can properly store data in the cloud. Although sometimes you may encounter situations where photos are not uploaded to iCloud, timely updates can be completed in most cases. Many people think that it only helps us back up files to the cloud when there is insufficient space on the phone to reduce storage pressure, but whether it is Mac or Windows, you can use iCloud to upload pictures from your iPhone wirelessly.
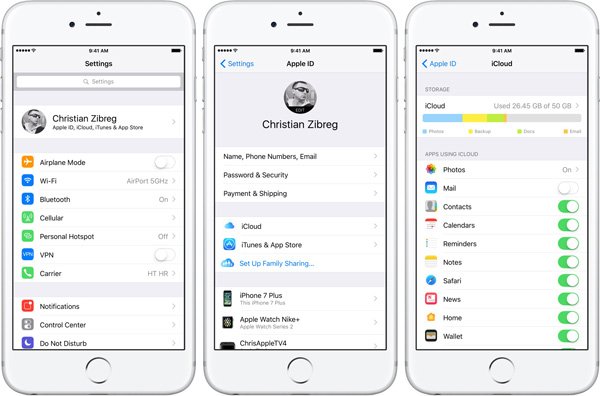
Step 1Before operating on your computer, you must enable iCloud Photo Library on your iPhone. Tap Settings > Photos, then turn on iCloud Photos .
Step 2If you are not a Mac user, download and open iCloud for Windows . Then open the iCloud control panel and sign in with the same Apple ID as your iPhone App Store account.

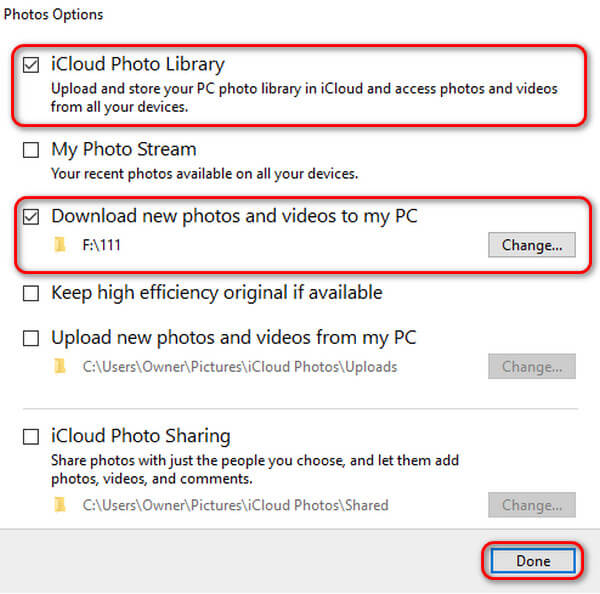
Step 3 After that, the iCloud home page will pop up, and a checkmark will appear on Photos . Then click the Options button next to it, check iCloud Photo Library , and Download new photos and videos to my PC . Click Done and quickly Apply .
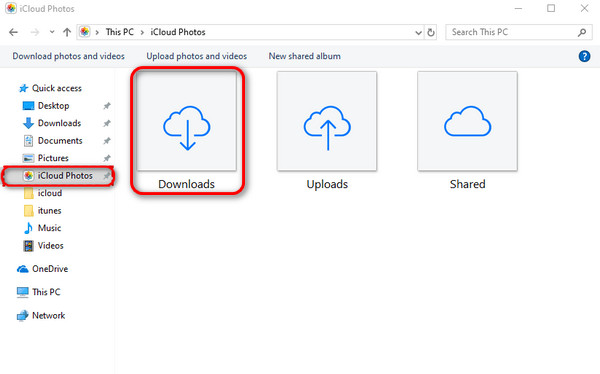
Step 4After the setup is complete, click on This PC on your computer, then double-click on iCloud Photos . Finally, you can transfer photos from your iPhone to your PC by clicking on Downloads .
Part 4. How to Transfer Photos from iPhone to computer with USB
For Mac users:
Step 1Connect your iPhone to your Mac. In the pop-up Trust this computer window on your iPhone, choose Trust. Then, open the Photos app on your Mac.
Step 2Click the iPhone button under Devices to view all the photos on your iPhone.

Step 3 Then, you can select the address you want to transfer to your Mac. There, you can find all the photos that were transferred.

Step 4Select the photos and click Import Selected or All New Items . You can also automatically delete them after conversion. Finally, you can view these photos at the selected address.

For Windows users:
Step 1Connect your computer and your iPhone with a USB cable and Trust the devices. As you connect devices, the Autoplay will pop up automatically.
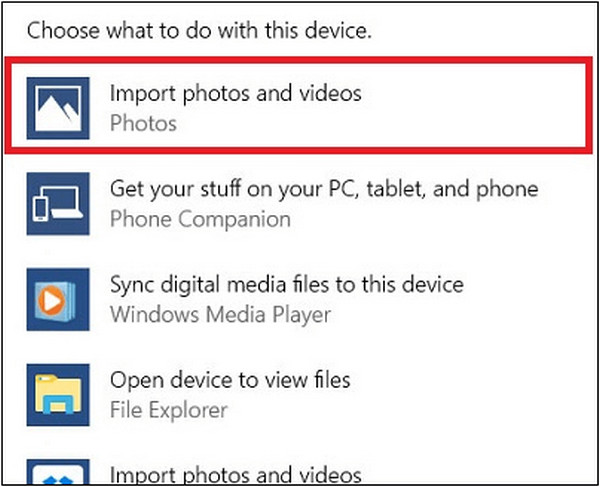
Step 2When the Autoplay page appears, click Import photos and videos .
Step 3 Then select the folder in Import Settings where you want to save your photos. Finally, choose the photos you want to transfer and tap on Import to transfer photos from iPhone to PC.
Conclusion
This detailed guidance has given you four methods for transferring pictures from iPhone to computer. You can choose the best way according to your specific equipment and needs. Apeaksoft iPhone Transfer is the most recommended method, as it is the most professional tool for solving transfer issues for both Windows and Mac users.